


Greetings!
In this article, the second in my series on JIRA Service Management (JSM), I will be exploring the Project Settings available in a JSM project. Due to the numerous options, and level of detail, available in Project Settings I am splitting this article into two as follows.
This first article covered
Details
Summary
Features
Access
This article covers
Request Management
Automation
The third article will cover
Channels & self-service
Operations
Notifications
Language support
Apps
Versions
Components
In my first article I setup a basic JSM project using the ‘out of the box’ functionality and the Customer Service Management template. Now we will go deeper into the available configuration options and discuss what is possible.
It is worth noting that, where additional functionality can be added as part of a paid subscription or license upgrade, I will be covering these in later articles.
Key Principles
The following are a few examples of areas that should be considered, ideally as part of your design for JSM as discussed in the initial article of this series, when planning for the configuration of a JSM project.
Is your Service Desk going to be managing processes other than Incident Management and Request Management e.g. Problem Management, Change Management or Asset Management?
What information needs to be captured for each process, both at the initial creation of a record and through its lifecycle?
Are there existing process templates that can be used for the data capture and workflow?
What queues and views are needed by the teams?
How many customers are being supported and is there a need to split the data by customer?
What integrations are needed? JSM can integrate with
Collaboration tools e.g. MS Teams and Slack
Enterprise Management tools e.g. DataDog
Email integration for a more seamless service experience
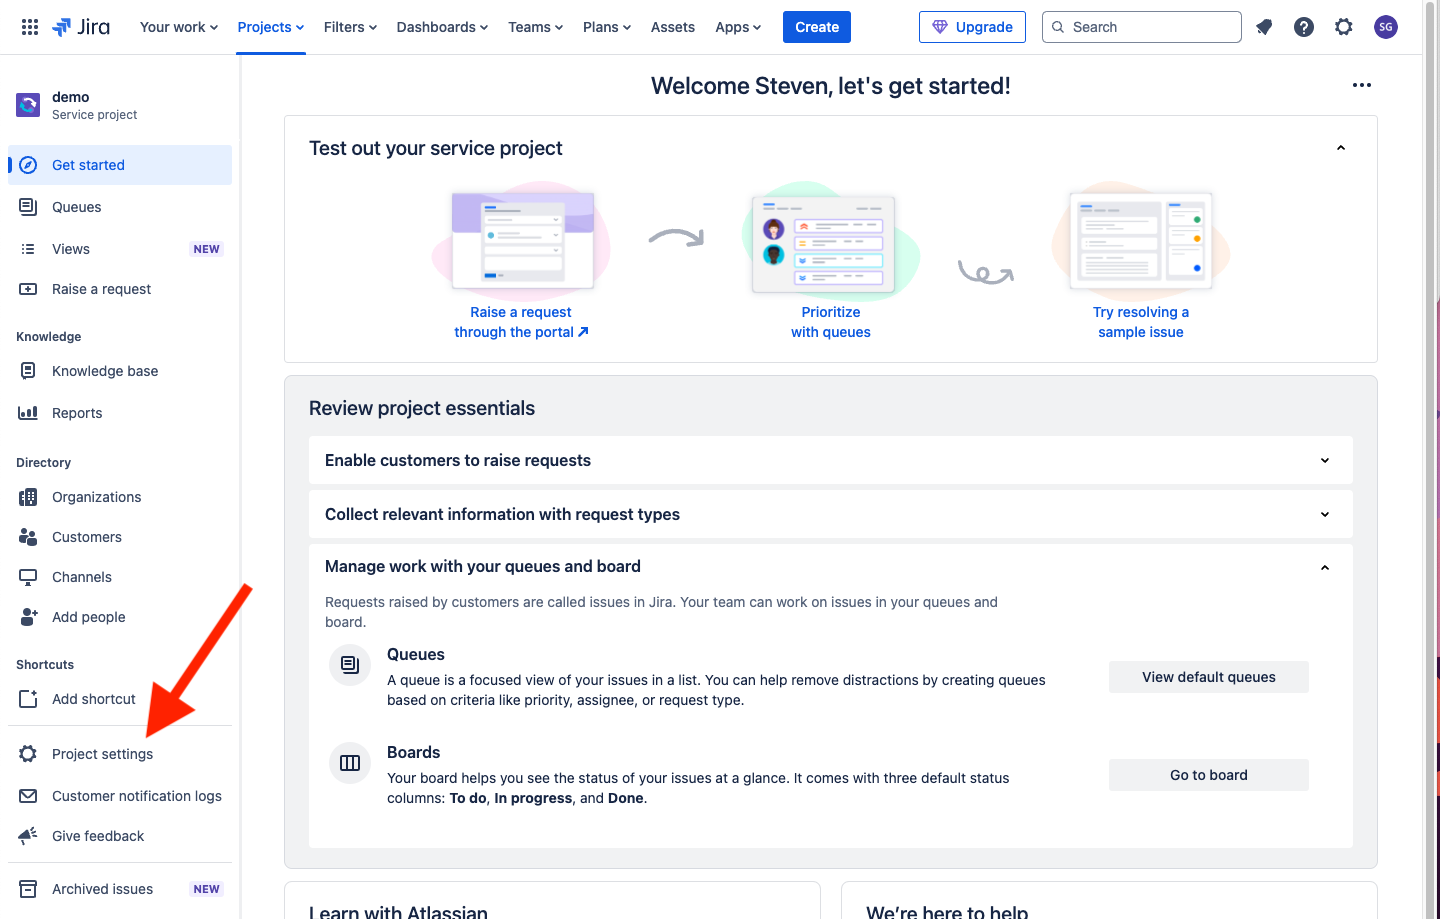
Project Settings
We will now go through the sections of the Project Settings menu and see what each sub element lets us configure.
This is accessed from the link shown below, you must have Admin permissions to see this link.
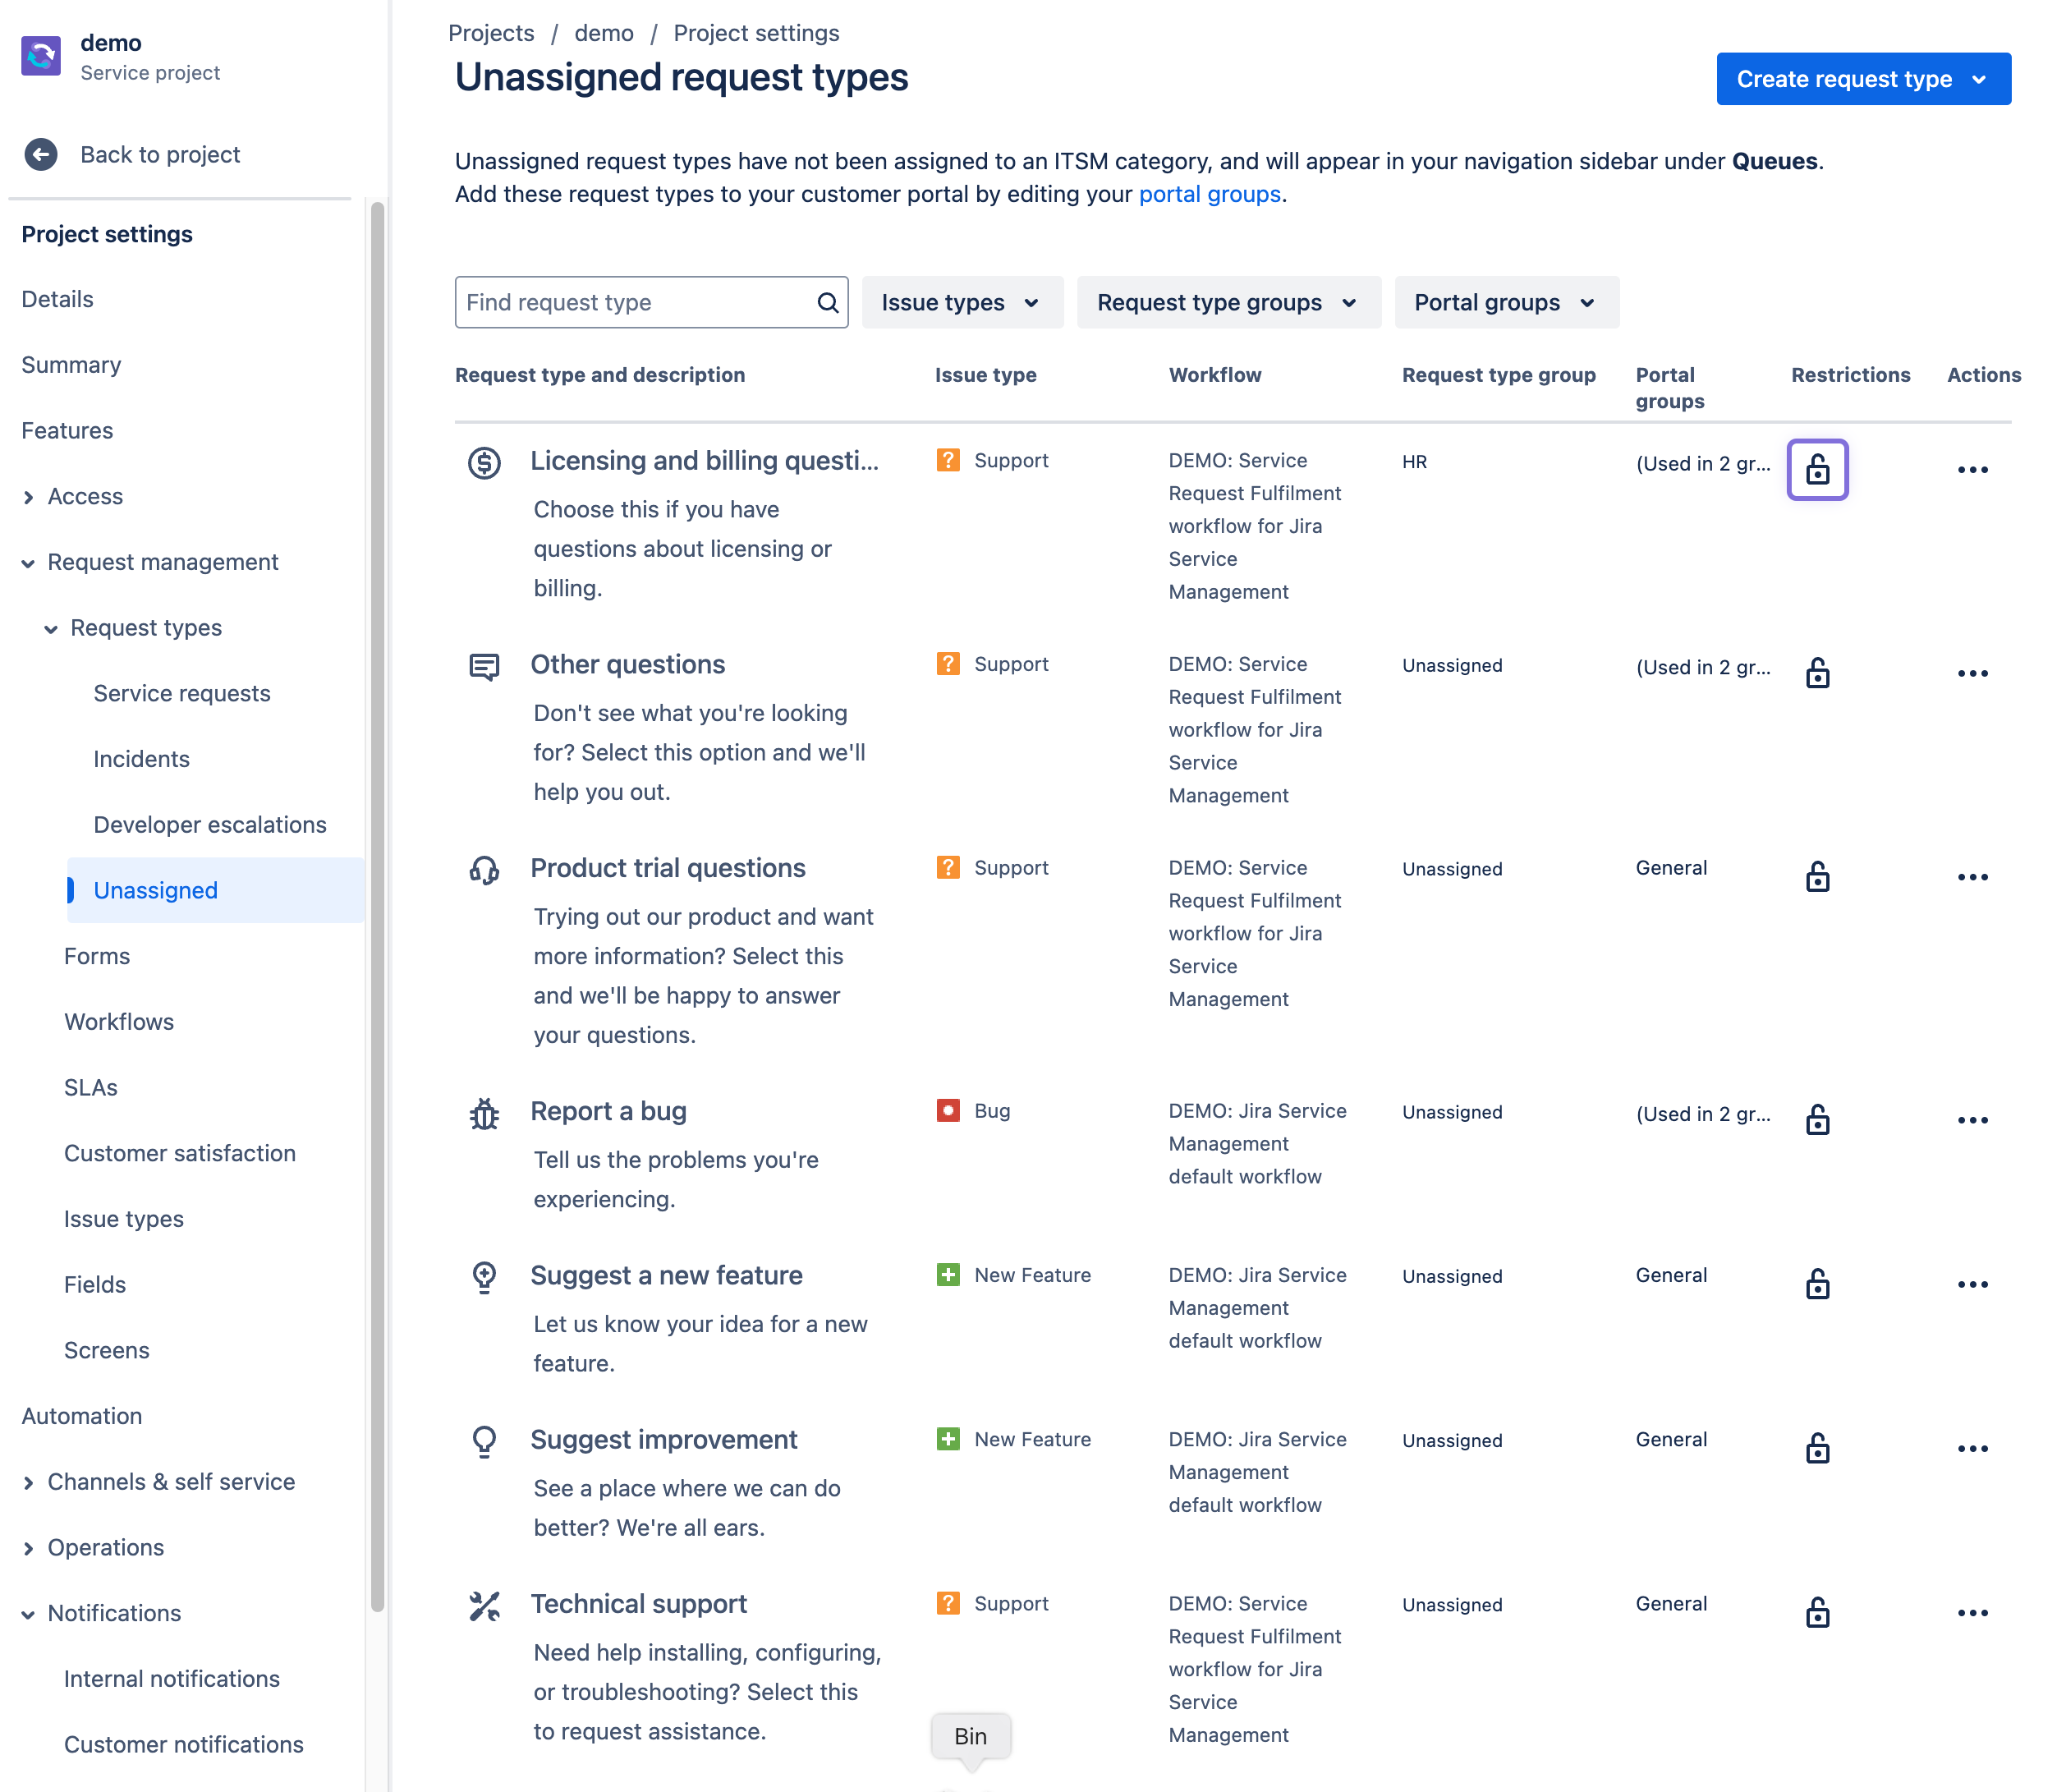
Request Management
Request types
This section has a separate section for each of the request types that you have activated in your JSM project. If you have taken out a Premium or Enterprise plan, and activate Problem Management, Change Management etc, these will show up here as well.
The process related ones give the same functionality, so I will only go through one of them so you can see what can be done.
The Unassigned option, at the bottom of the list, is a list of all the active requests in your JSM project that have not been assigned to a specific request type.
I have clicked on the Service requests option under the Request types header and the following screen is loaded. If you already have some requests assigned to the service request type they will be listed here.
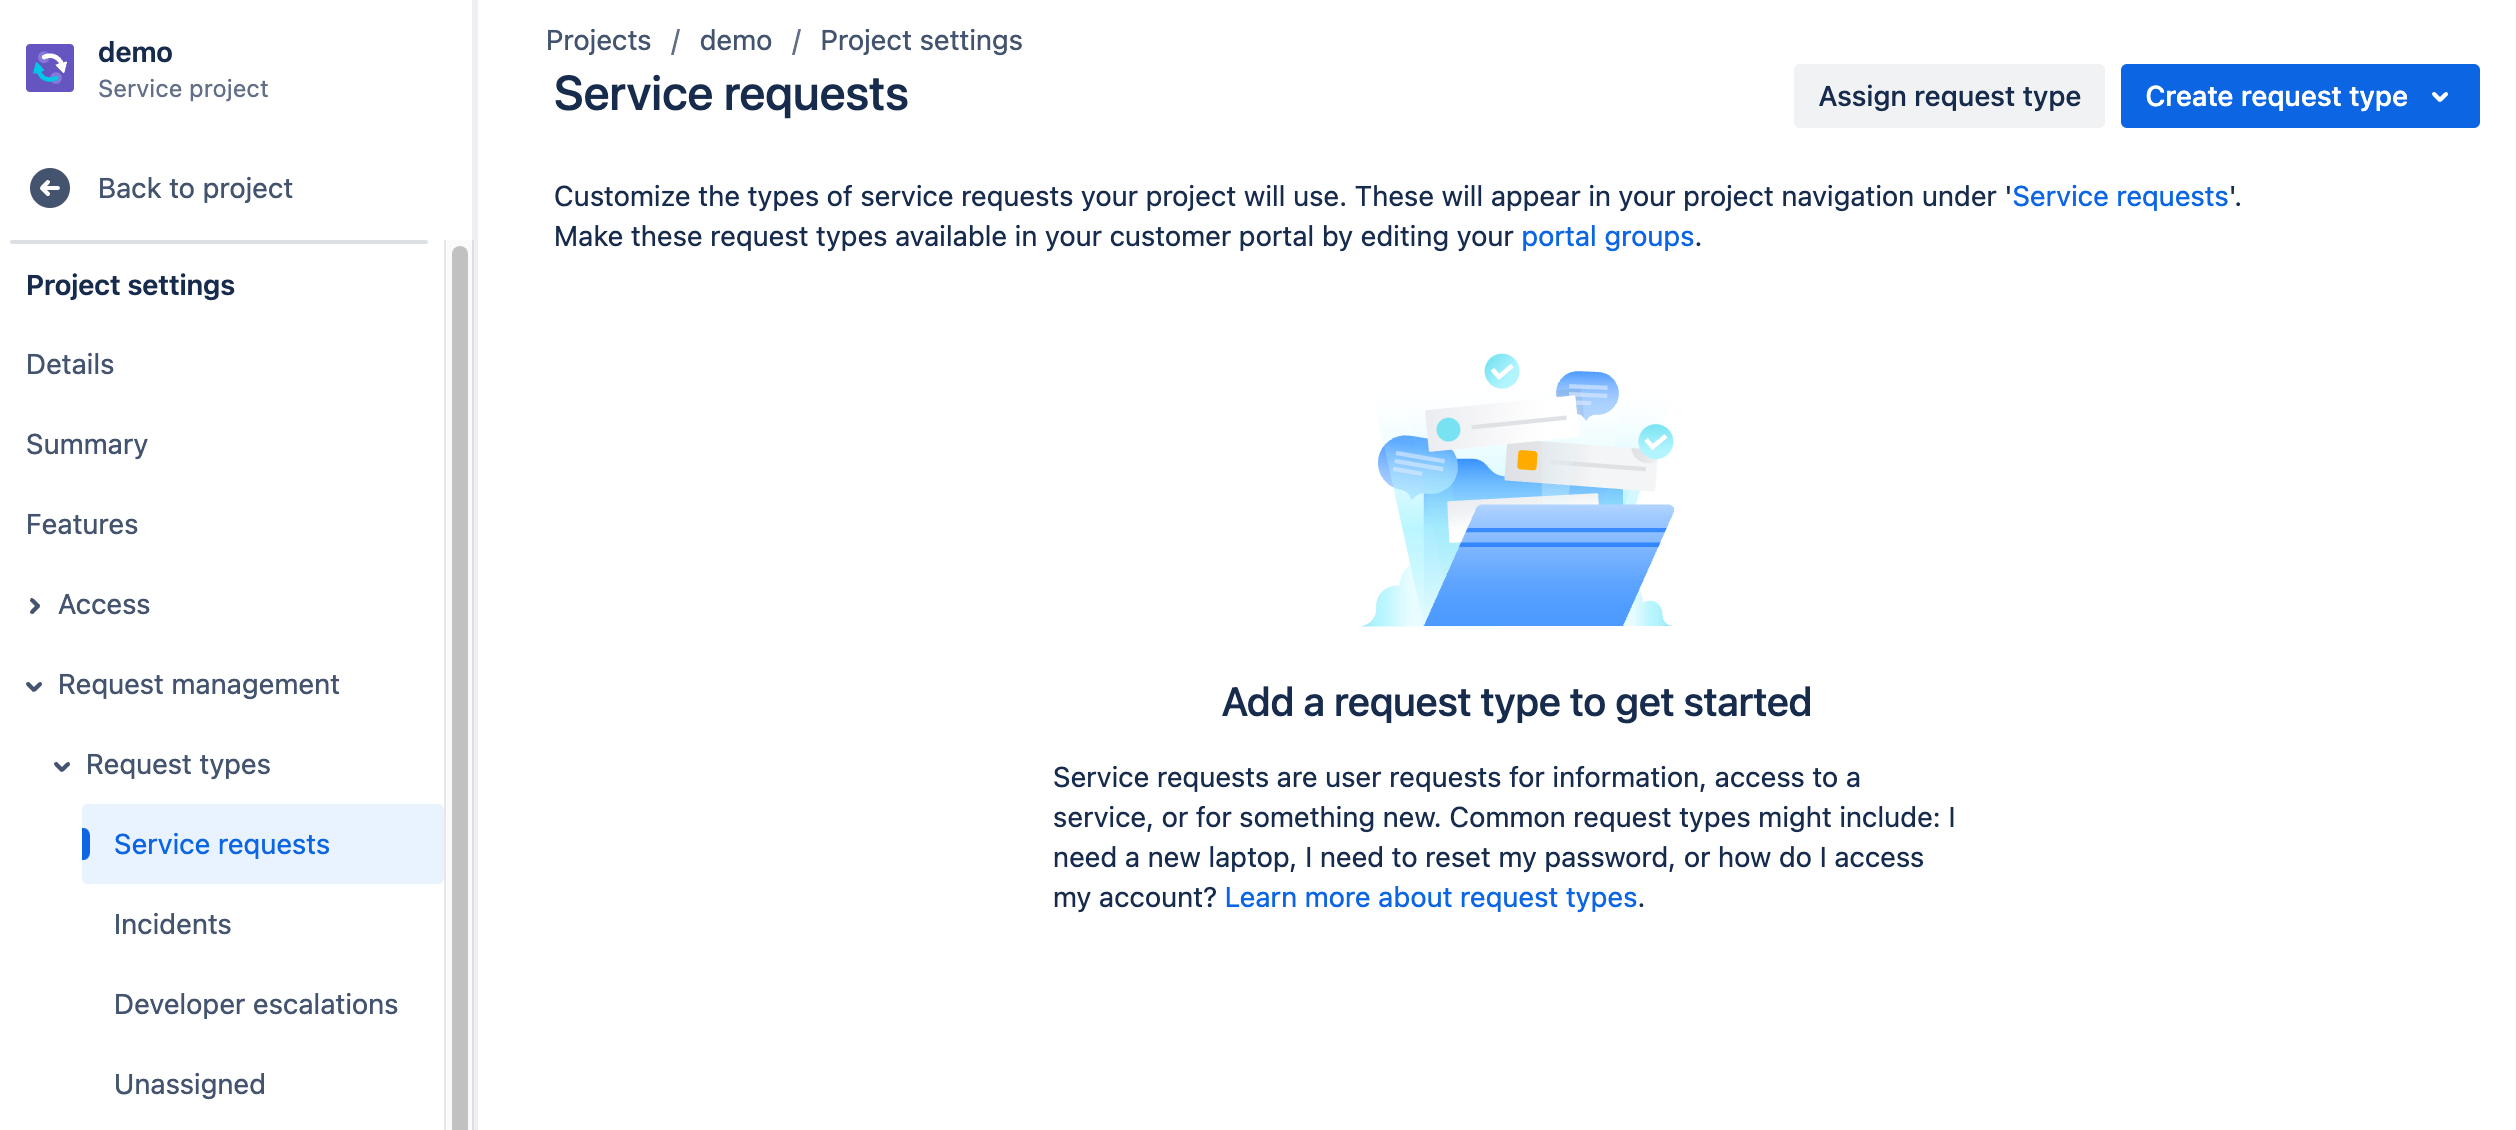
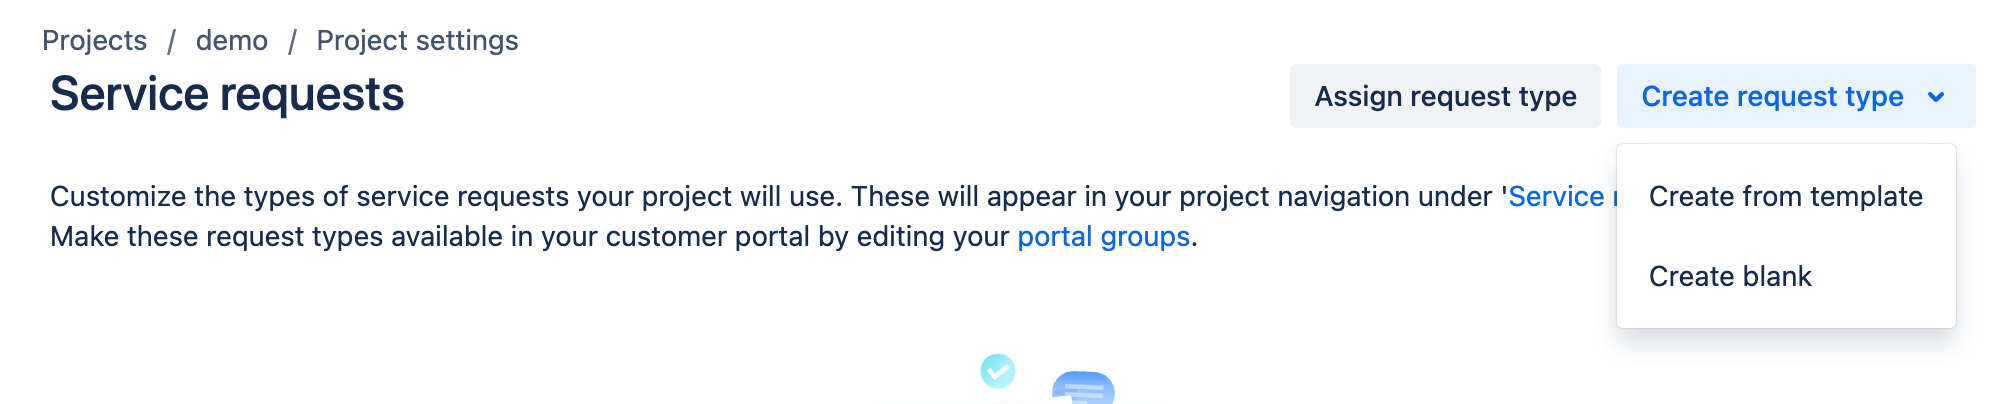
Initially though it will be blank, so we will click of the Create request type button and select Create from template.
From the following screen you can select the request type that you want to start with by clicking on Select.
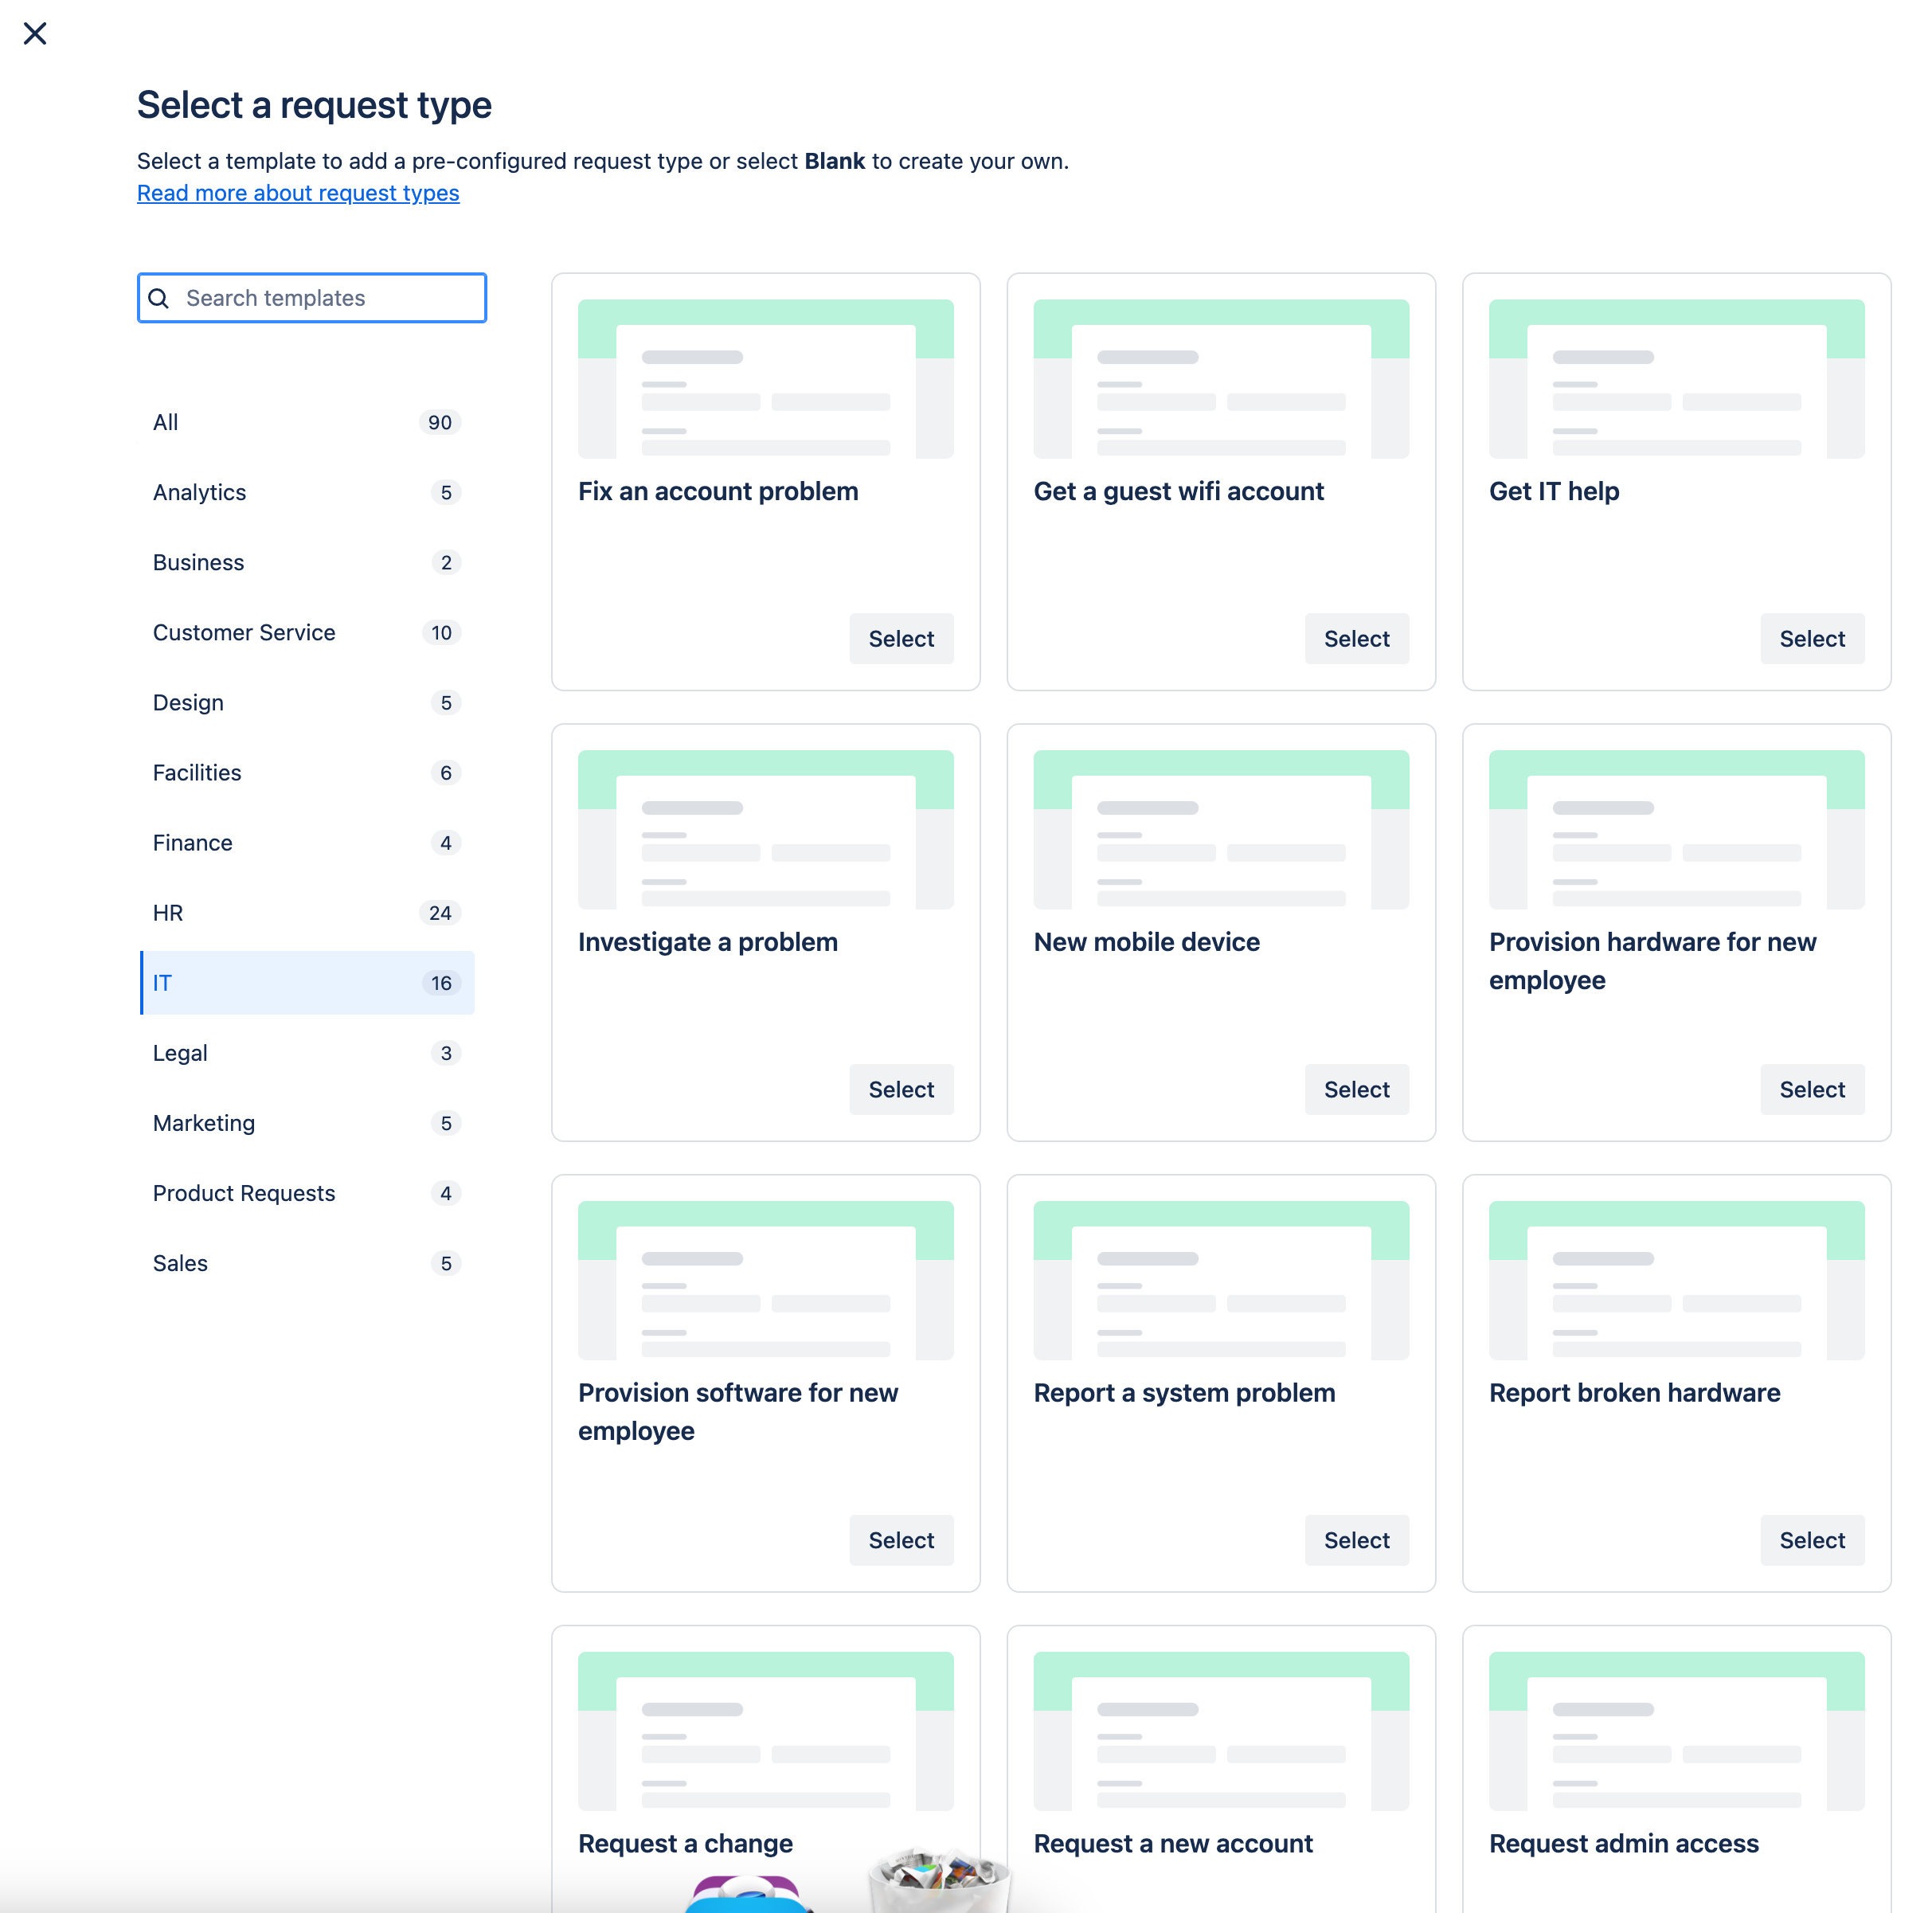
At the time of writing this there are 90 templates that can be used as a starter, more if you have a Premium or Enterprise plan. They cover the key scenarios that JSM can be used for, across many business support and IT functions.
Once selected you will see the following screen where you can configure
Name - the label that a customer will see
Description- a brief summary of what the customer can request using the form
Icon - the icon that will be visible beside the Name. This can be a standard JSM one or created from an uploaded image
Portal Group - the section within the which the request will be visible under OR it can be set to not be shown on the customer portal (it will still be usable by the service desk agents)
Issue type - select one of the standard or configured Issue types or set the default service request issue type
On the right-hand side of the screen you are shown a mock-up of how the form will look to a customer on the portal.
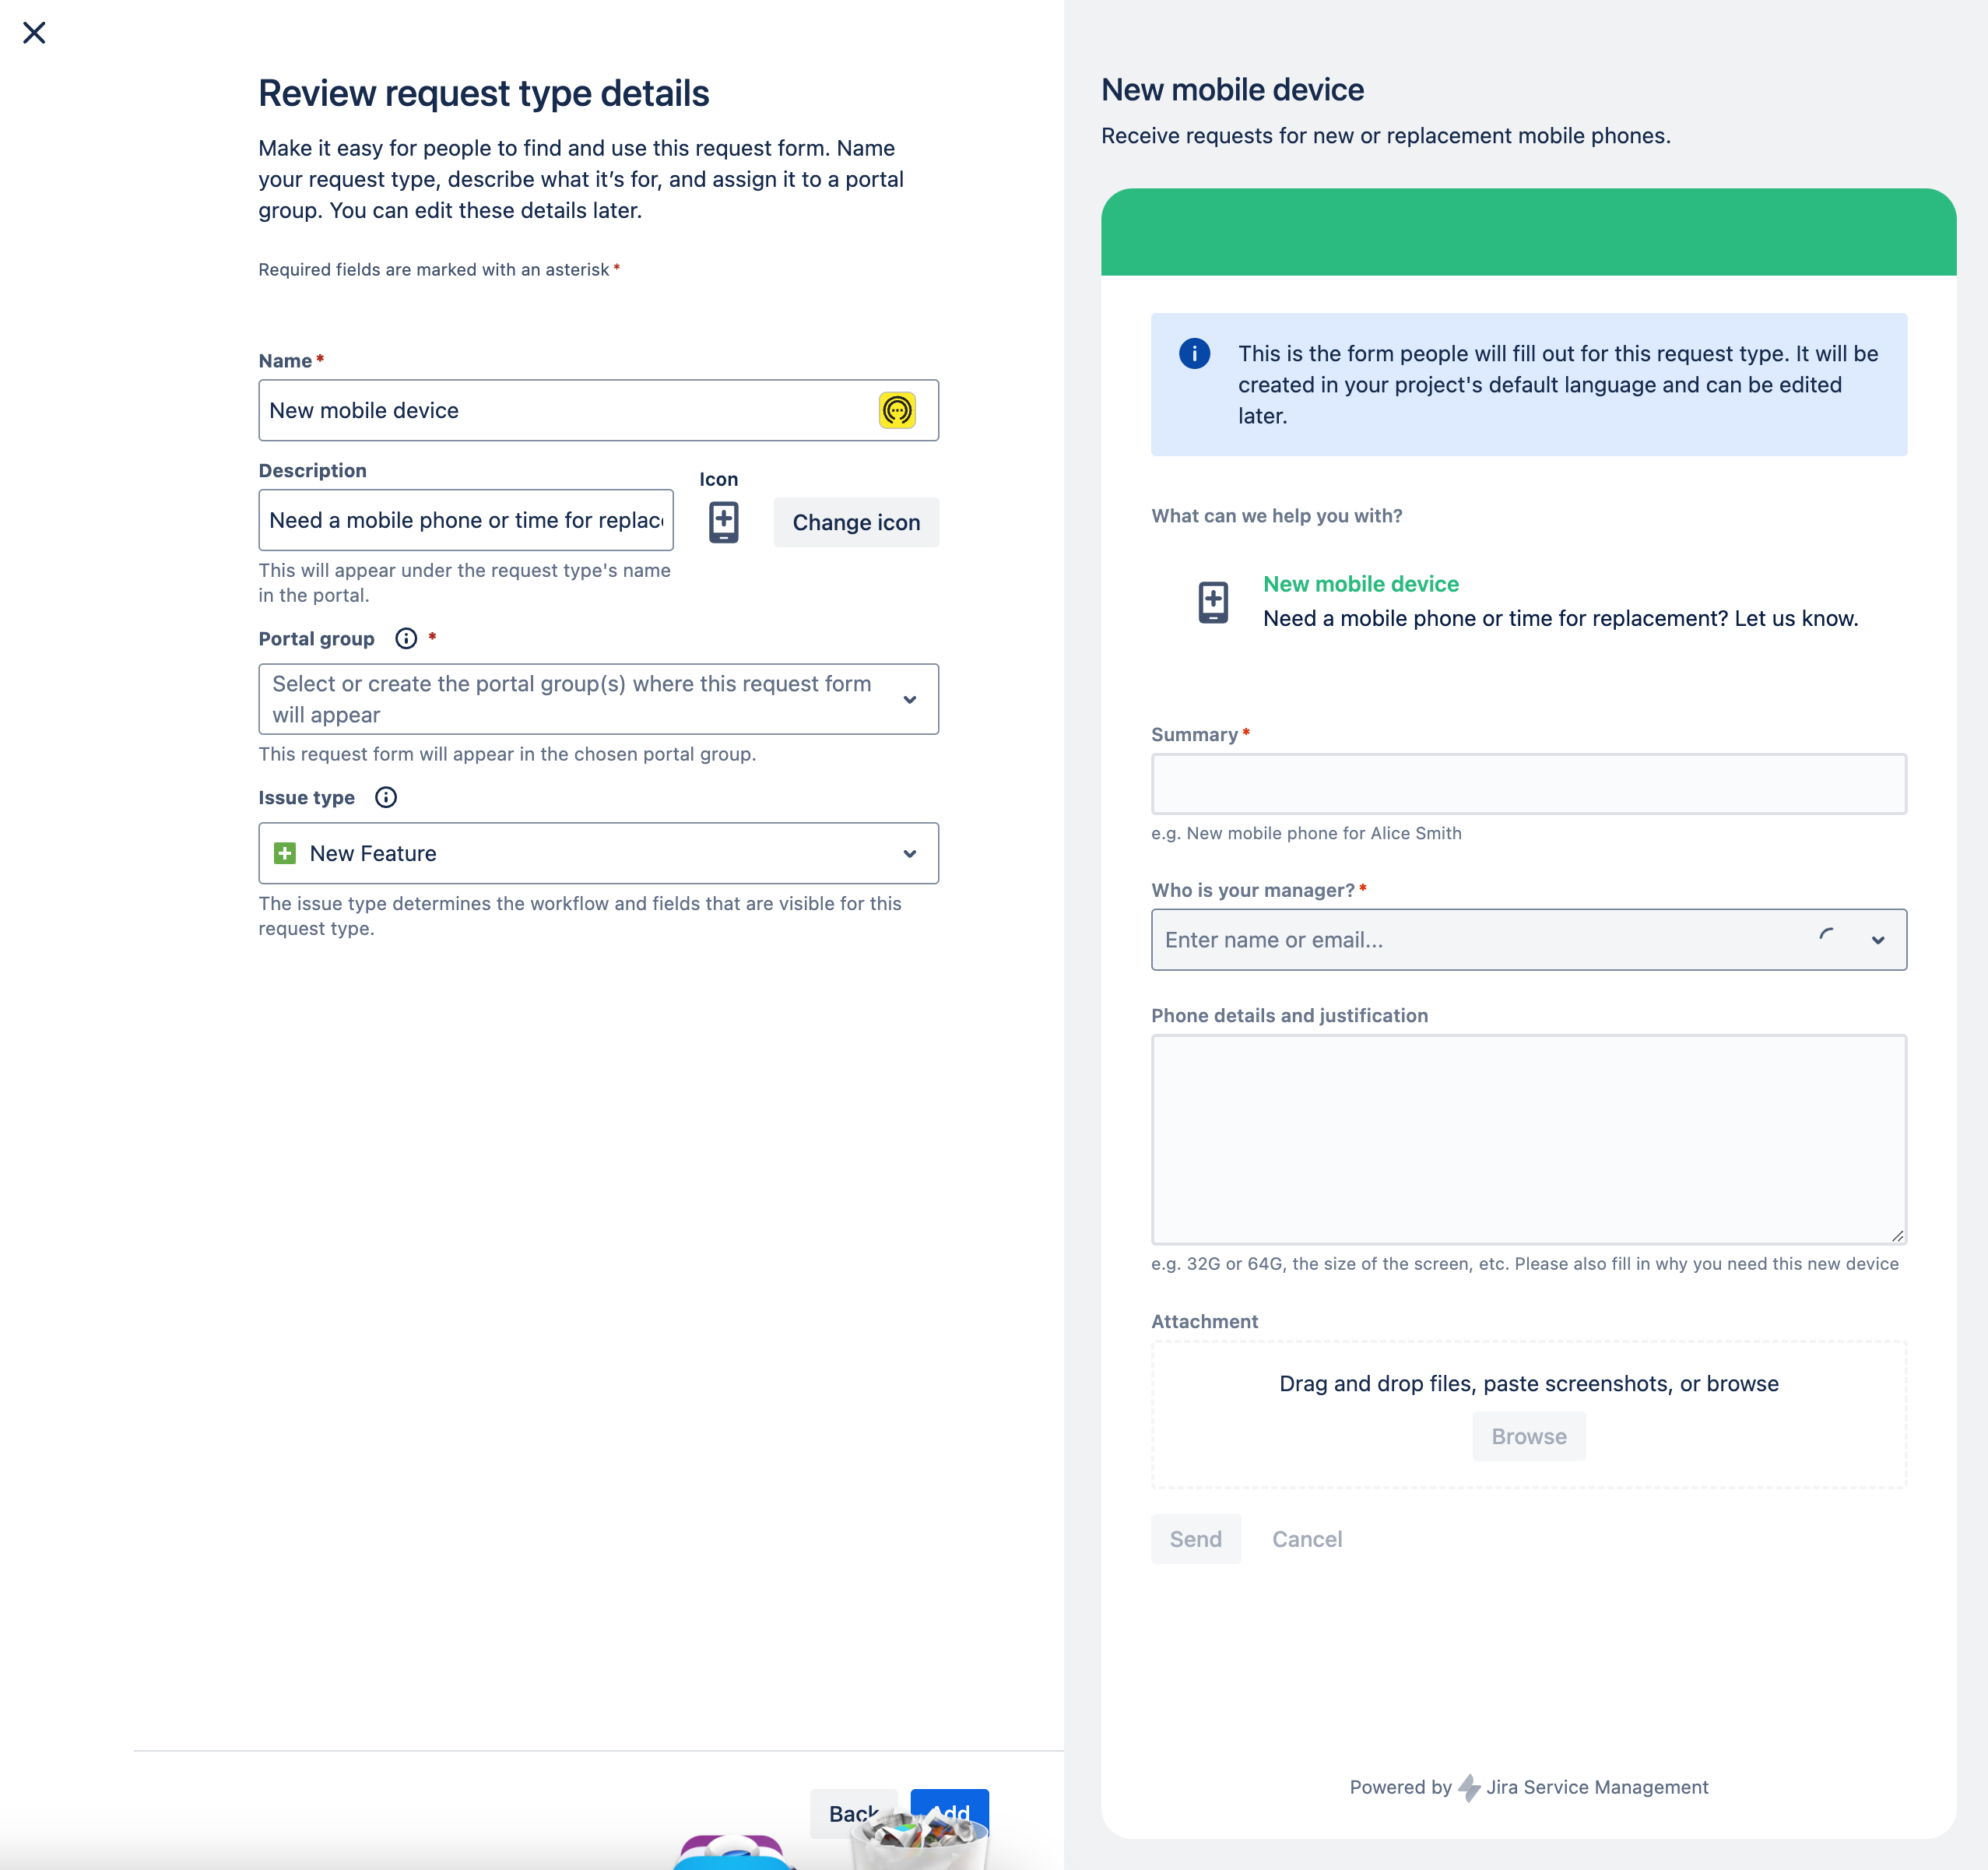
Once you are ready, click on Add.
The next screen has three tabs where you can customise Request form, Issue view and Workflow statuses for the specific request type. It is a powerful tool that gives Project Admins fine control to create forms and workflows that match the needs of the service desk, operational teams and customers.
Request form
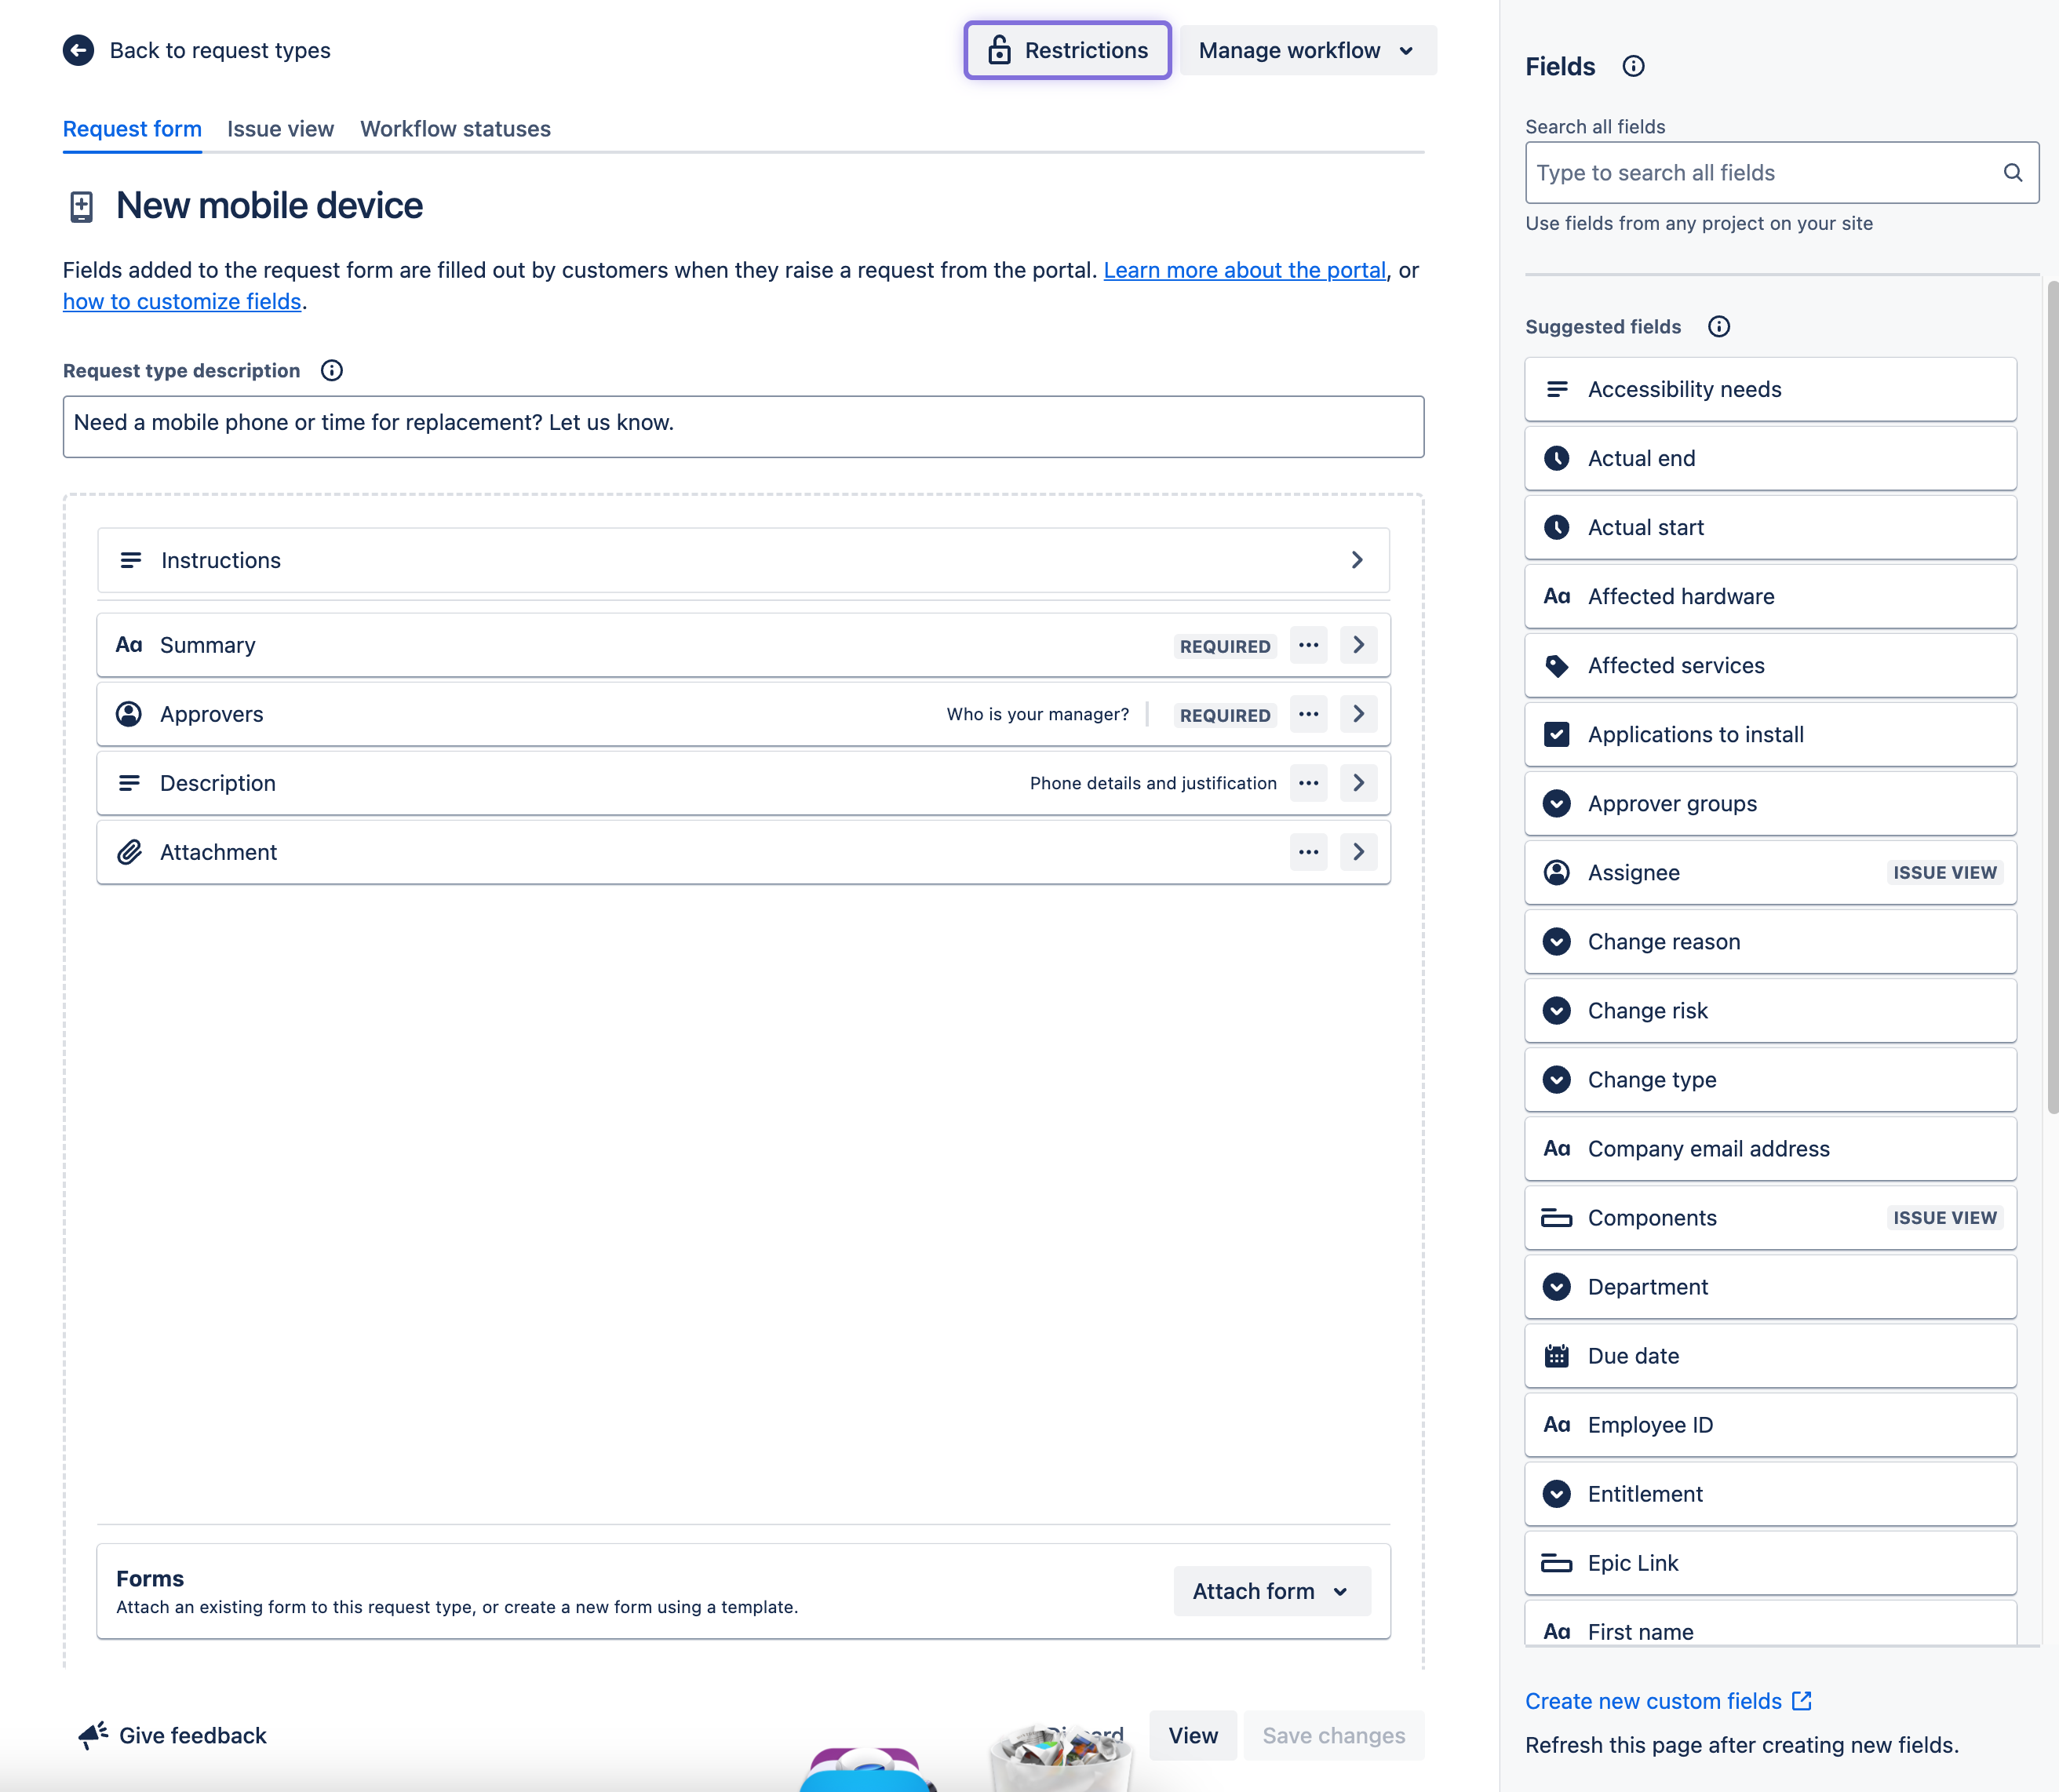
Looking at the right-hand side of the screen you seen a list of field suggestions, that can be dragged to the main section of the screen for inclusion in the form, and a link at the bottom that takes you to the screen to create a custom field.
In the main part of the screen you will see the list of fields that are currently included in the form that a customer will see.
Clicking on a specific field will expand it to show the fields and options. Looking at the example below you can.
Change the displayed name of the field
Change the fields description
Use a preset value and hide the field from the customer view
Set the field as Required
Change its position in the form
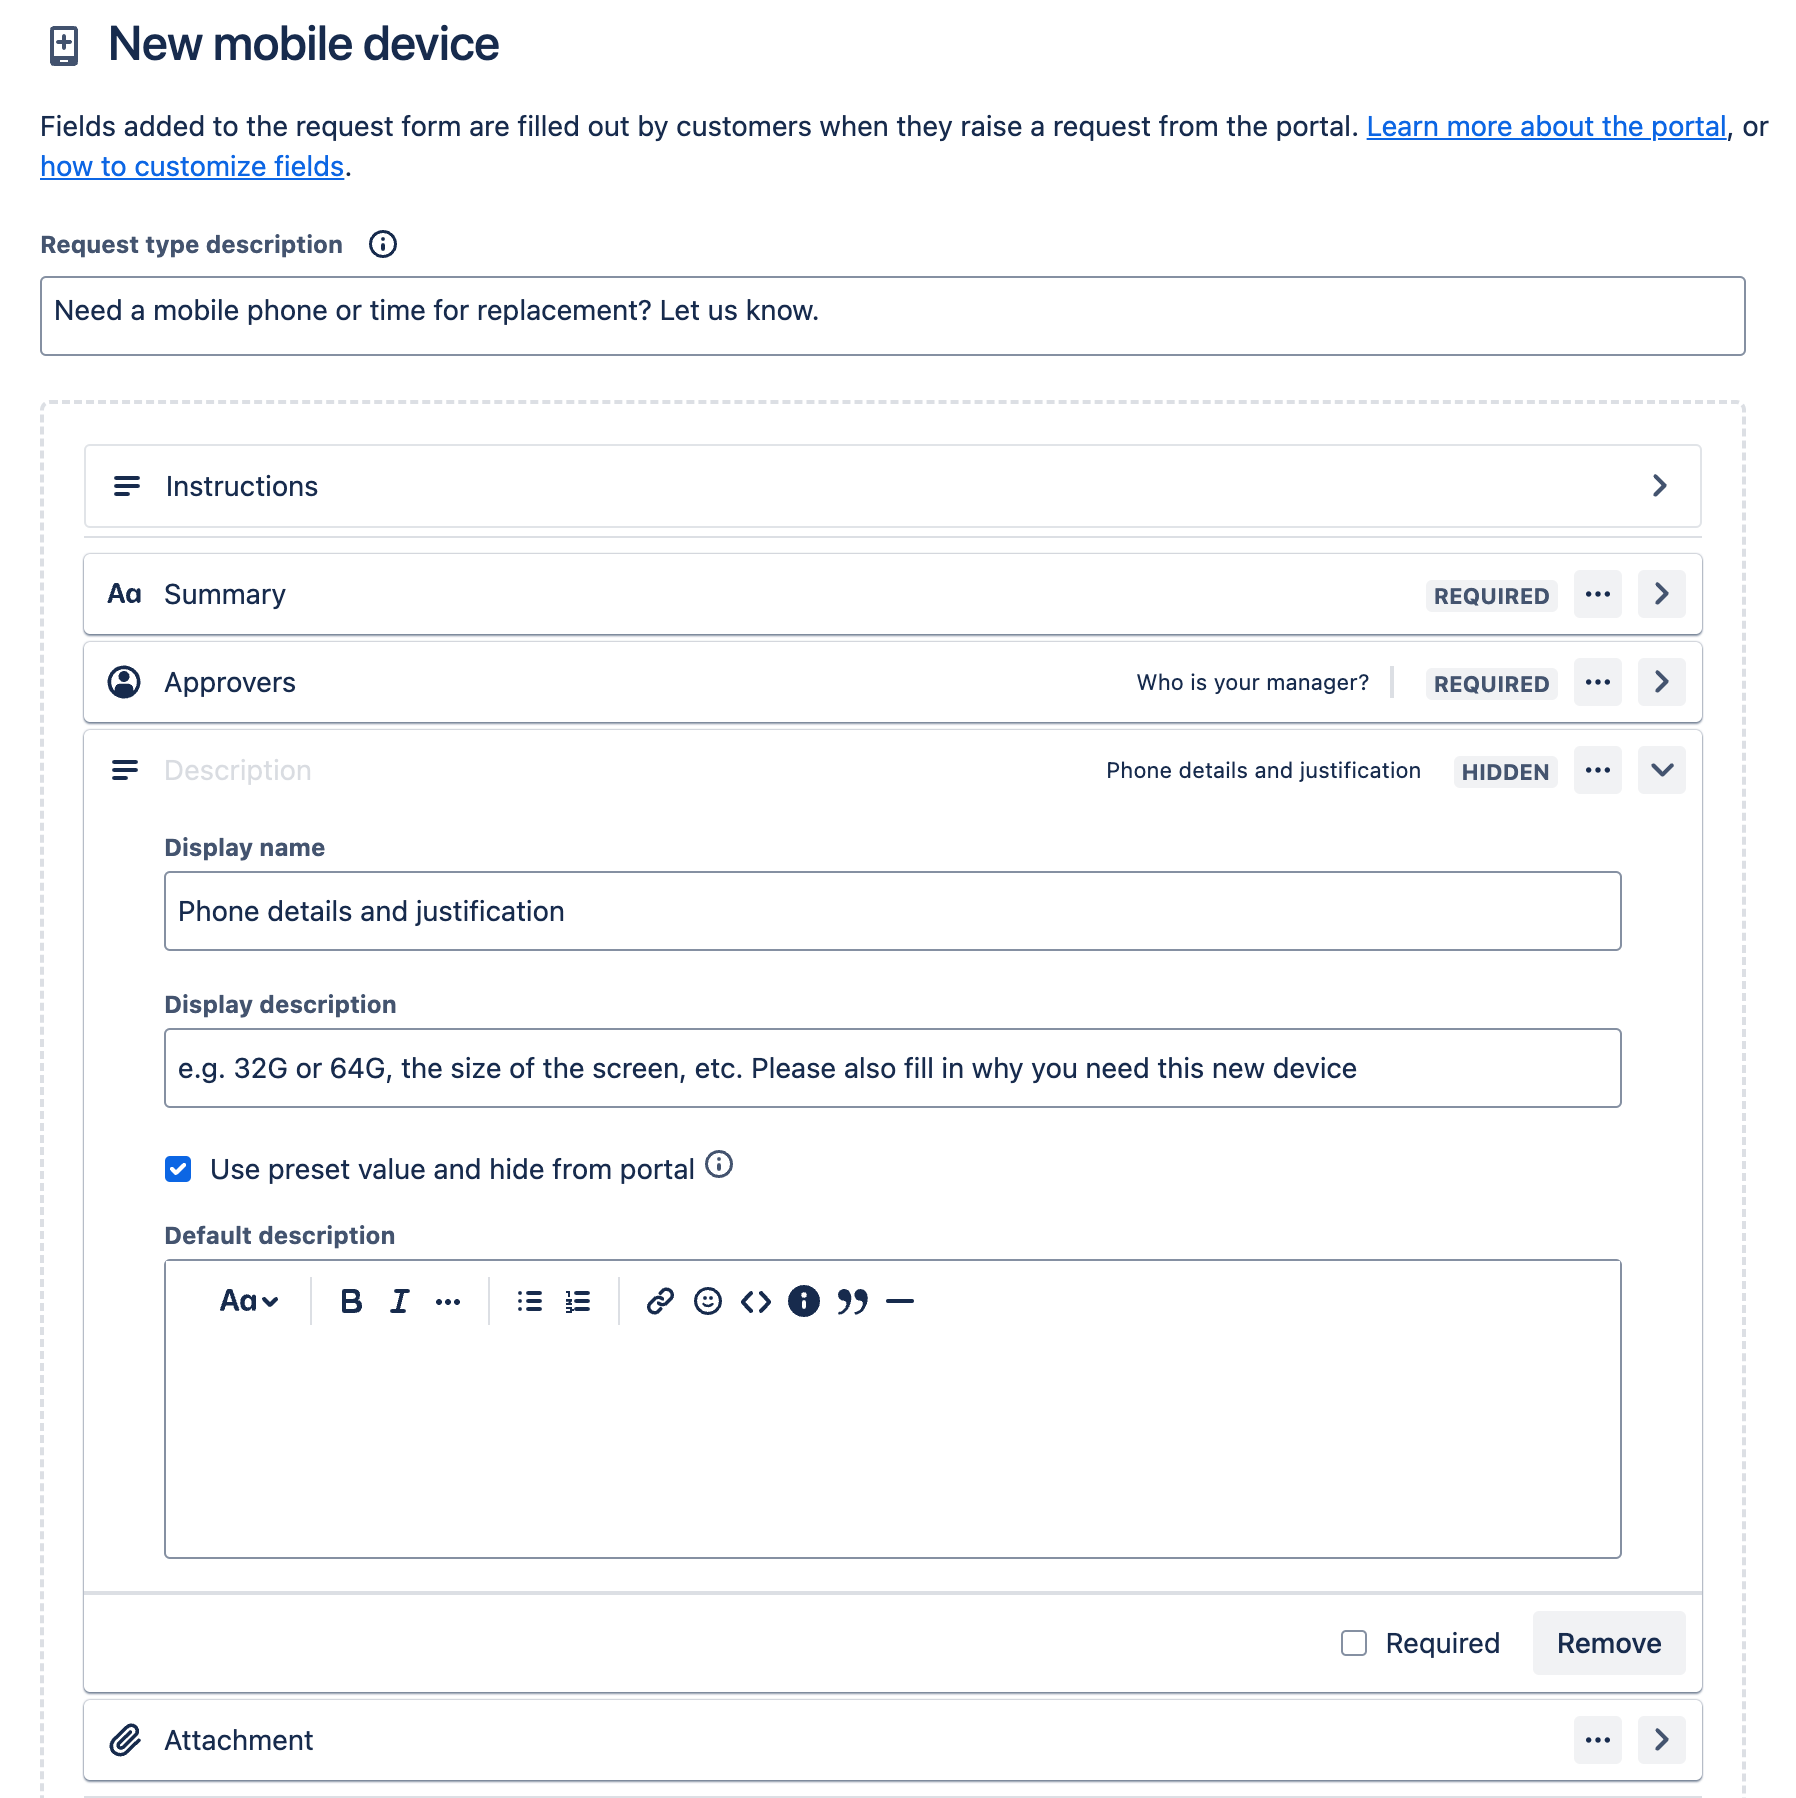
Remember to Save Changes when you are ready to move on.
Issue view
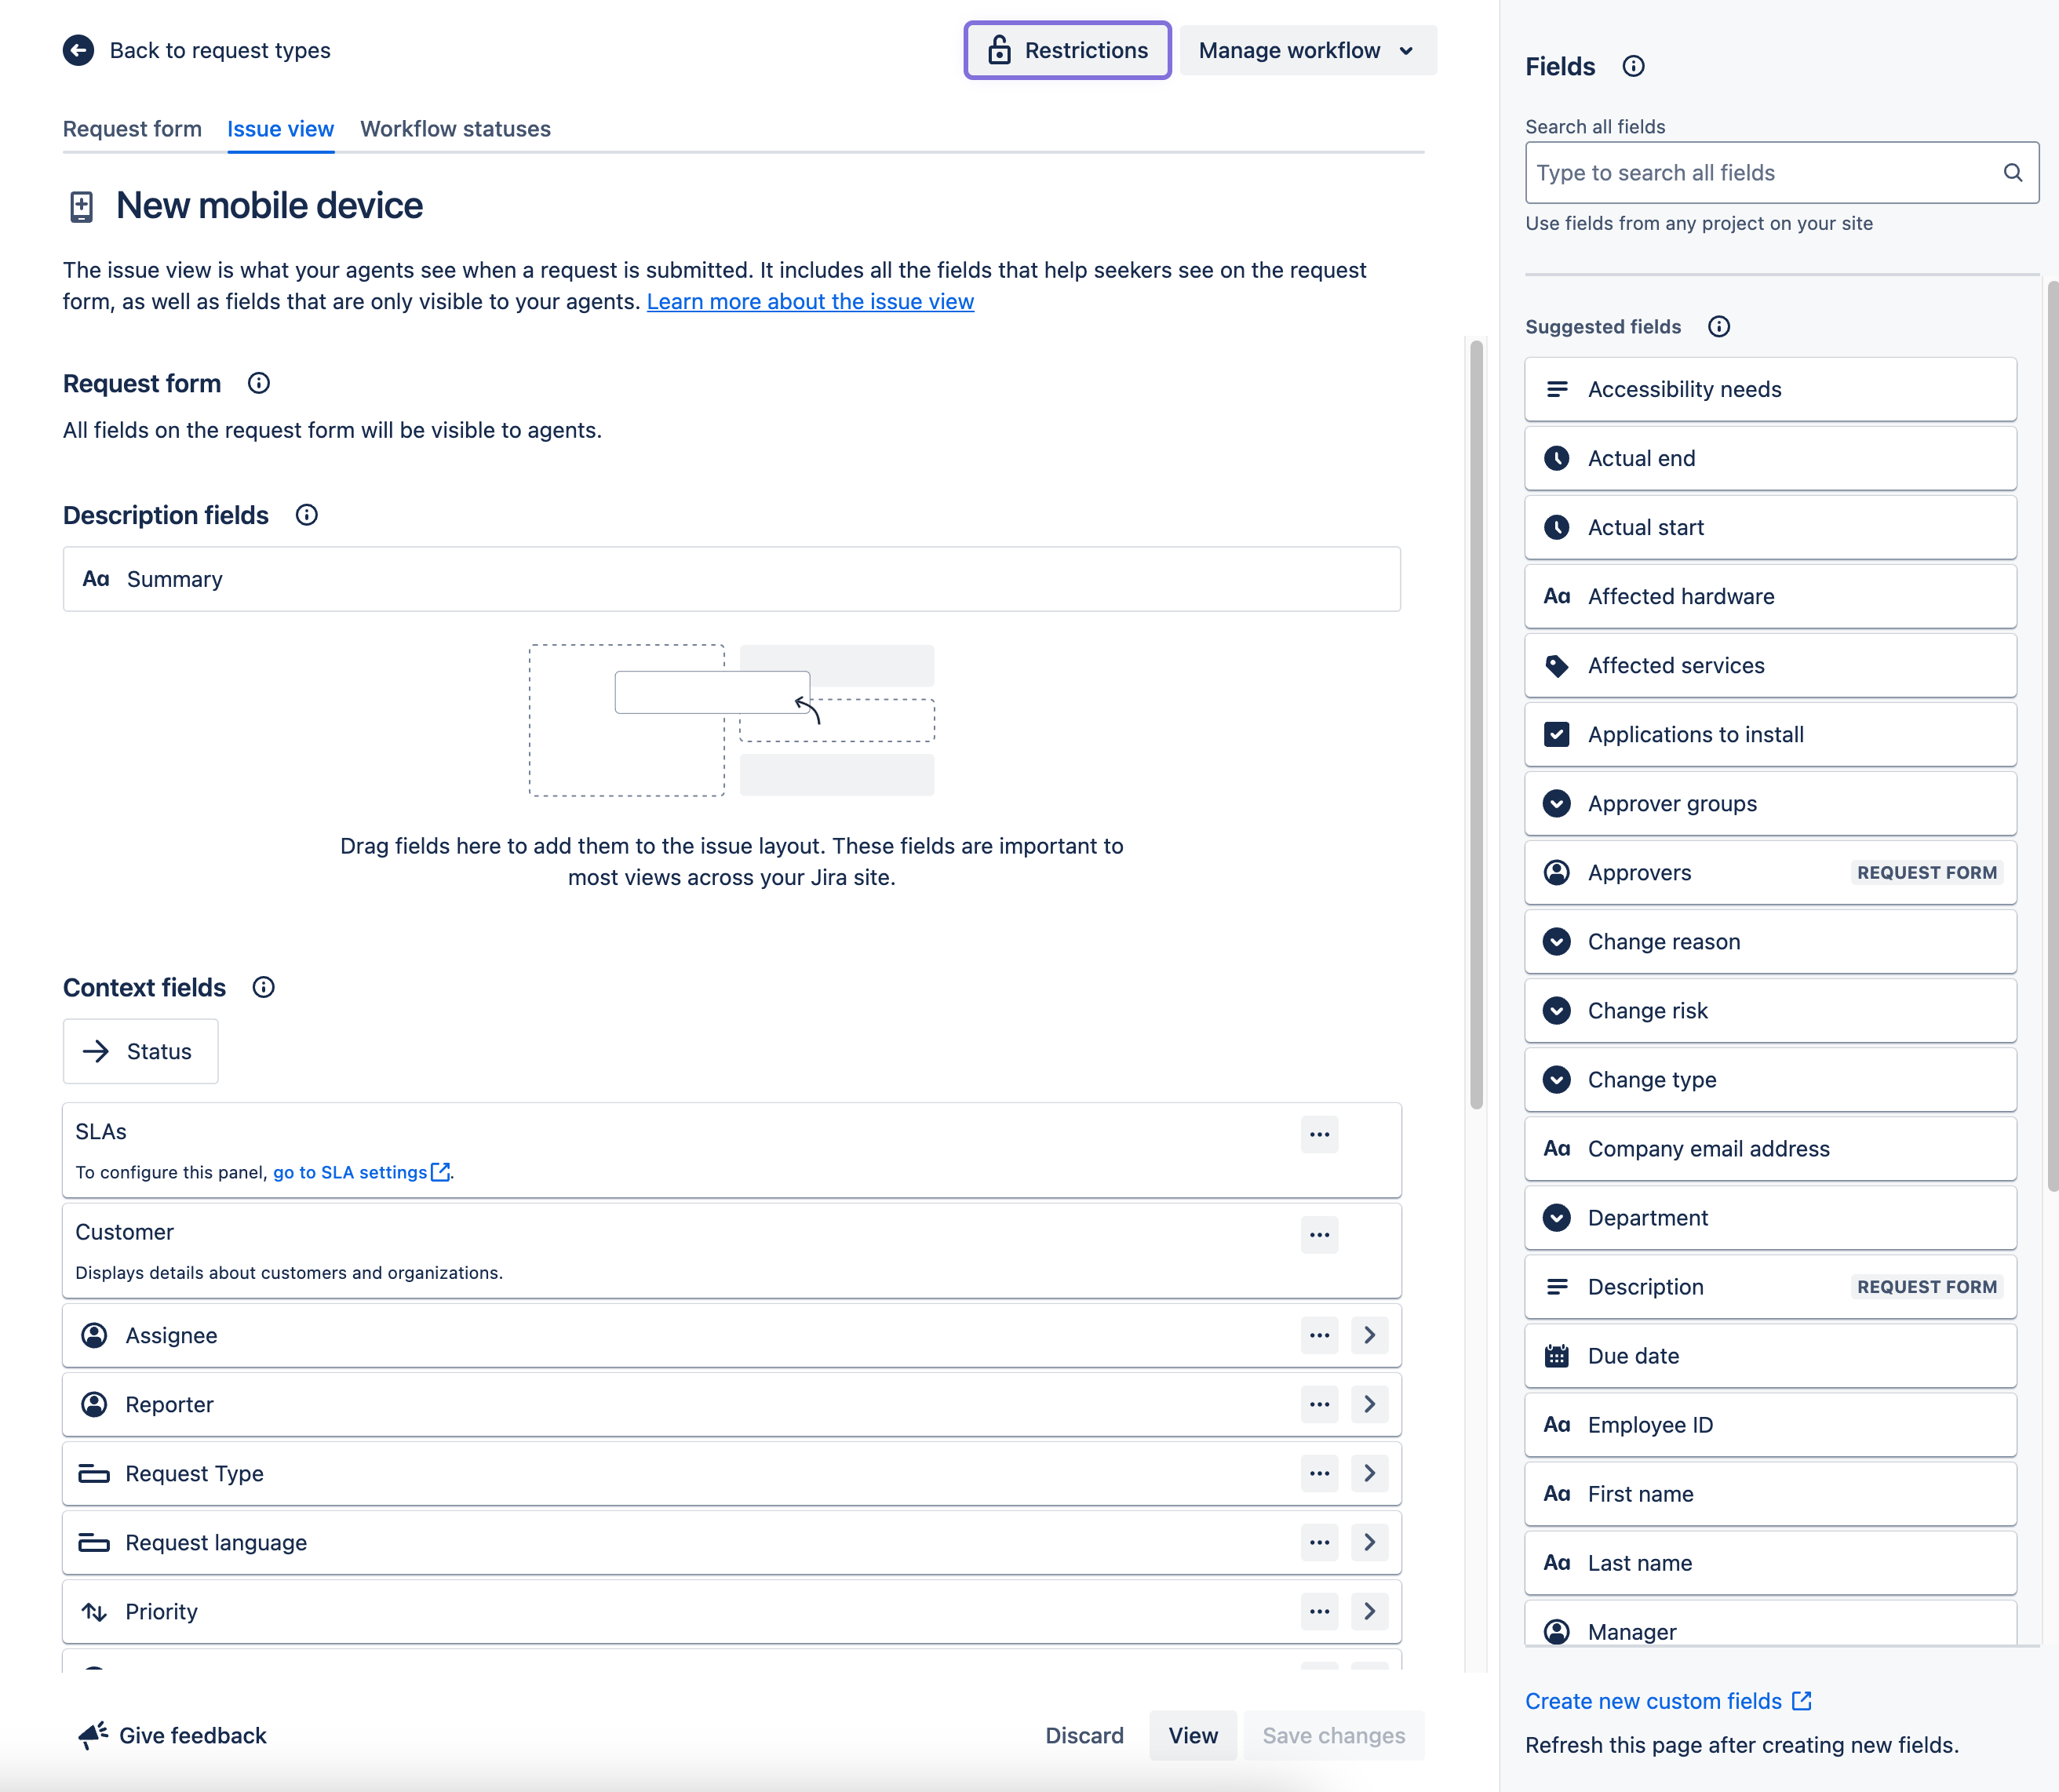
Similar to the Request form tab the Issue view tab lets you customise the view that the those with the service desk agent and project admin roles see when opening a Service Request / Incident / Problem / Change record.
Looking at the right-hand side of the screen you seen a list of field suggestions, that can be dragged to the main section of the screen for inclusion in the form, and a link at the bottom that takes you to the screen to create a custom field.
In the main part of the screen you will see the list of fields that are currently included in the form that a customer will see.
Clicking on a specific field will expand it to show the fields and options. In addition to adding, removing or customising fields you can.
Set the Service Level Agreement (SLA) for each request type
Hide fields from the view if they are empty
Remember to Save Changes when you are ready to move on.
Workflow statuses
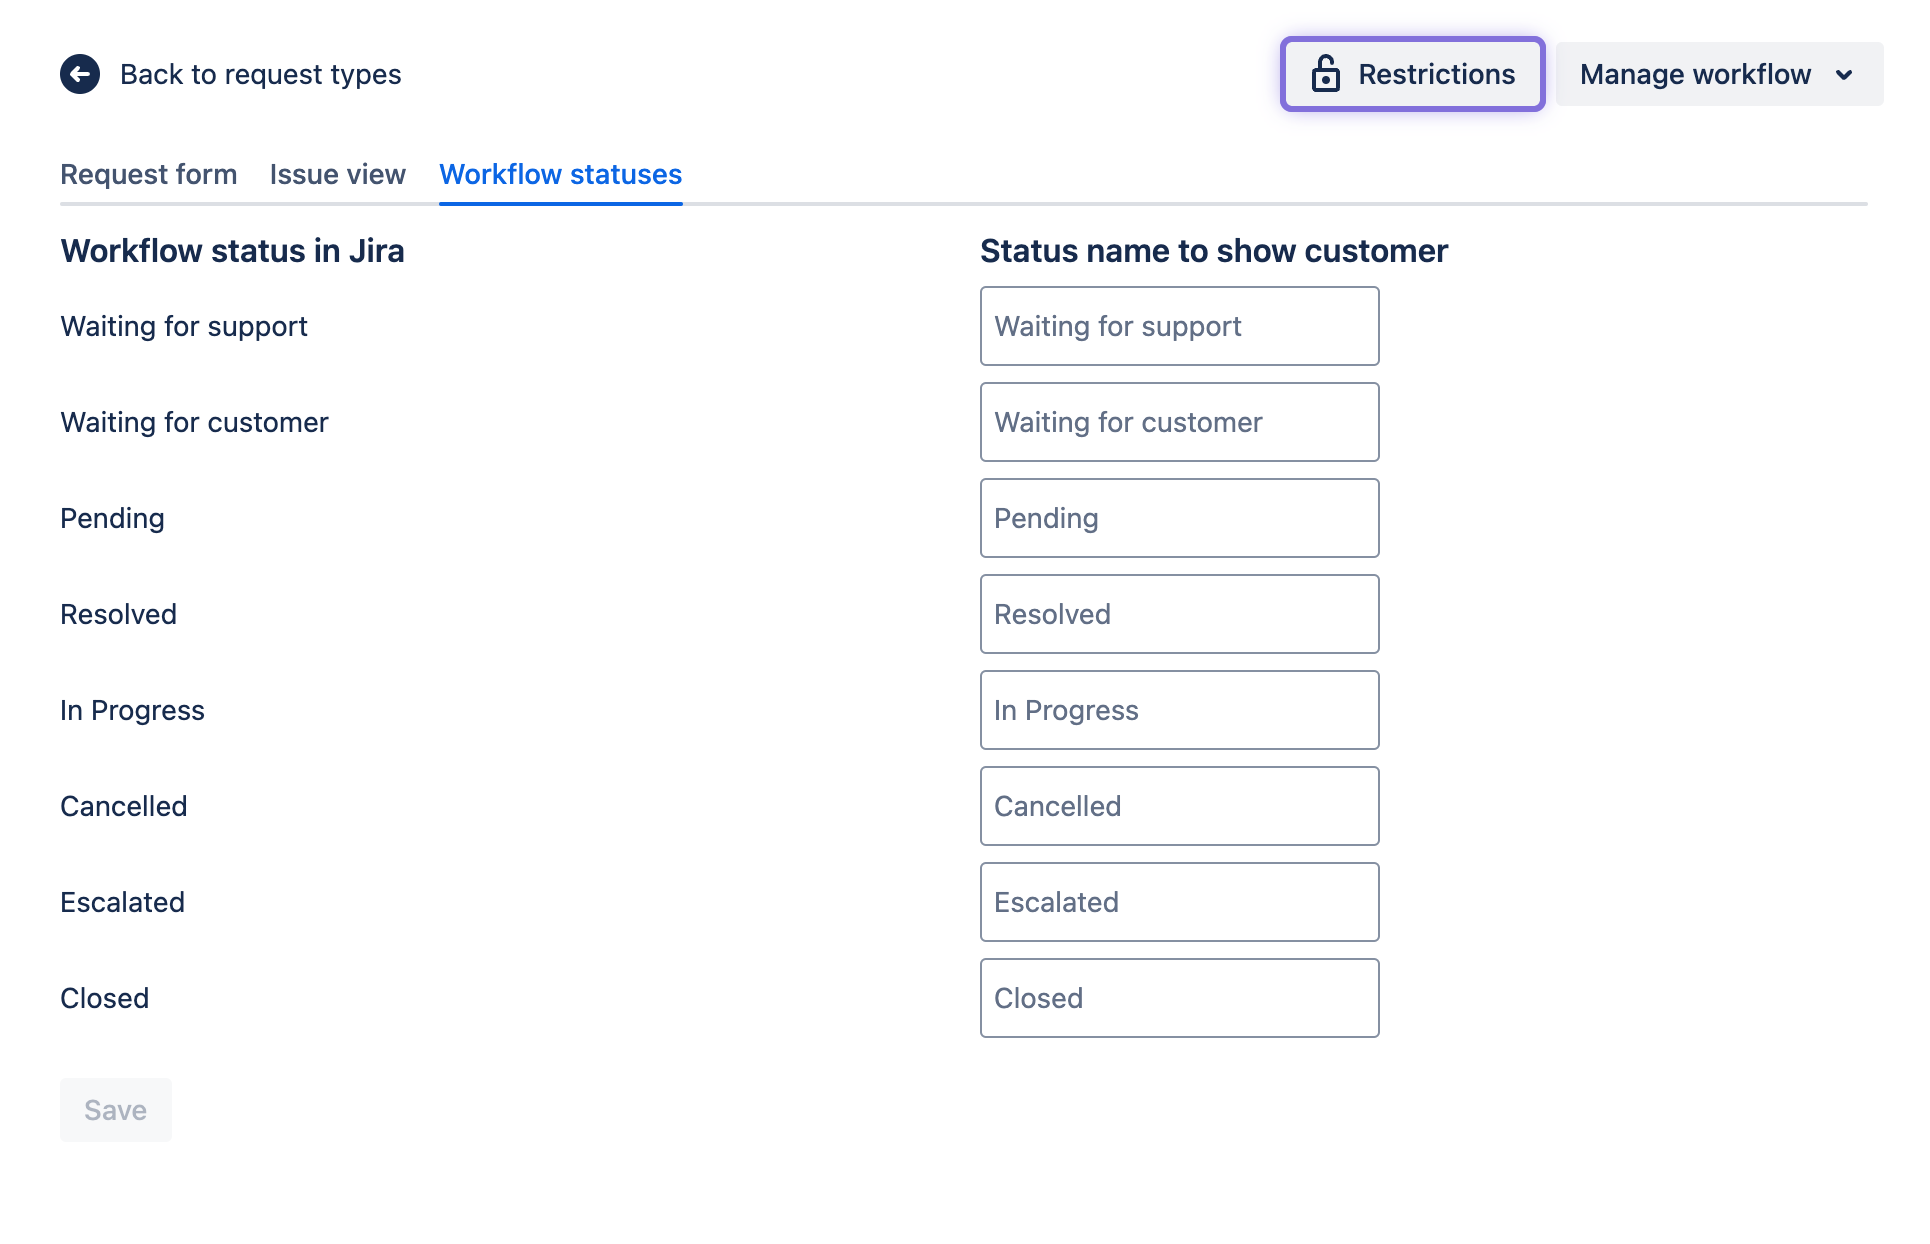
This screen is simply used for creating a customer visible mask for the configured Workflow statuses in the JSM workflow used for the specific request type.
Remember to Save Changes when you are ready to move on.
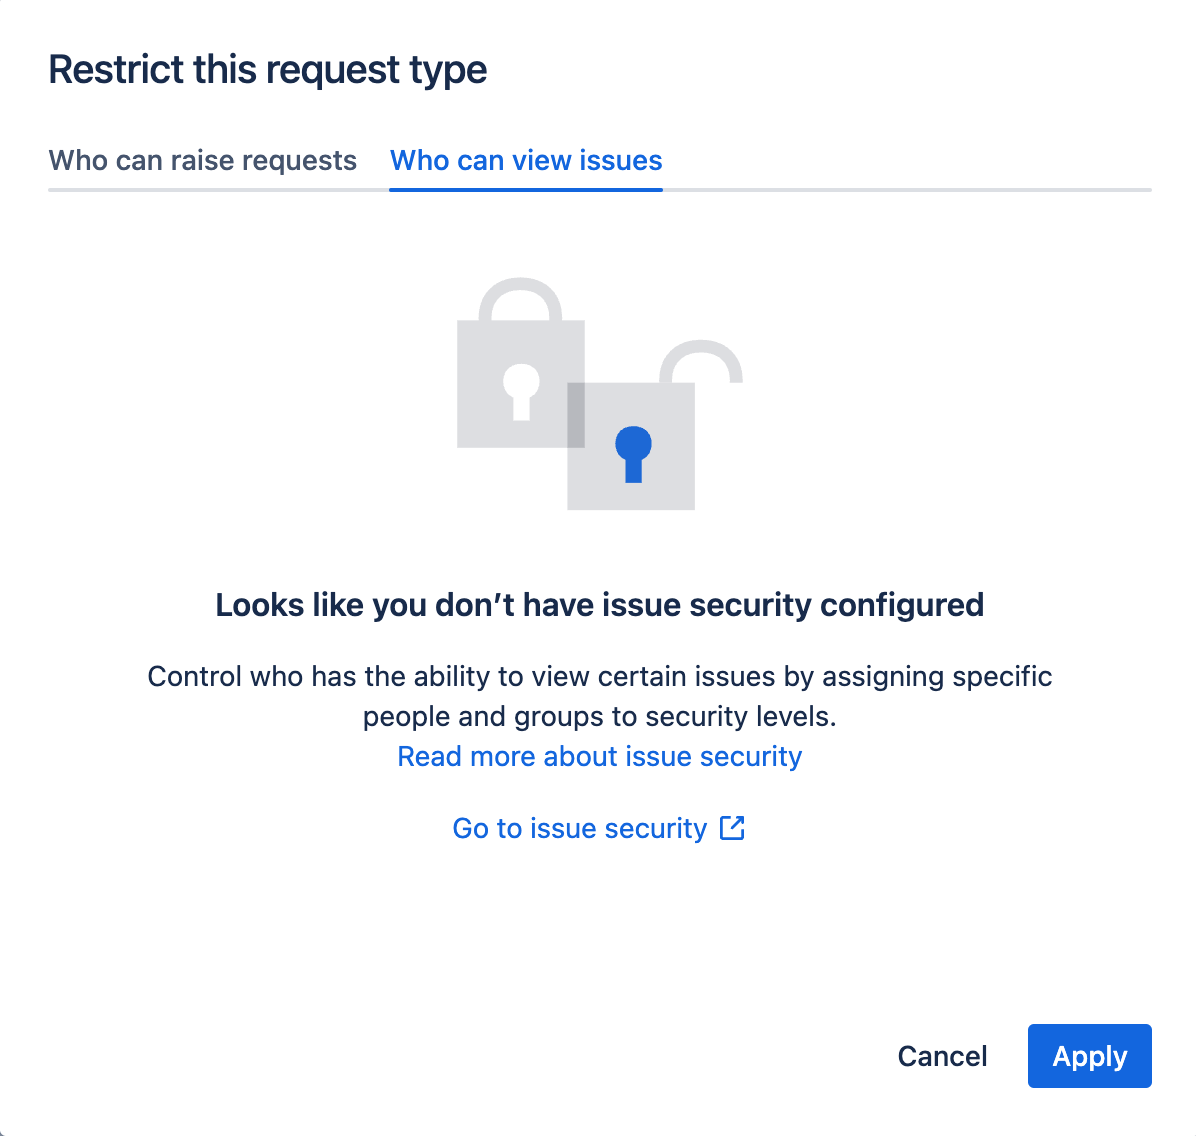
Restrictions
Clicking on the Restrictions tab gives you two options.
The first is to restrict access to be able to use the form to specific users or groups of users. Just populate the field and click on Apply. This is useful if you are providing certain services to certain customers or you need to restrict usage of a request type to certain groups of service desk agents or operational teams.

The second allows you to restrict who can see issues raised using this request type. This could be for security issues, internal view only issues etc. This required Issue security to be be switched on, which we will cover later on.
Manage workflow
JSM provides you with the ability to customise the default workflow for each issue type within your JSM project.. This is accessed by clicking on the Manage workflow button and selecting on of the following.
View and edit workflow
Replace with existing
Replace with template
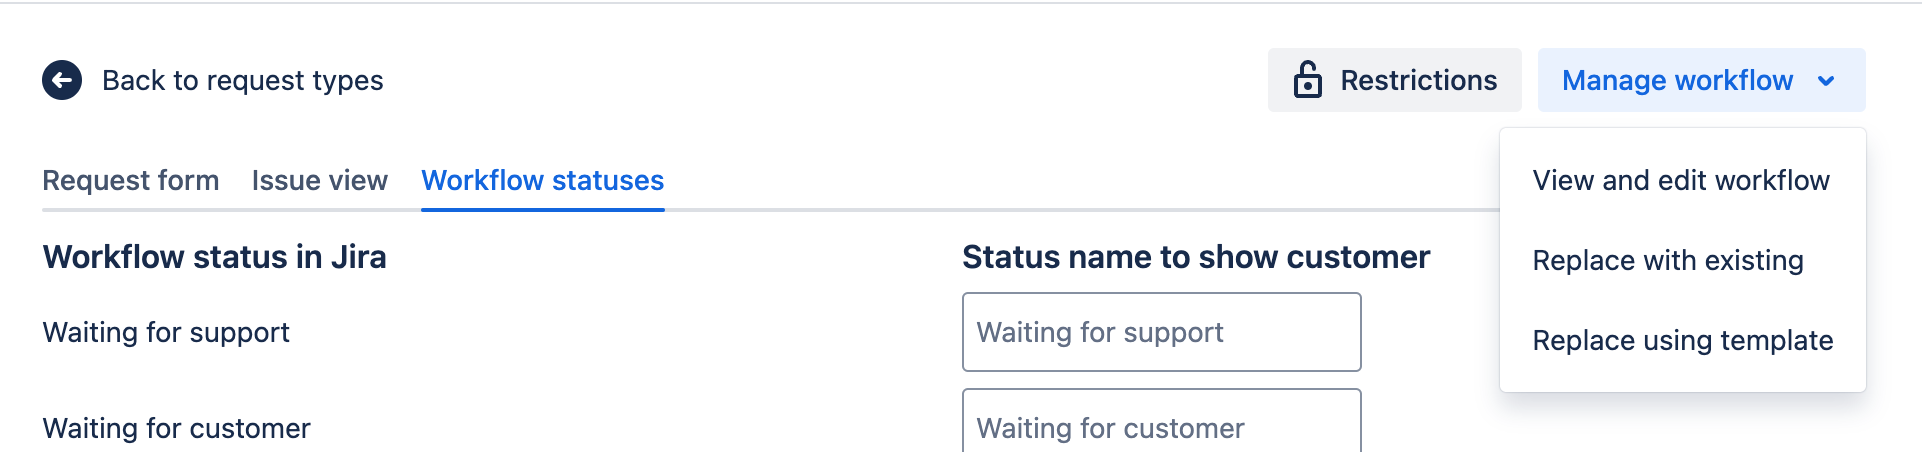
Note: changing the default workflow will impact all request types that use this workflow, so caution is advised!
View and edit workflow
Selecting this option brings up the workflow management screen where you can view the workflow as a Diagram or Text.
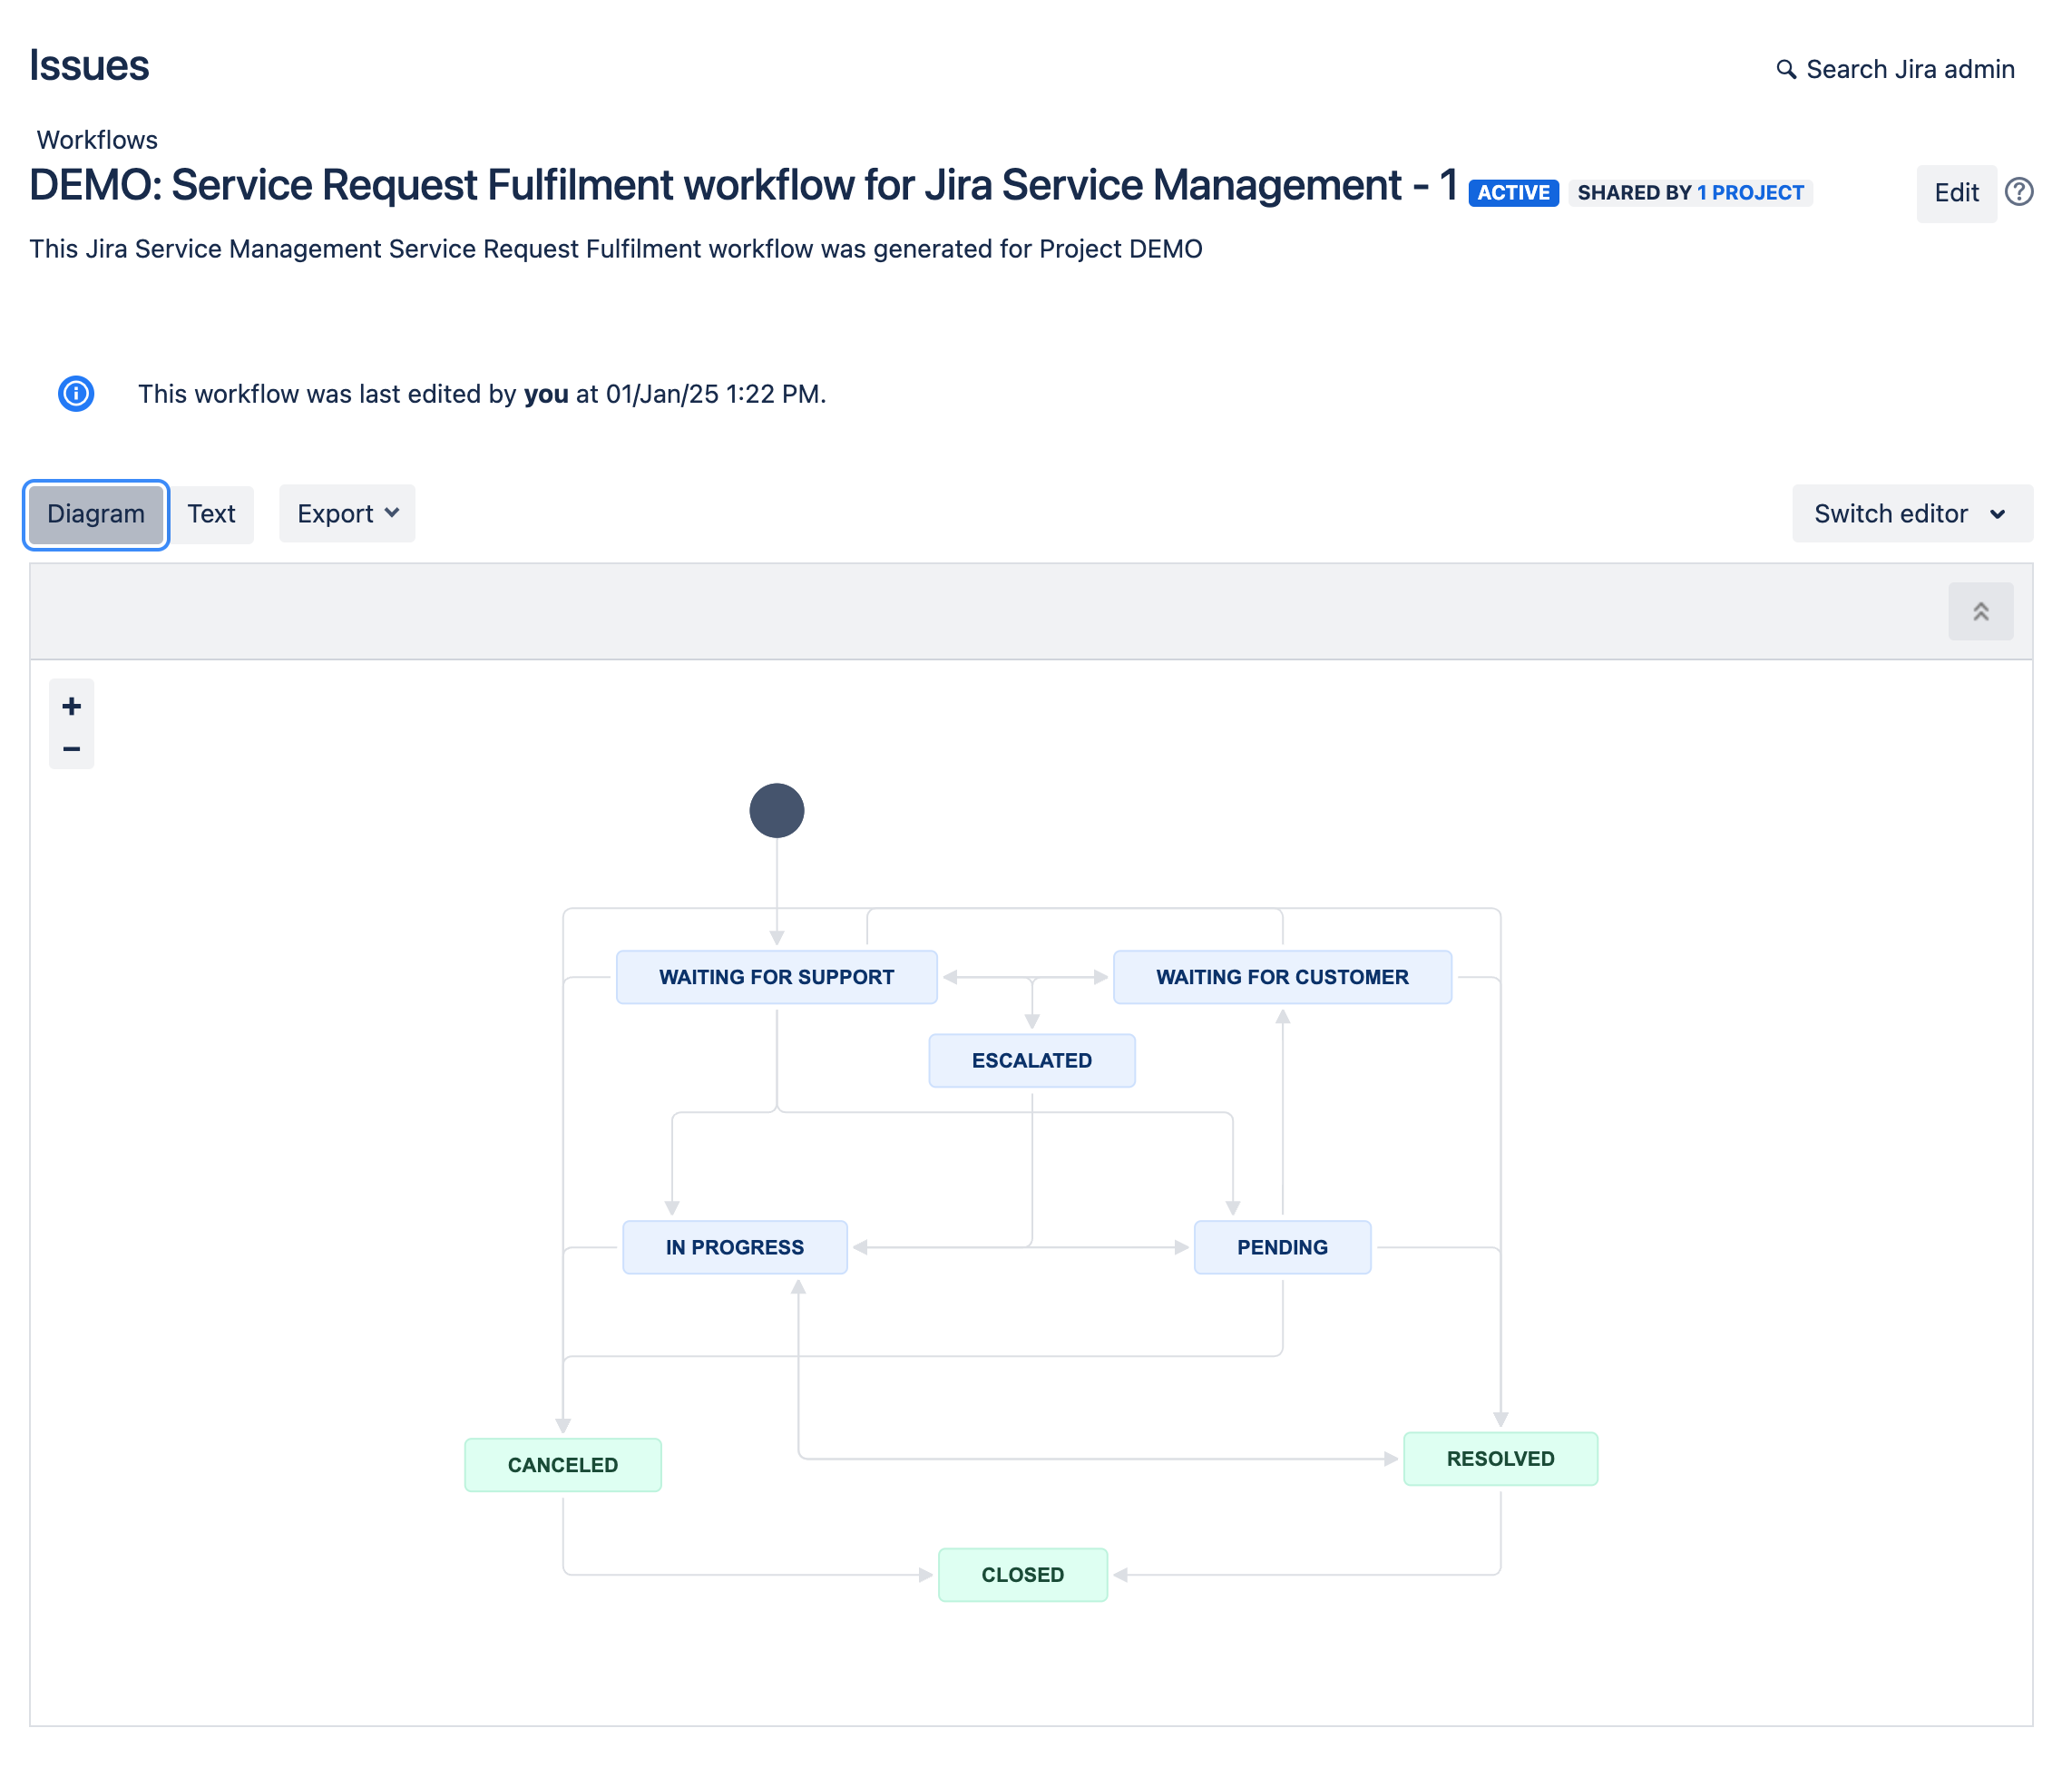
Diagram
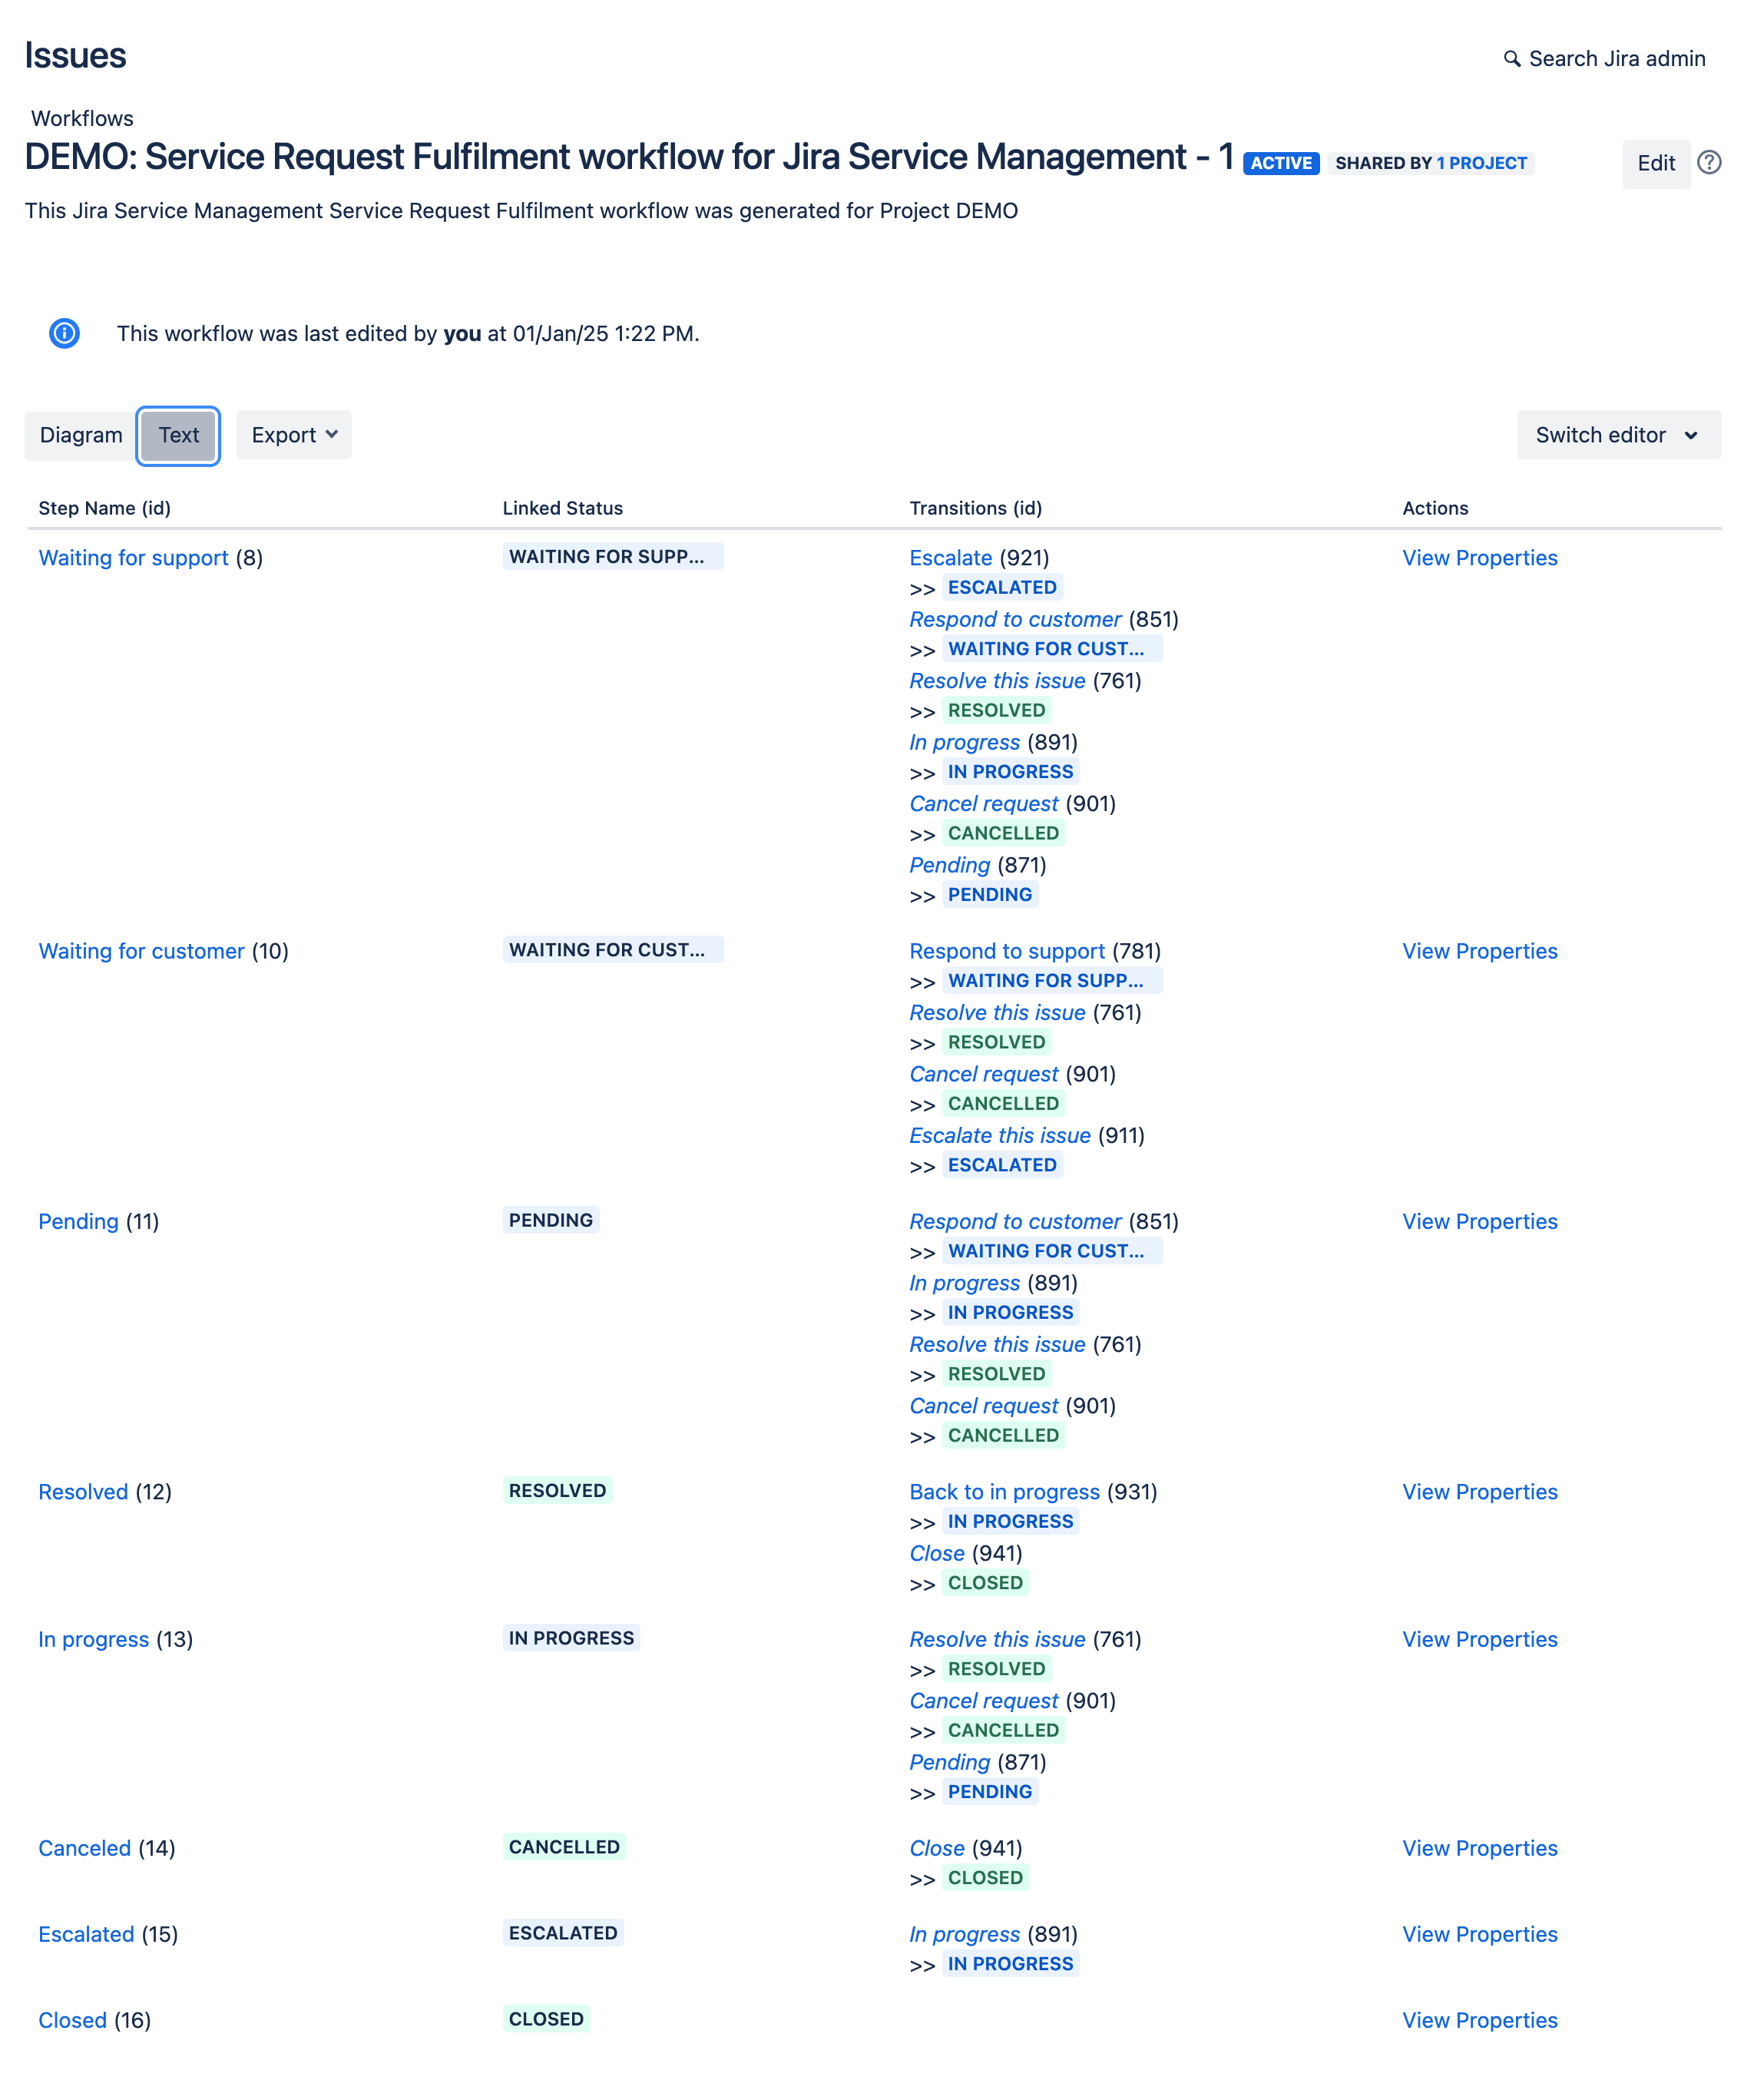
Text
And if you click on the Edit button, you get the following editor views.
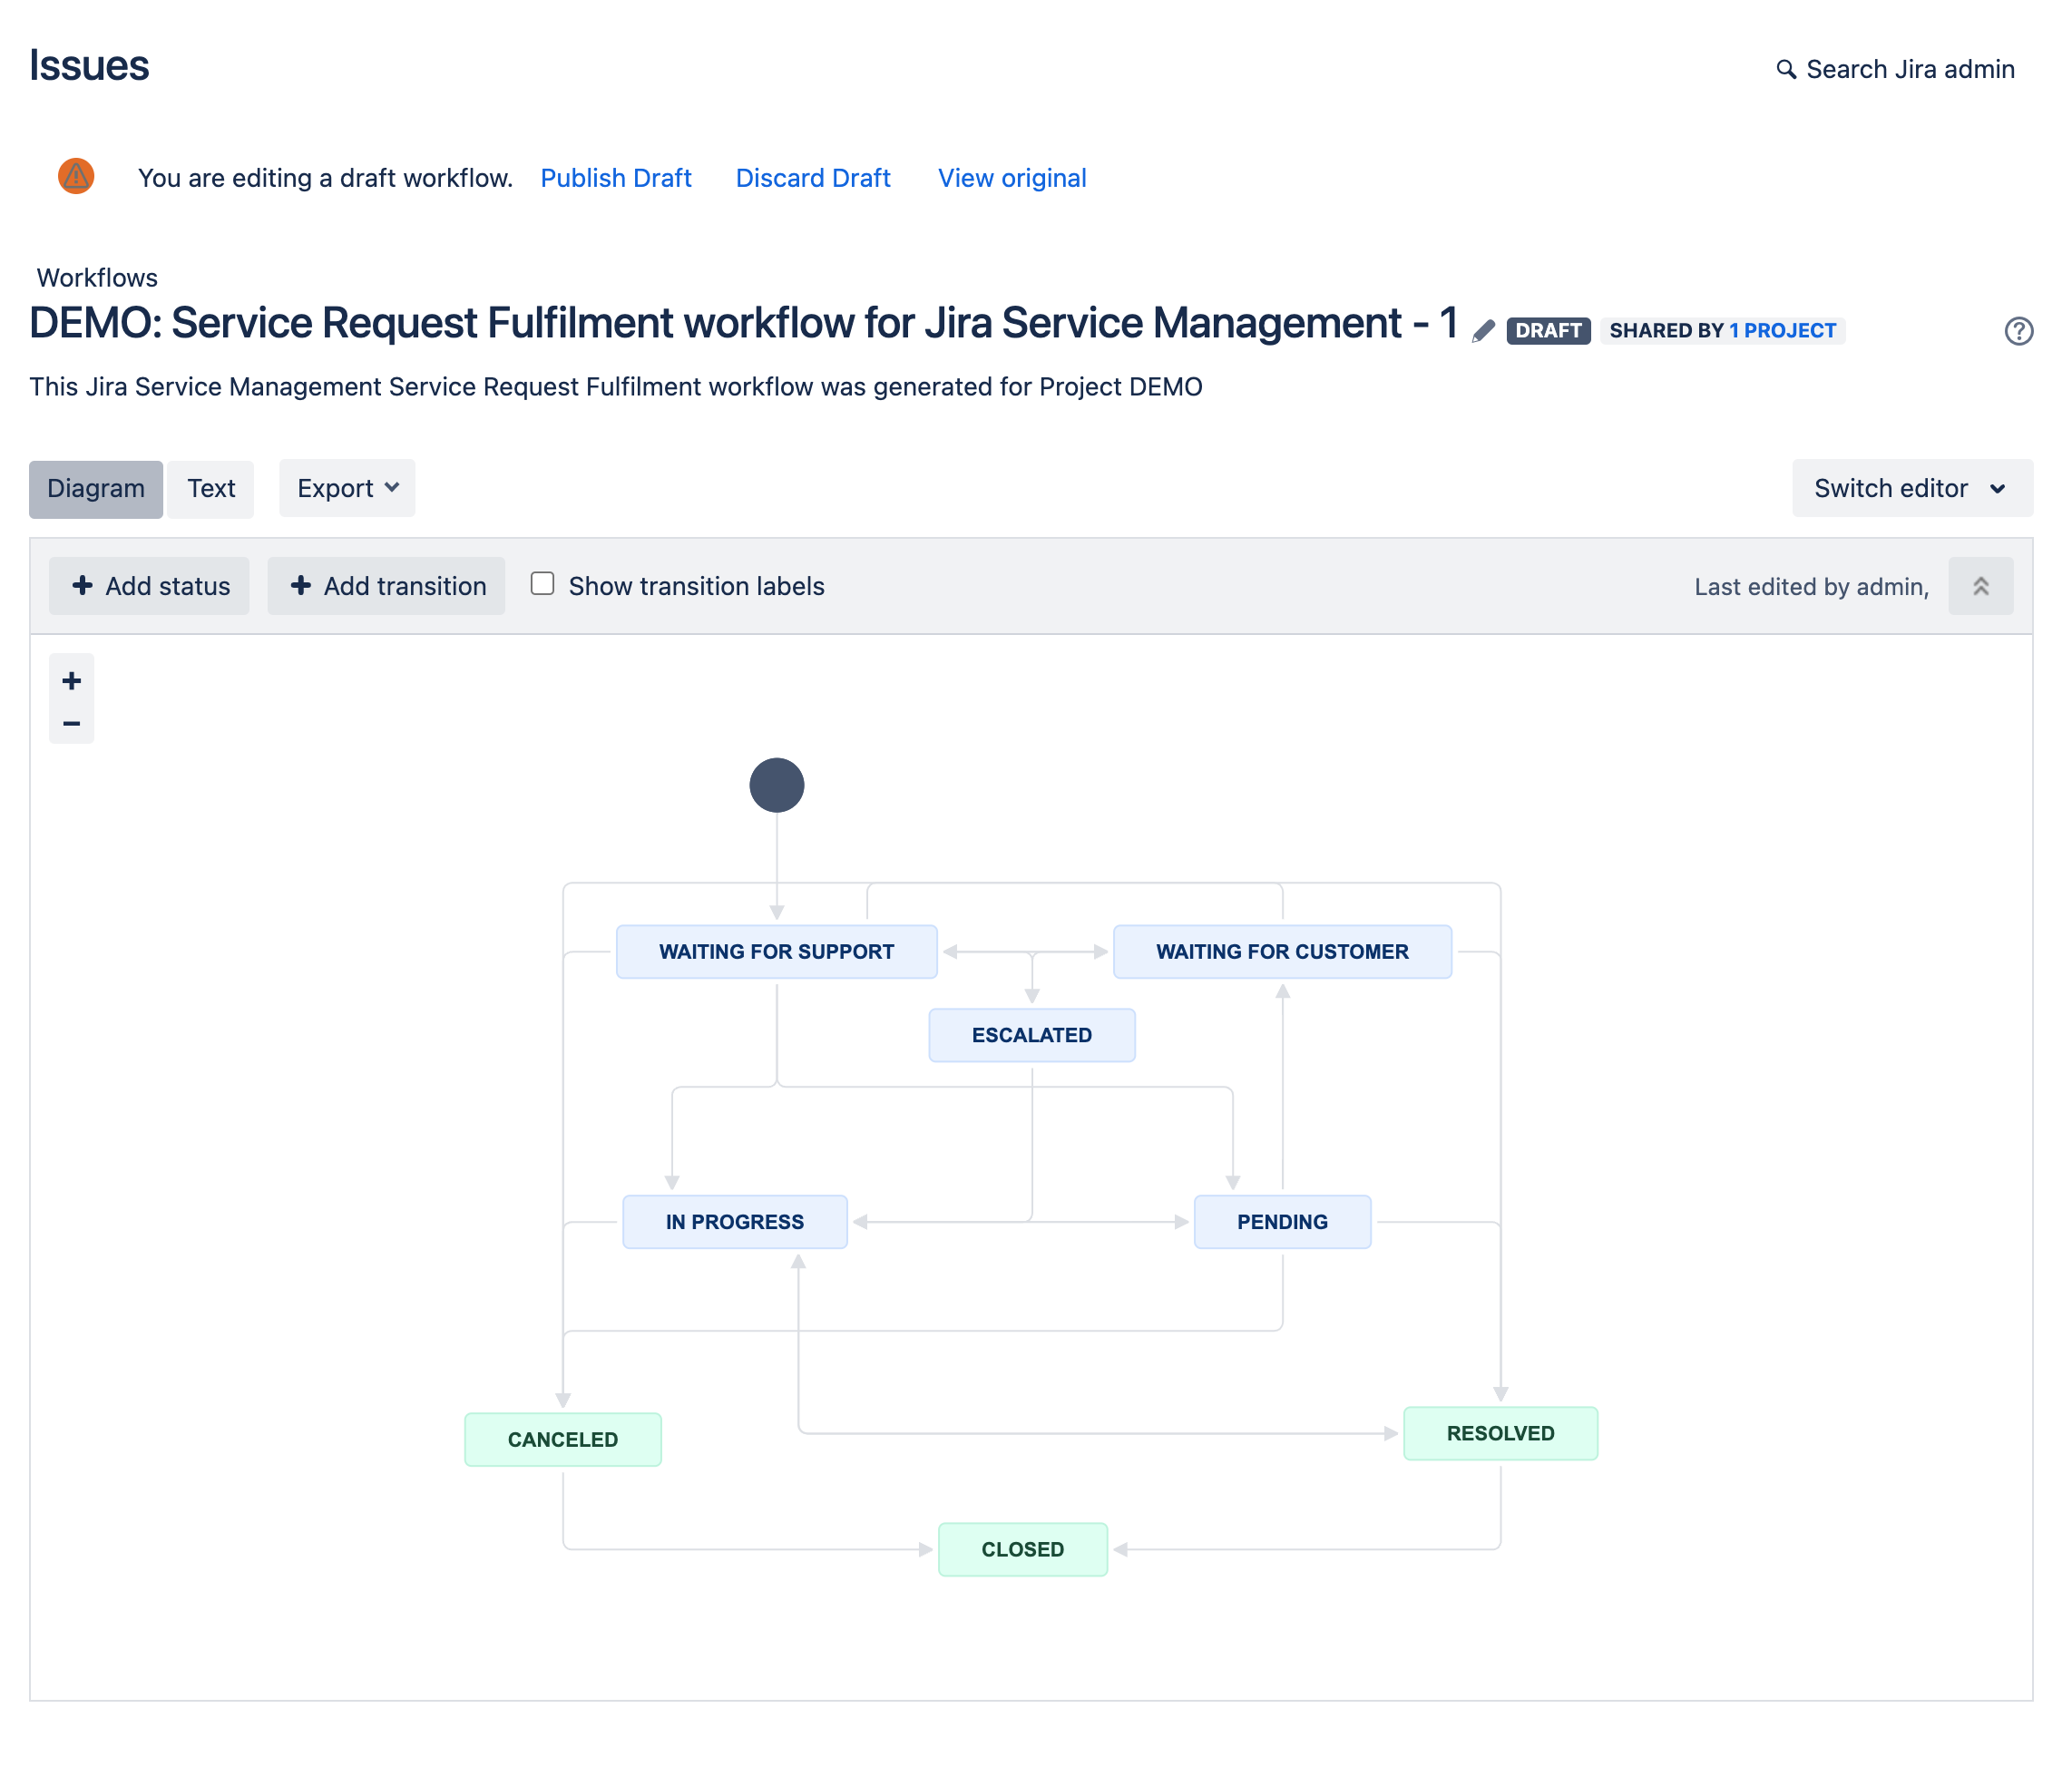
Diagram

Text
Once you have made the changes that you want to you can select either Publish Draft or Discard Draft at the top of the page.

Note: changing the default workflow will impact all request types that use this workflow, so caution is advised!
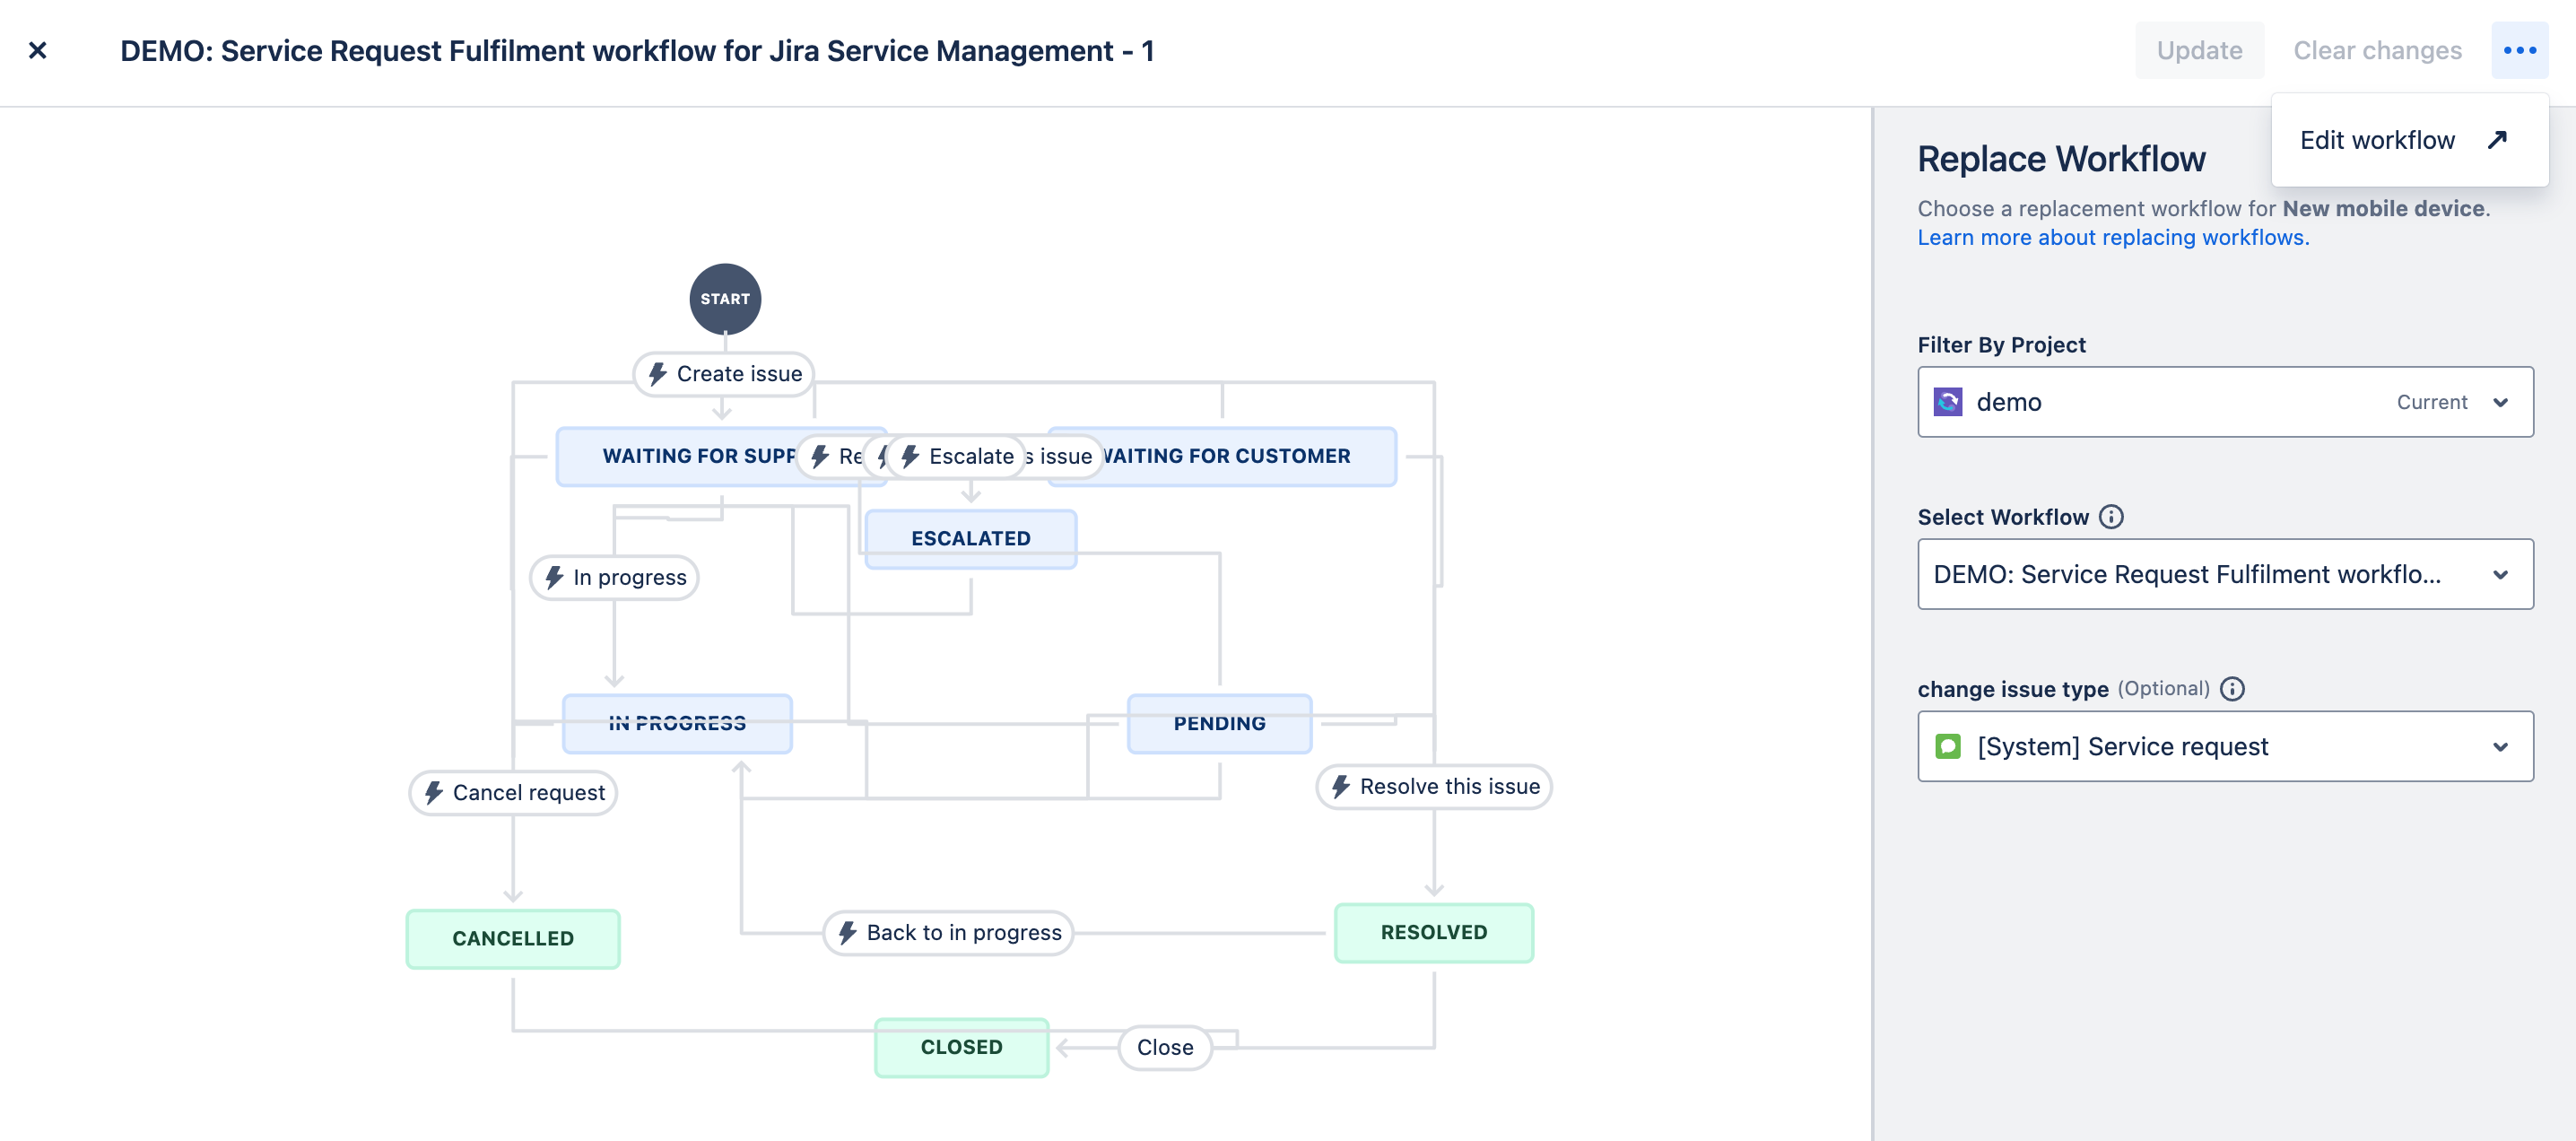
Replace with existing
This option gives the option to replace a workflow with one from any project that the Project Admin has access to.
Simply select theProject that the workflow exists is, then select the workflow and lastly you have the option to select the issue type that you want to apply it to.
You have the option to directly edit the workflow using the editor by clicking on the ellipsis at the top-tight of the screen.
When you have made your changes, and are happy with the outcome, click on Update. Otherwise click on Clear changes to reset the view.
Note: changing the default workflow will impact all request types that use this workflow, so caution is advised!
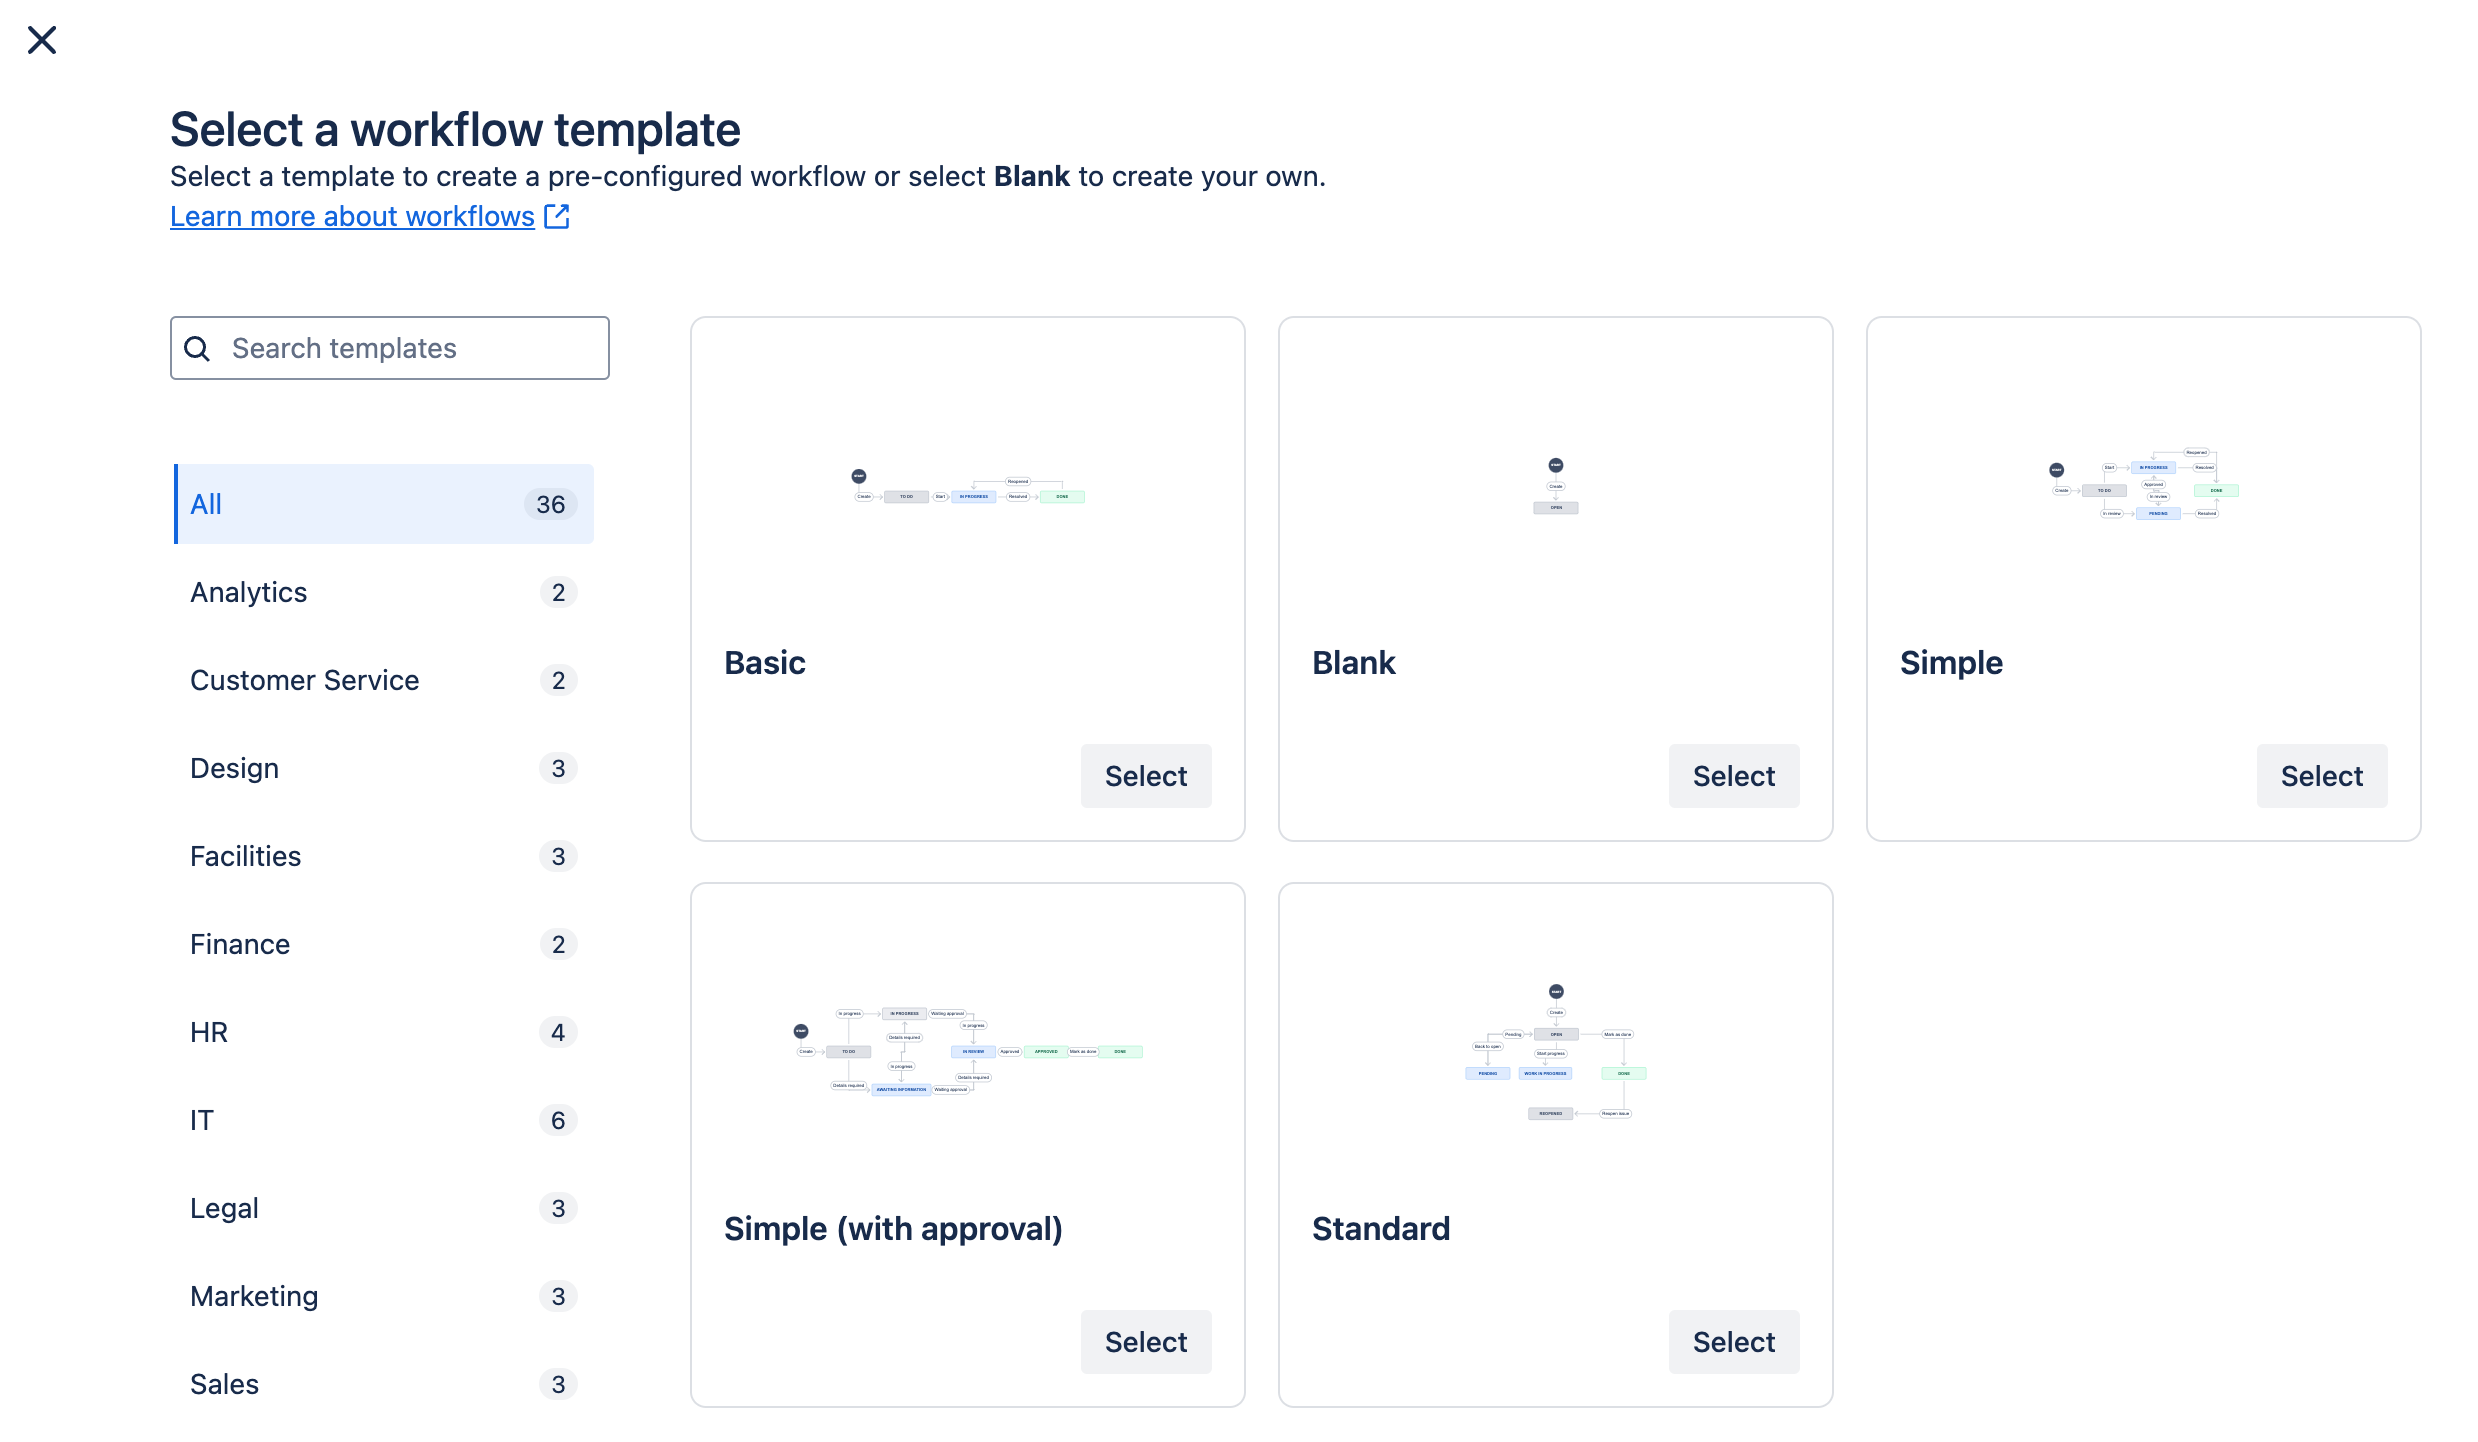
Replace using template
This option lets you select a template from one of the Atlassian predefined ones. As you can see the current catalogue of templates covers a wide range of business functions and IT processes.
These are a good starting point if want something fairly generic. The Premium and Enterprise plans give access to a wider range of templates, and I will be exploring these in a coming post.
Forms
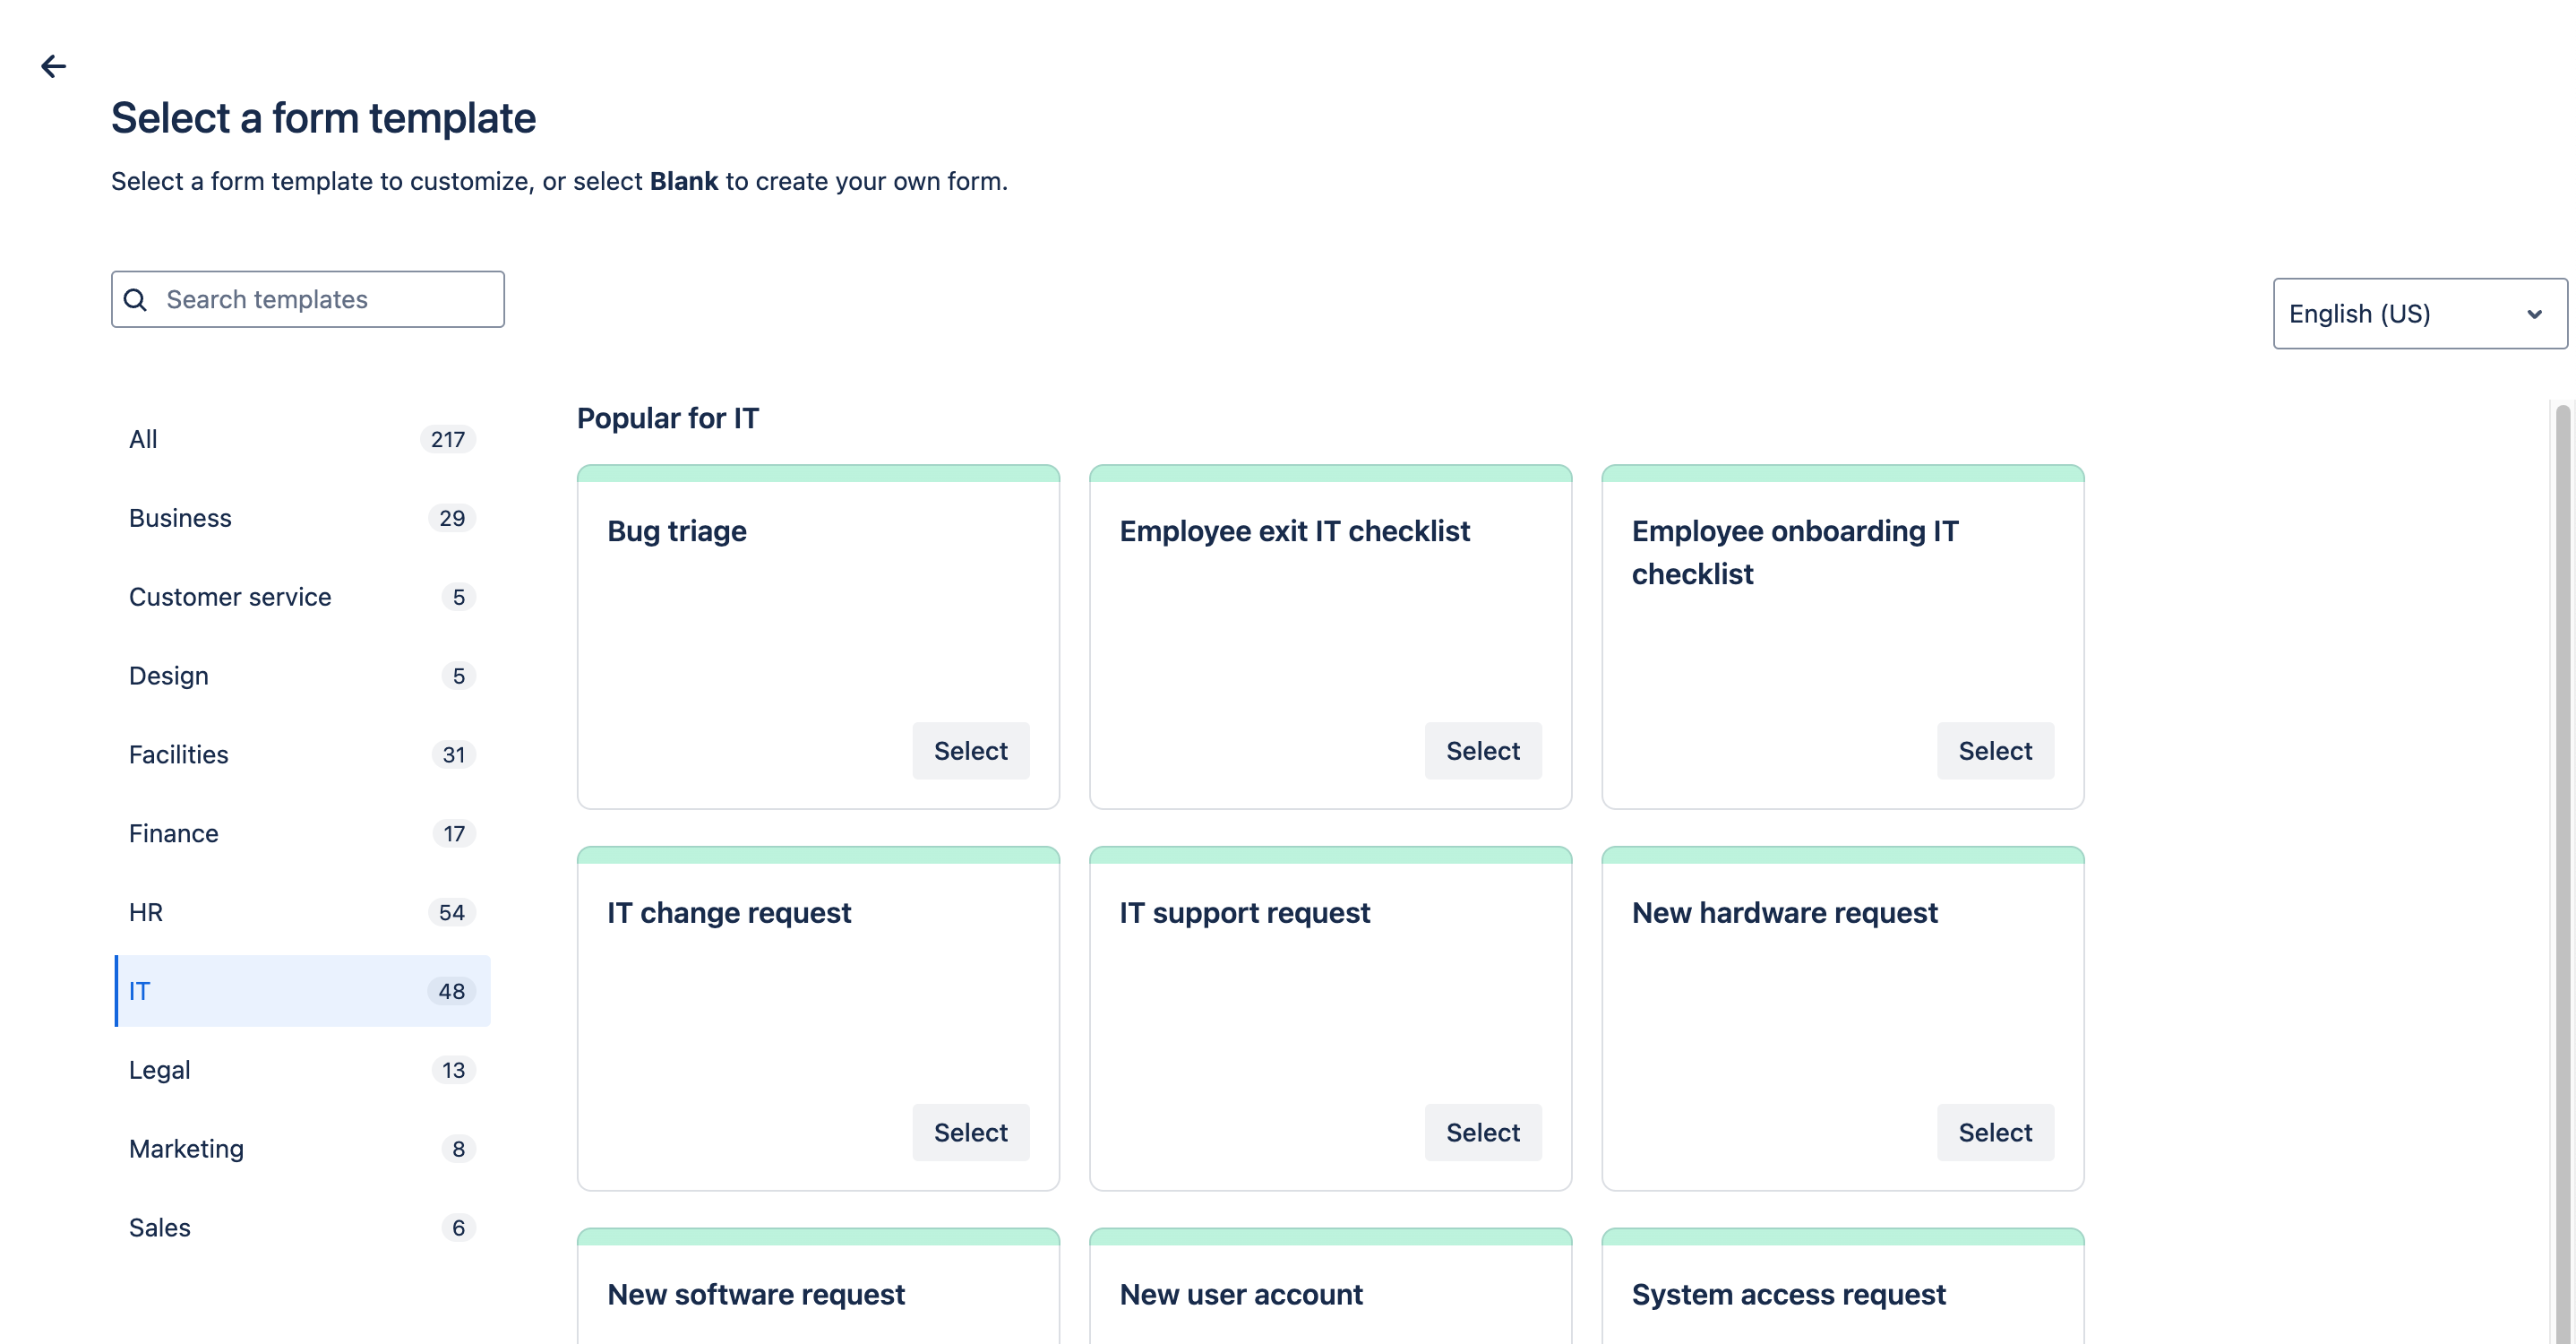
The Forms settings gives you the functionality to create, edit and delete data capture forms. You can either start with a Template or with a Blank slate.
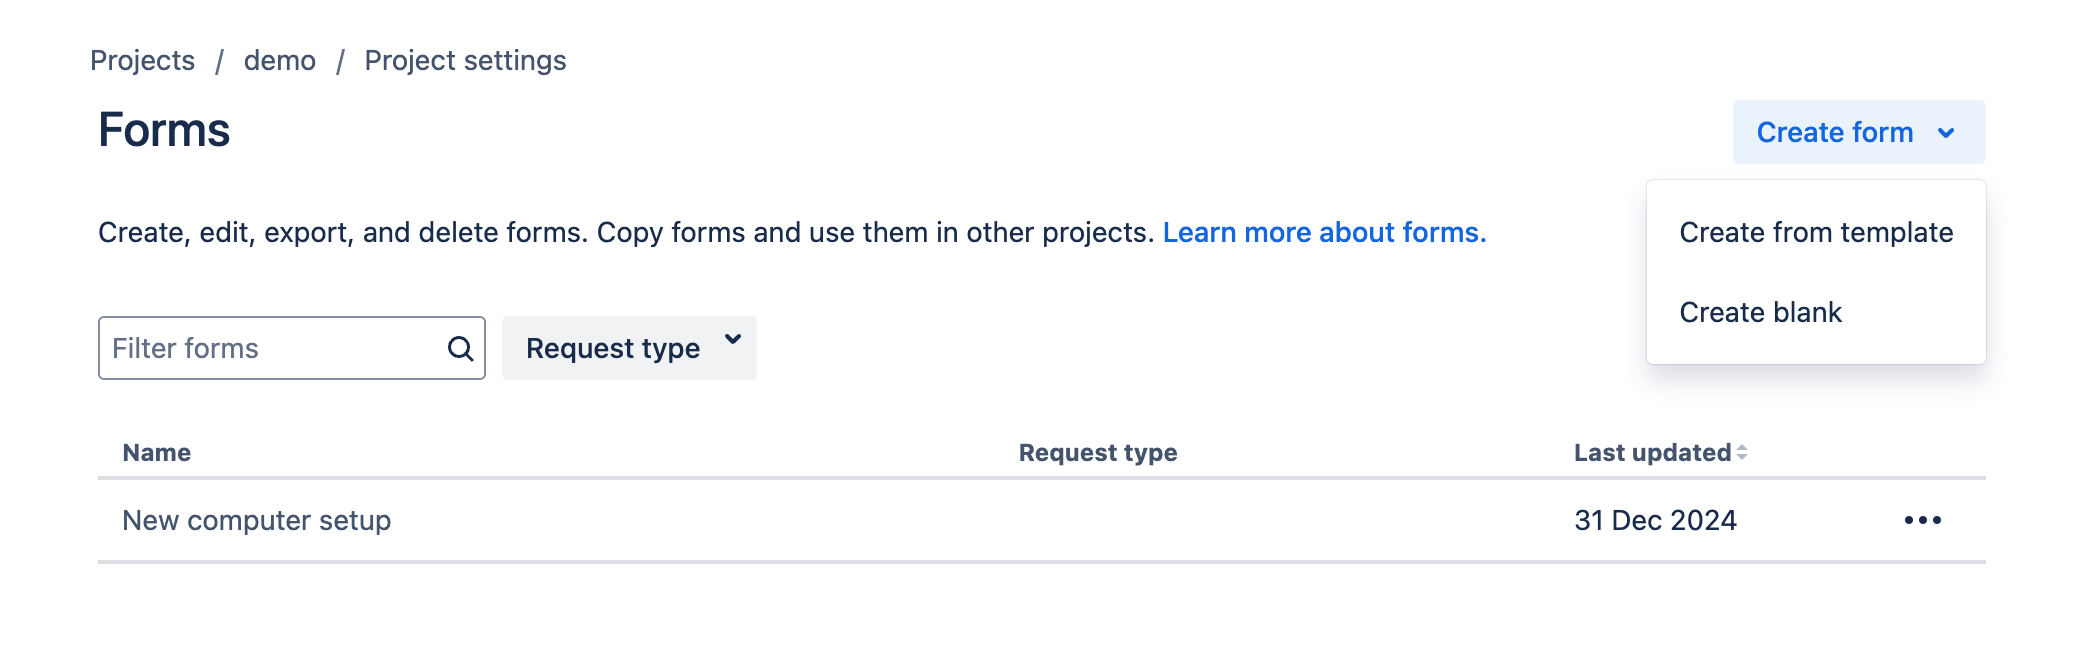
If you want to use a template, there are currently over 200 to choose from. They cover business and IT operational processes.
Once selected you will see the following screen. This is where you can
Customise existing fields on a template by adding conflation data, linkages to JIRA fields etc
Add new fields or sections to the template or a blank form, depending on what you started with
Remove fields if your specific use case does not require them
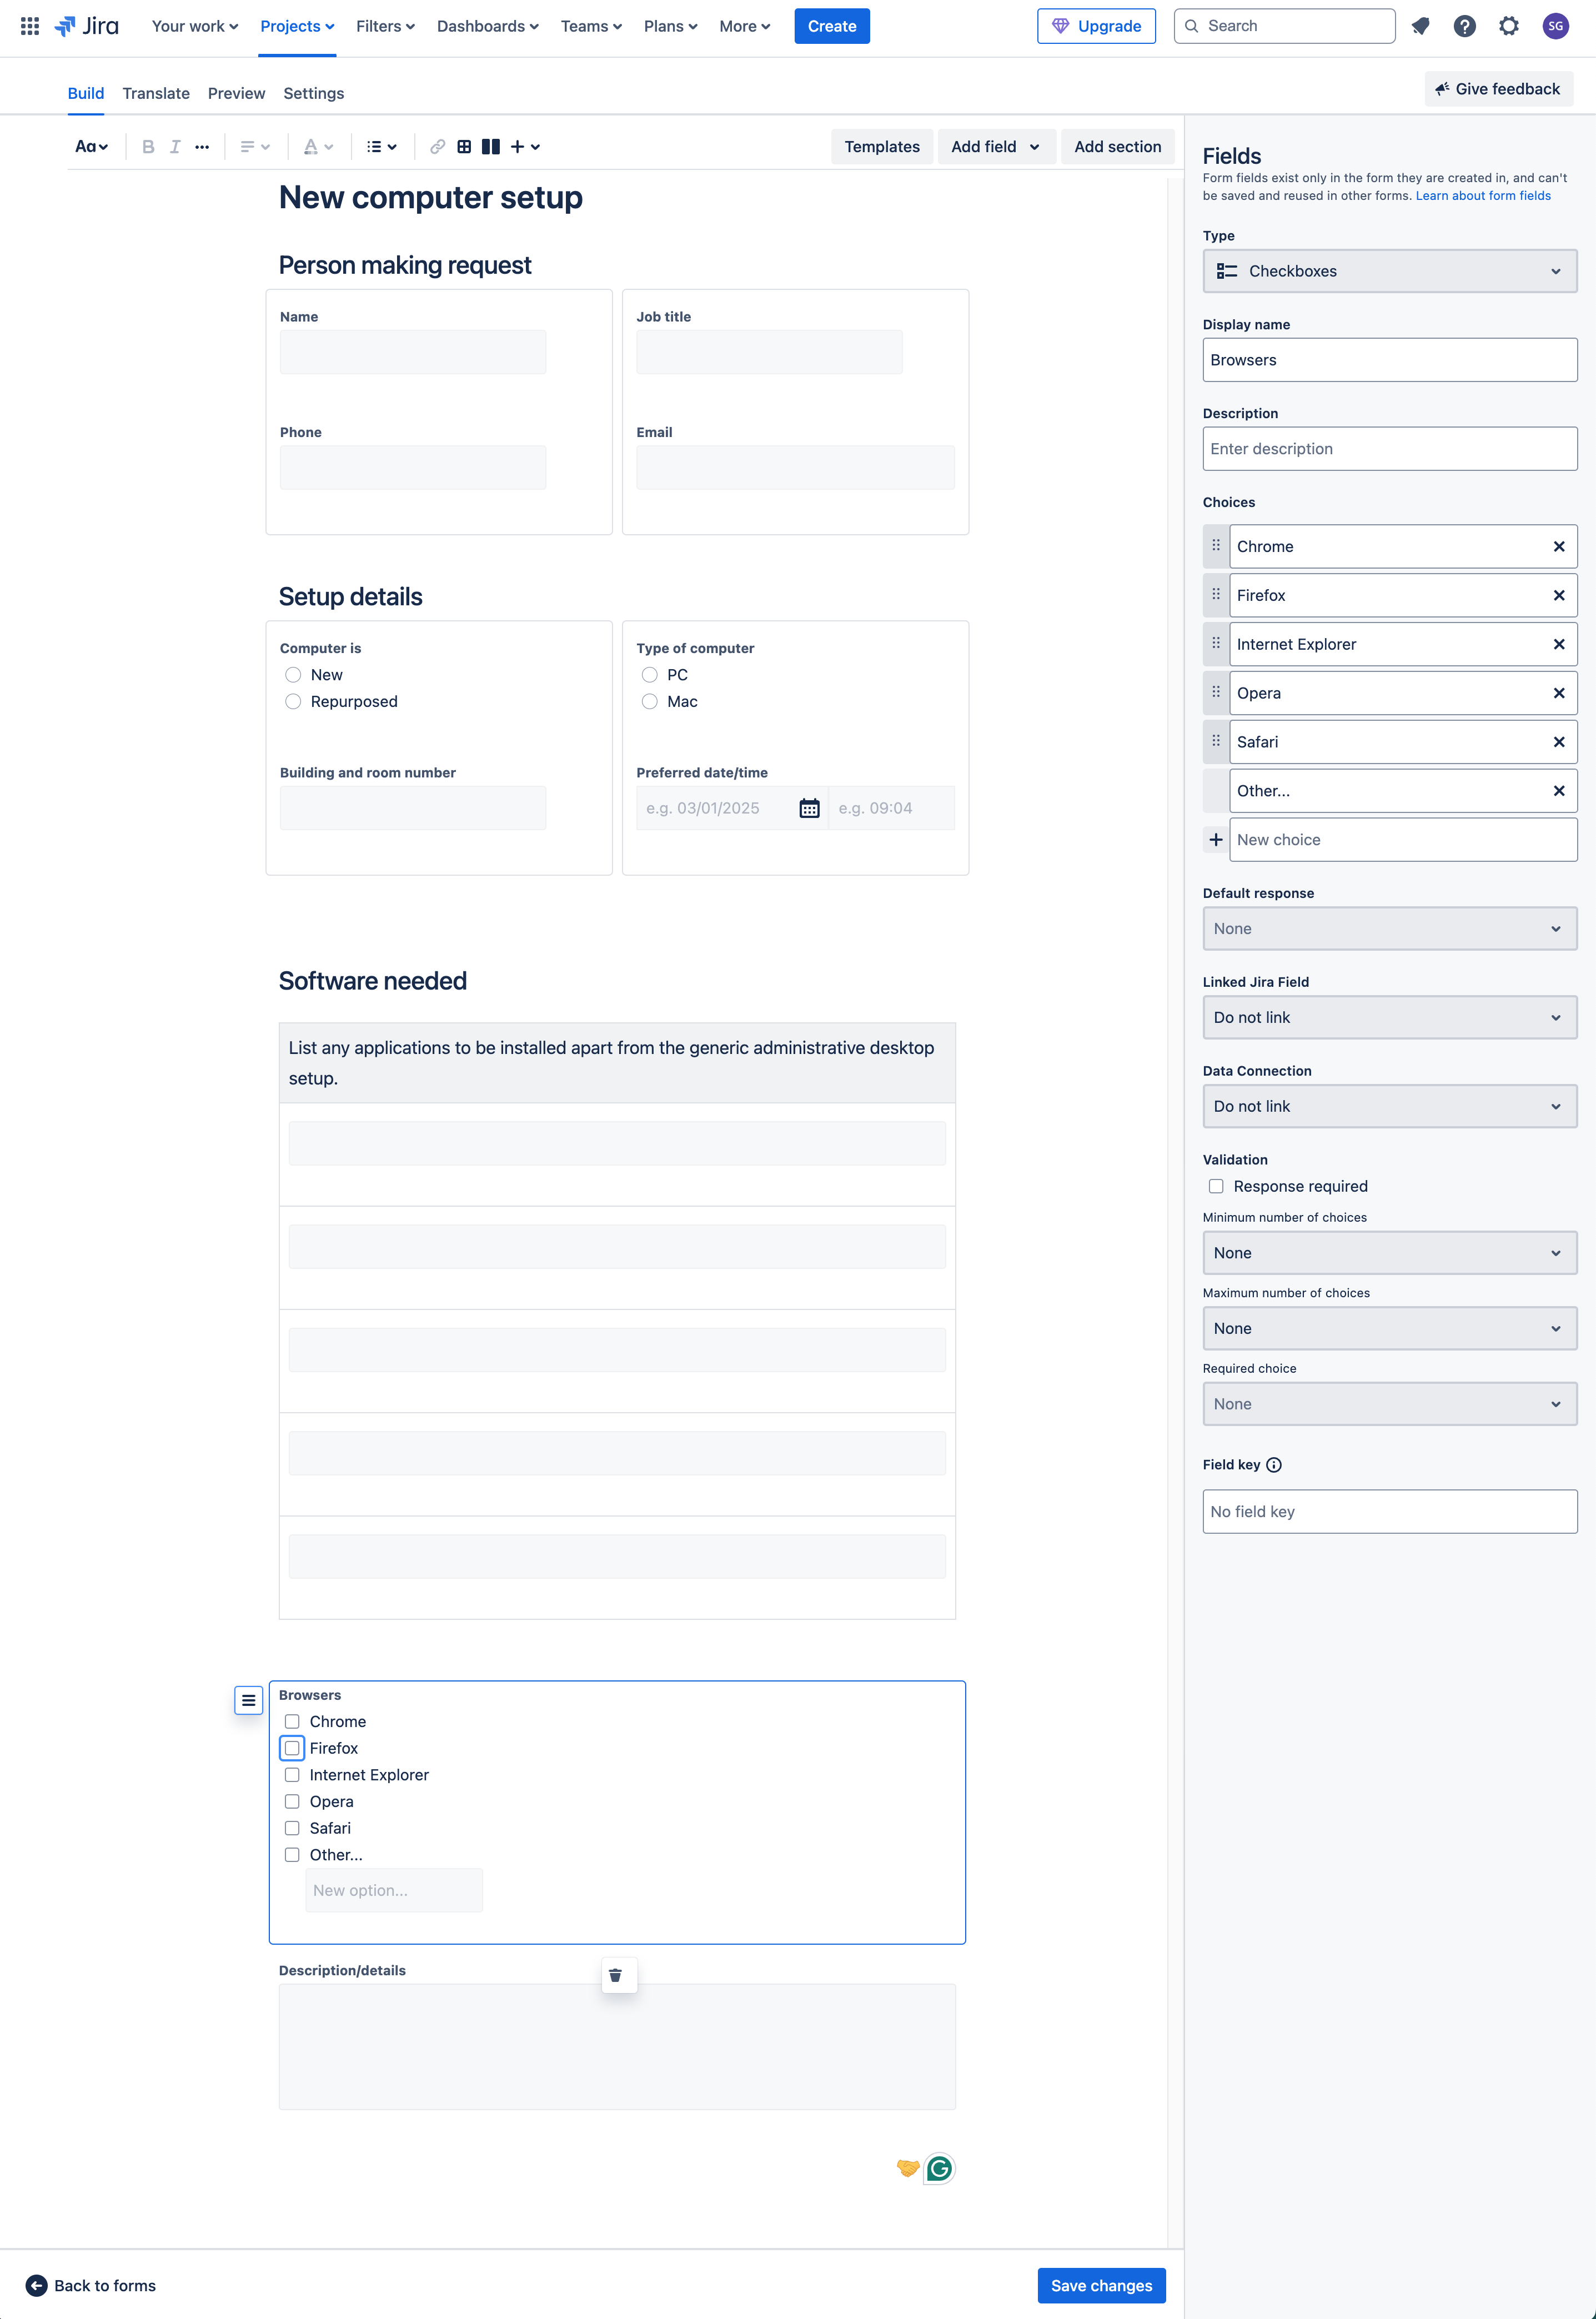
Once you have the form in a state that you are happy with you need to click on Save Changes and then, unless you ant to continue editing, on Back to forms.
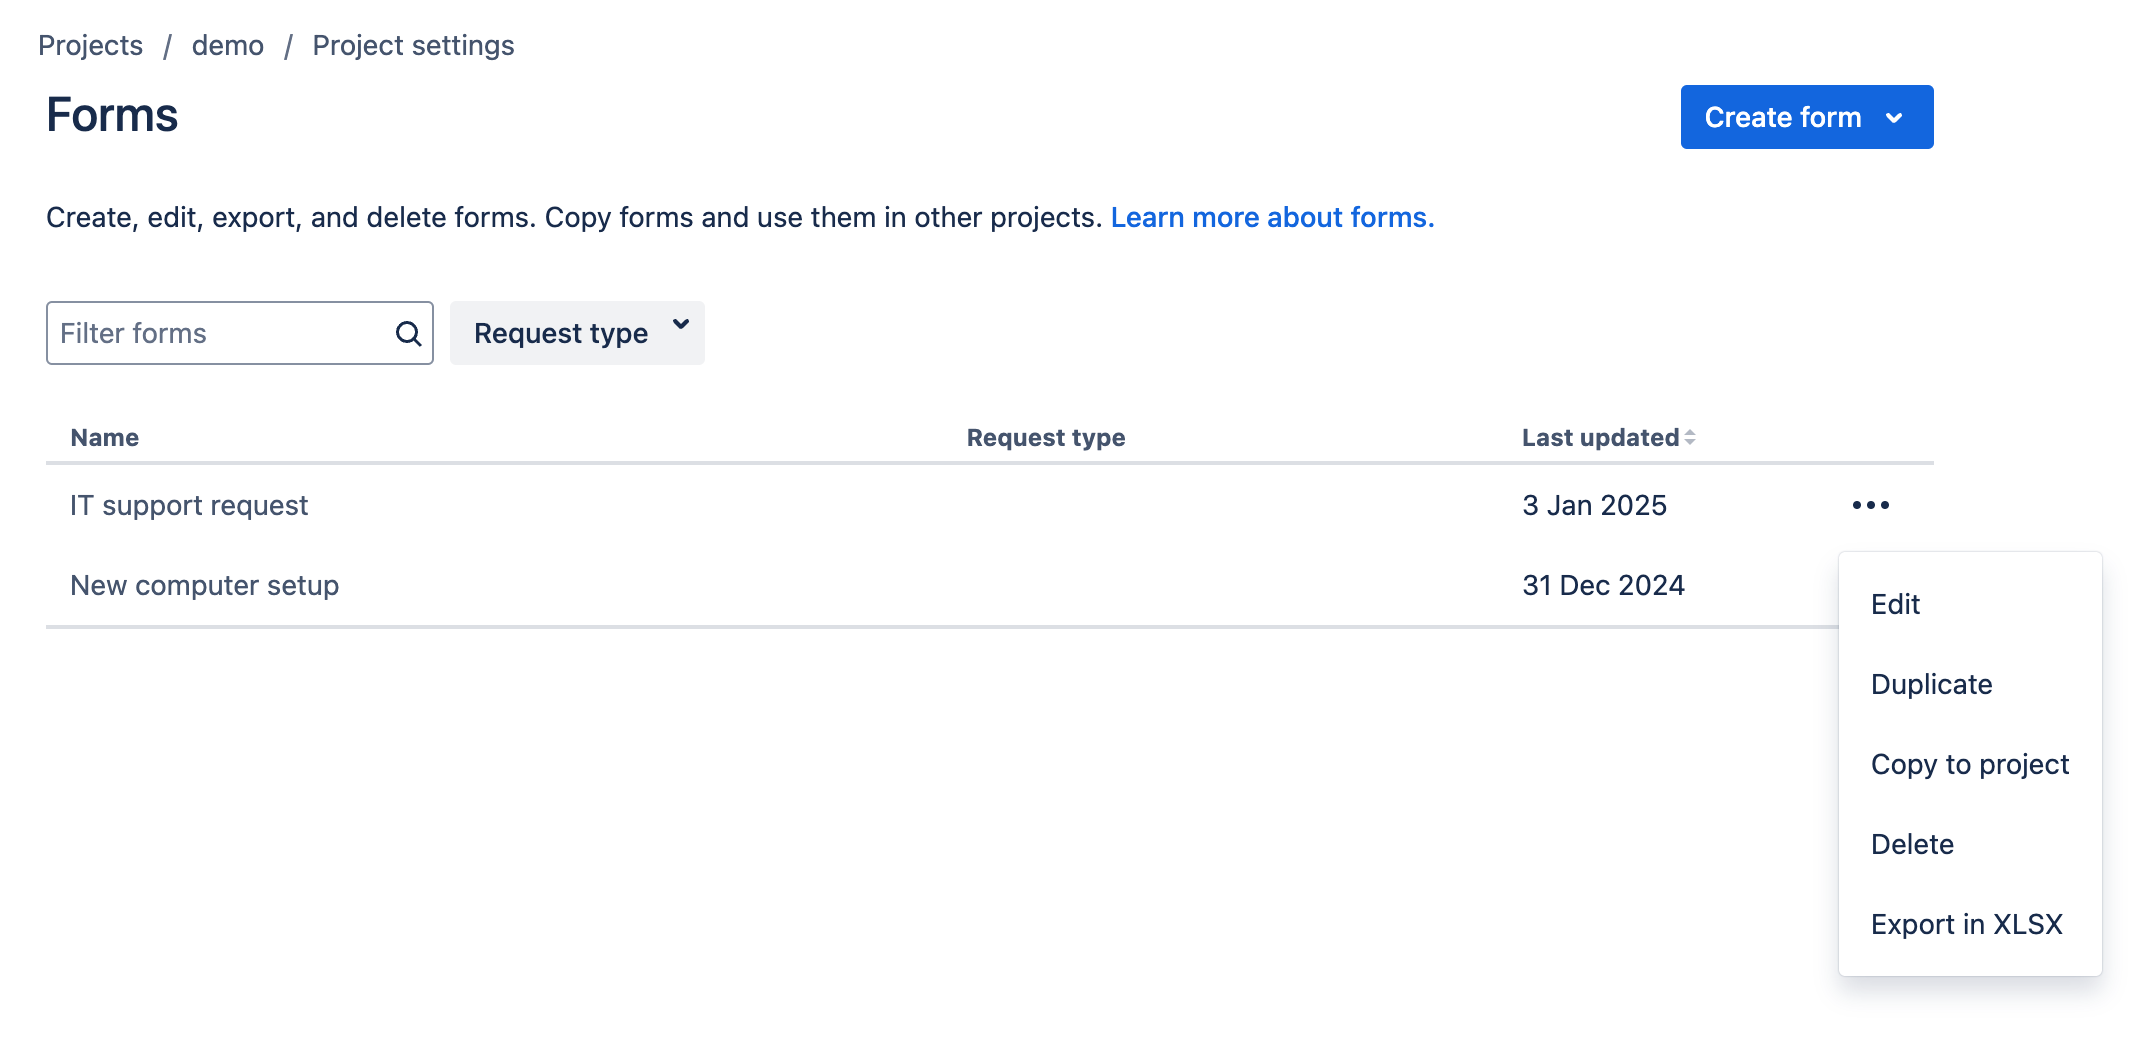
This takes you back to the main Forms screen where your new form is listed. By clicking on the ellipses next to the Last updated: field you can choose to
Edit the form, following the steps shown above
Duplicate the form to create a copy that you can edit for a similar use case
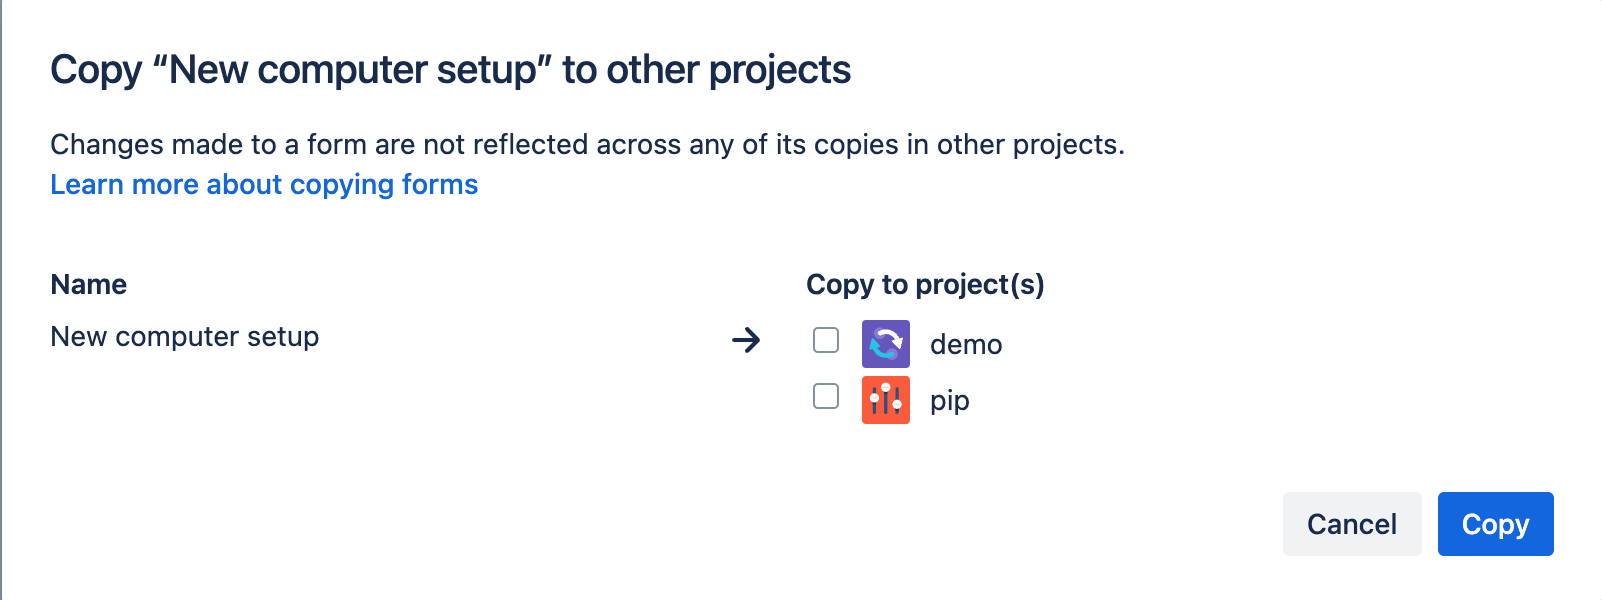
Copy to a project, which opens the following screen where you select the JSM project to copy in to
Delete, to remove the form
Export in XLSX, which downloads an MS Excel file that has the field names as column headers
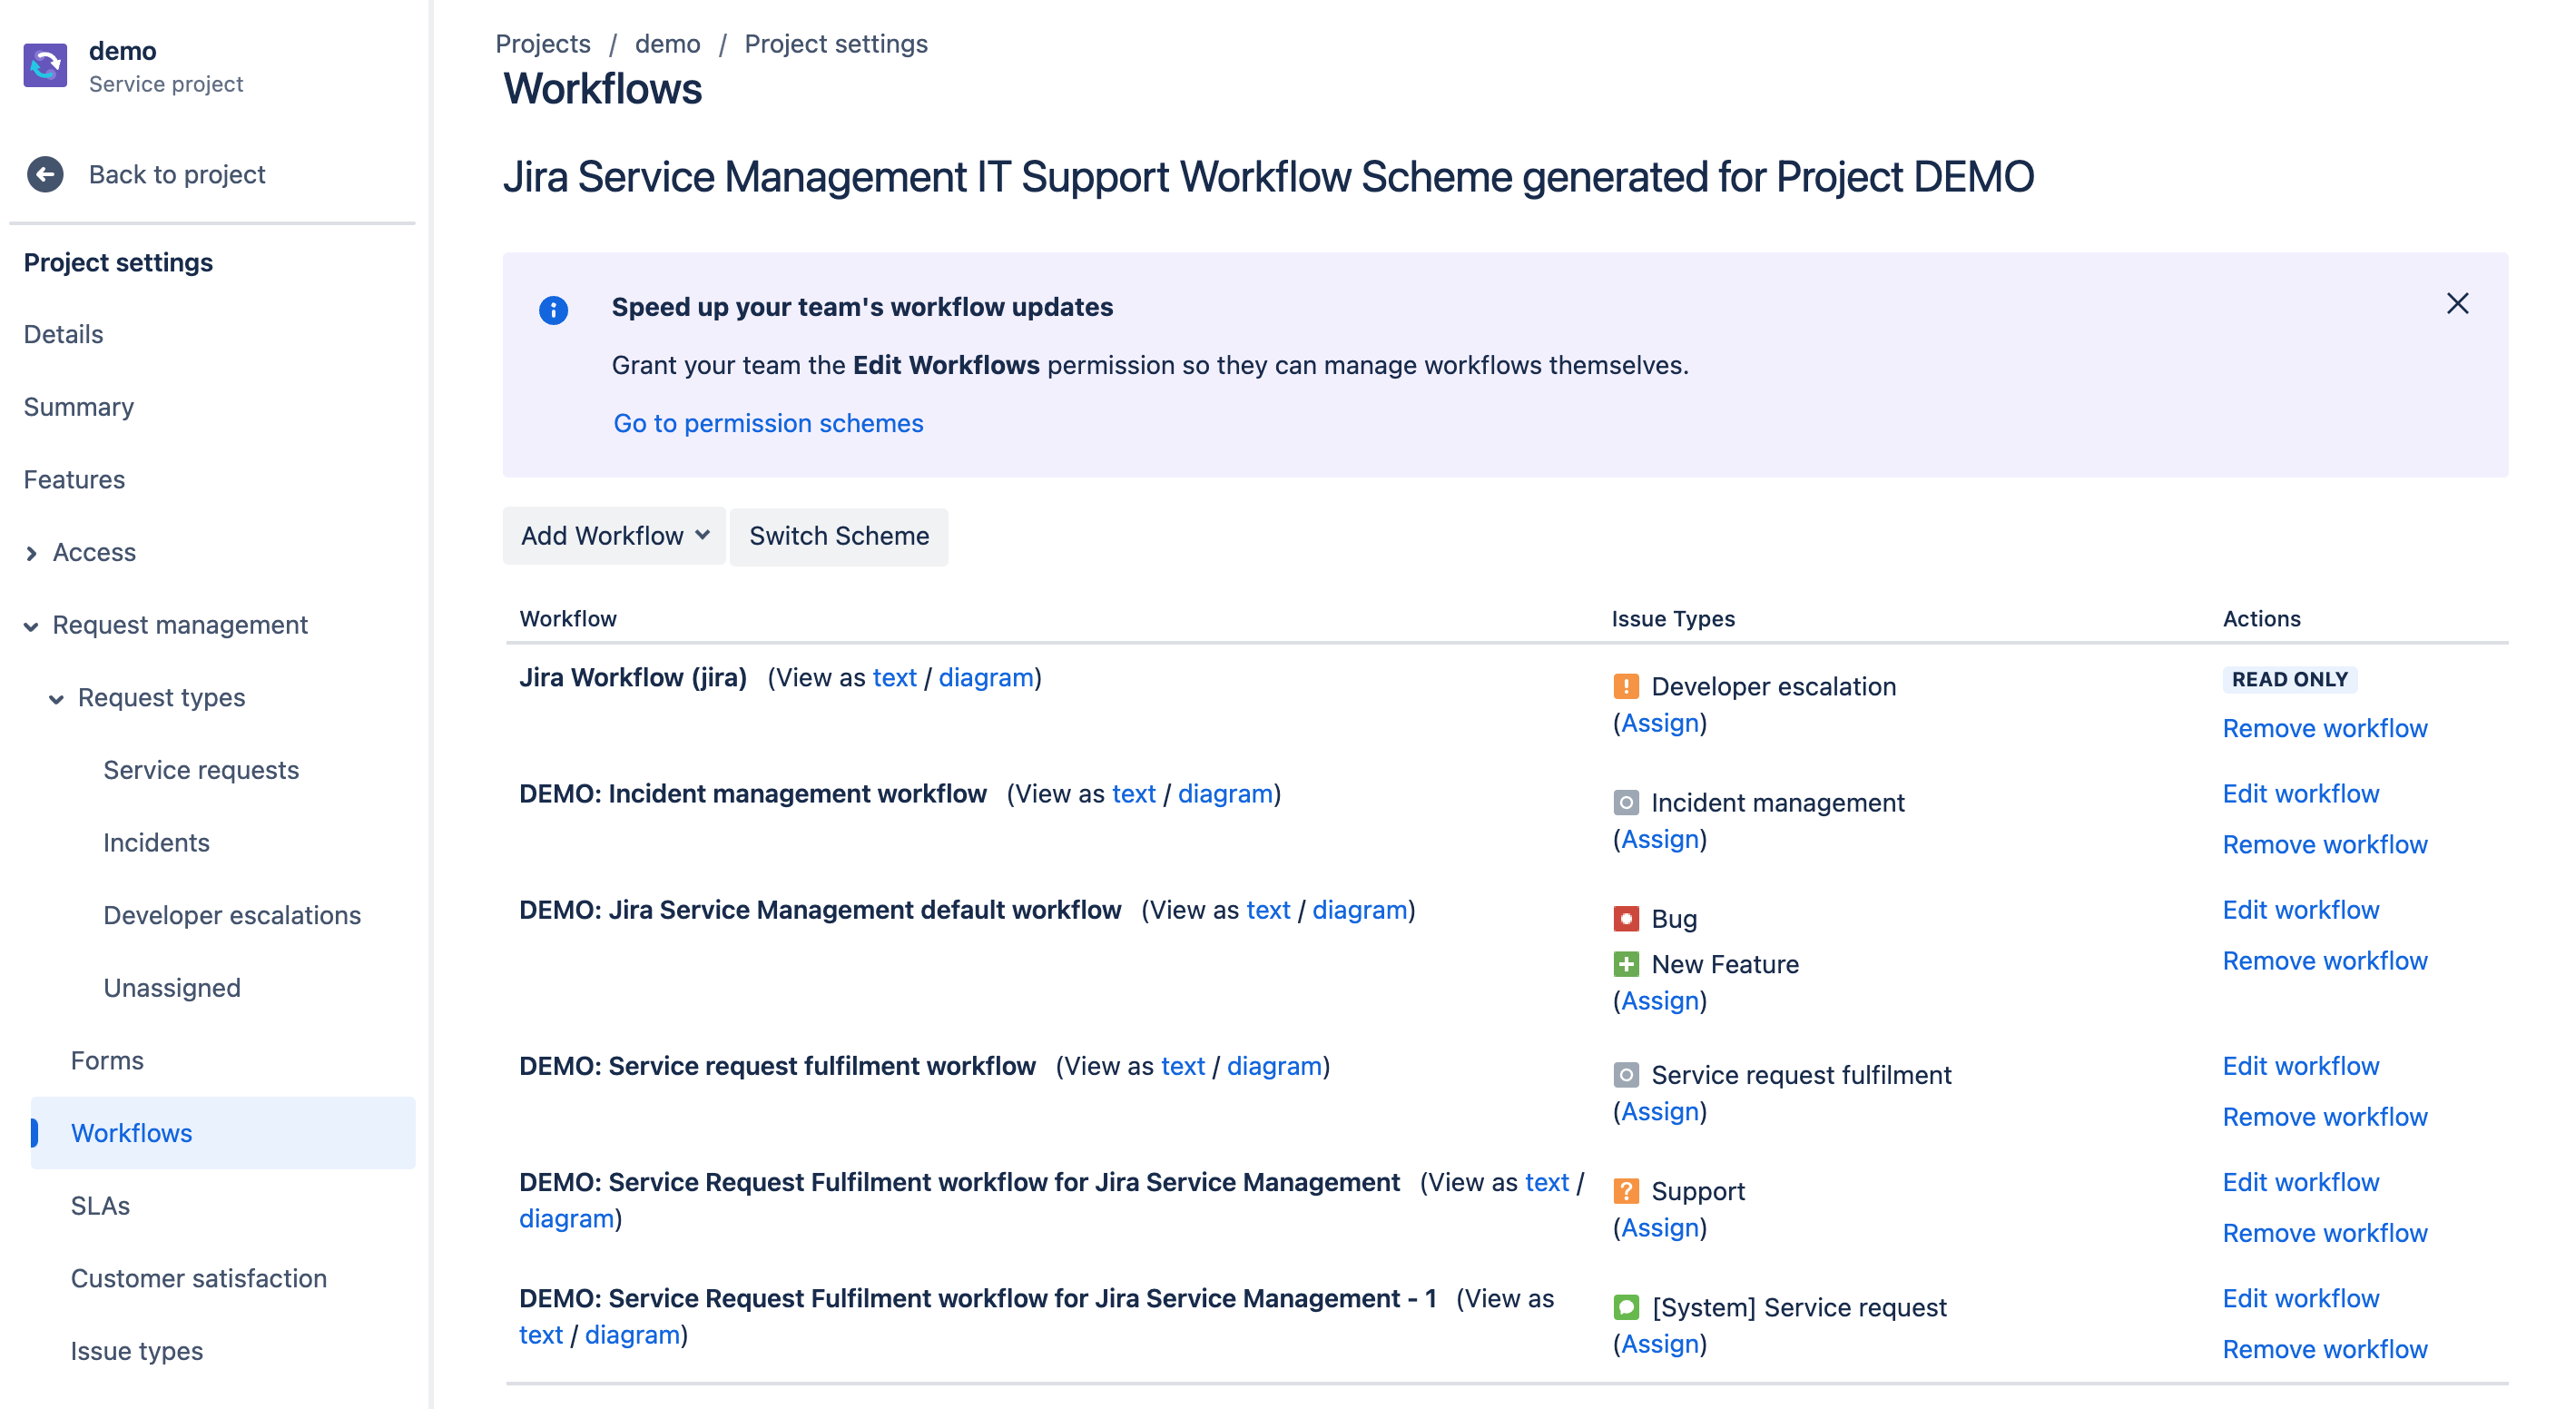
Workflows
The Workflows screen lists all of the workflow that are currently configured in the JSM project that you are in. From this screen you can
Add a new workflow
Edit an existing workflow, following the steps that we went through earlier
Remove a workflow
SLAs
The SLAs screen lists all off the Service Level Agreements that are configured within you JSM project. These are the measures, against your specific requests, that set the customers expectation for the level of service that you will provide.
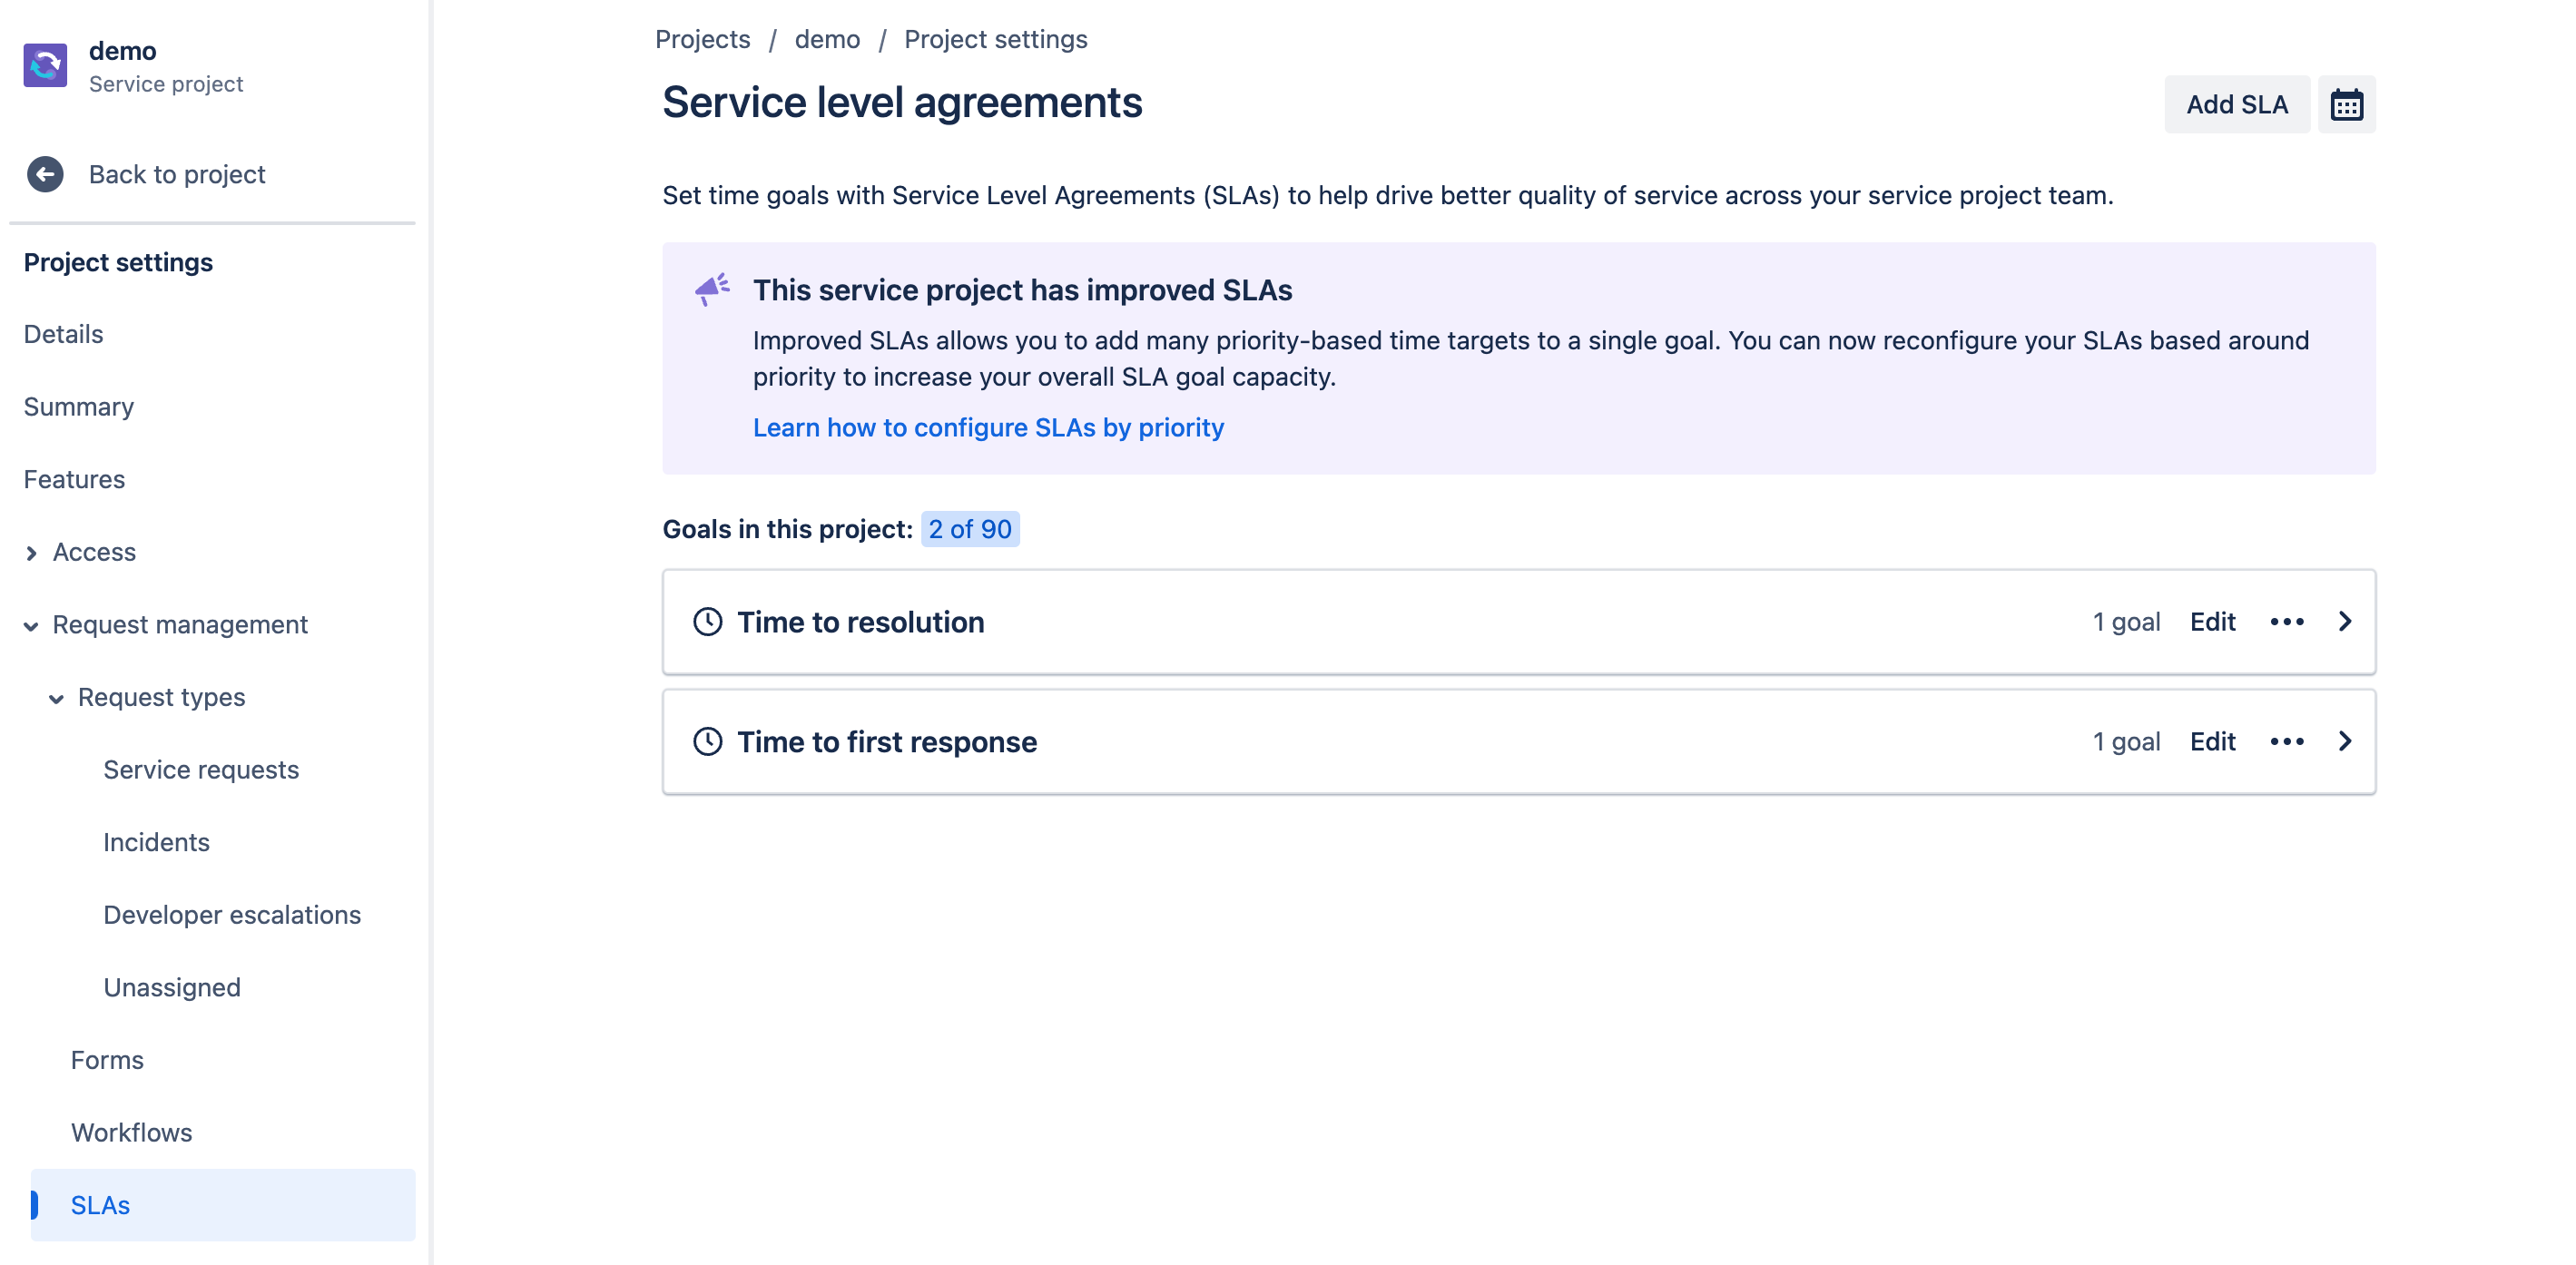
From this screen you can
Delete an SLA
View the details of an existing SLA
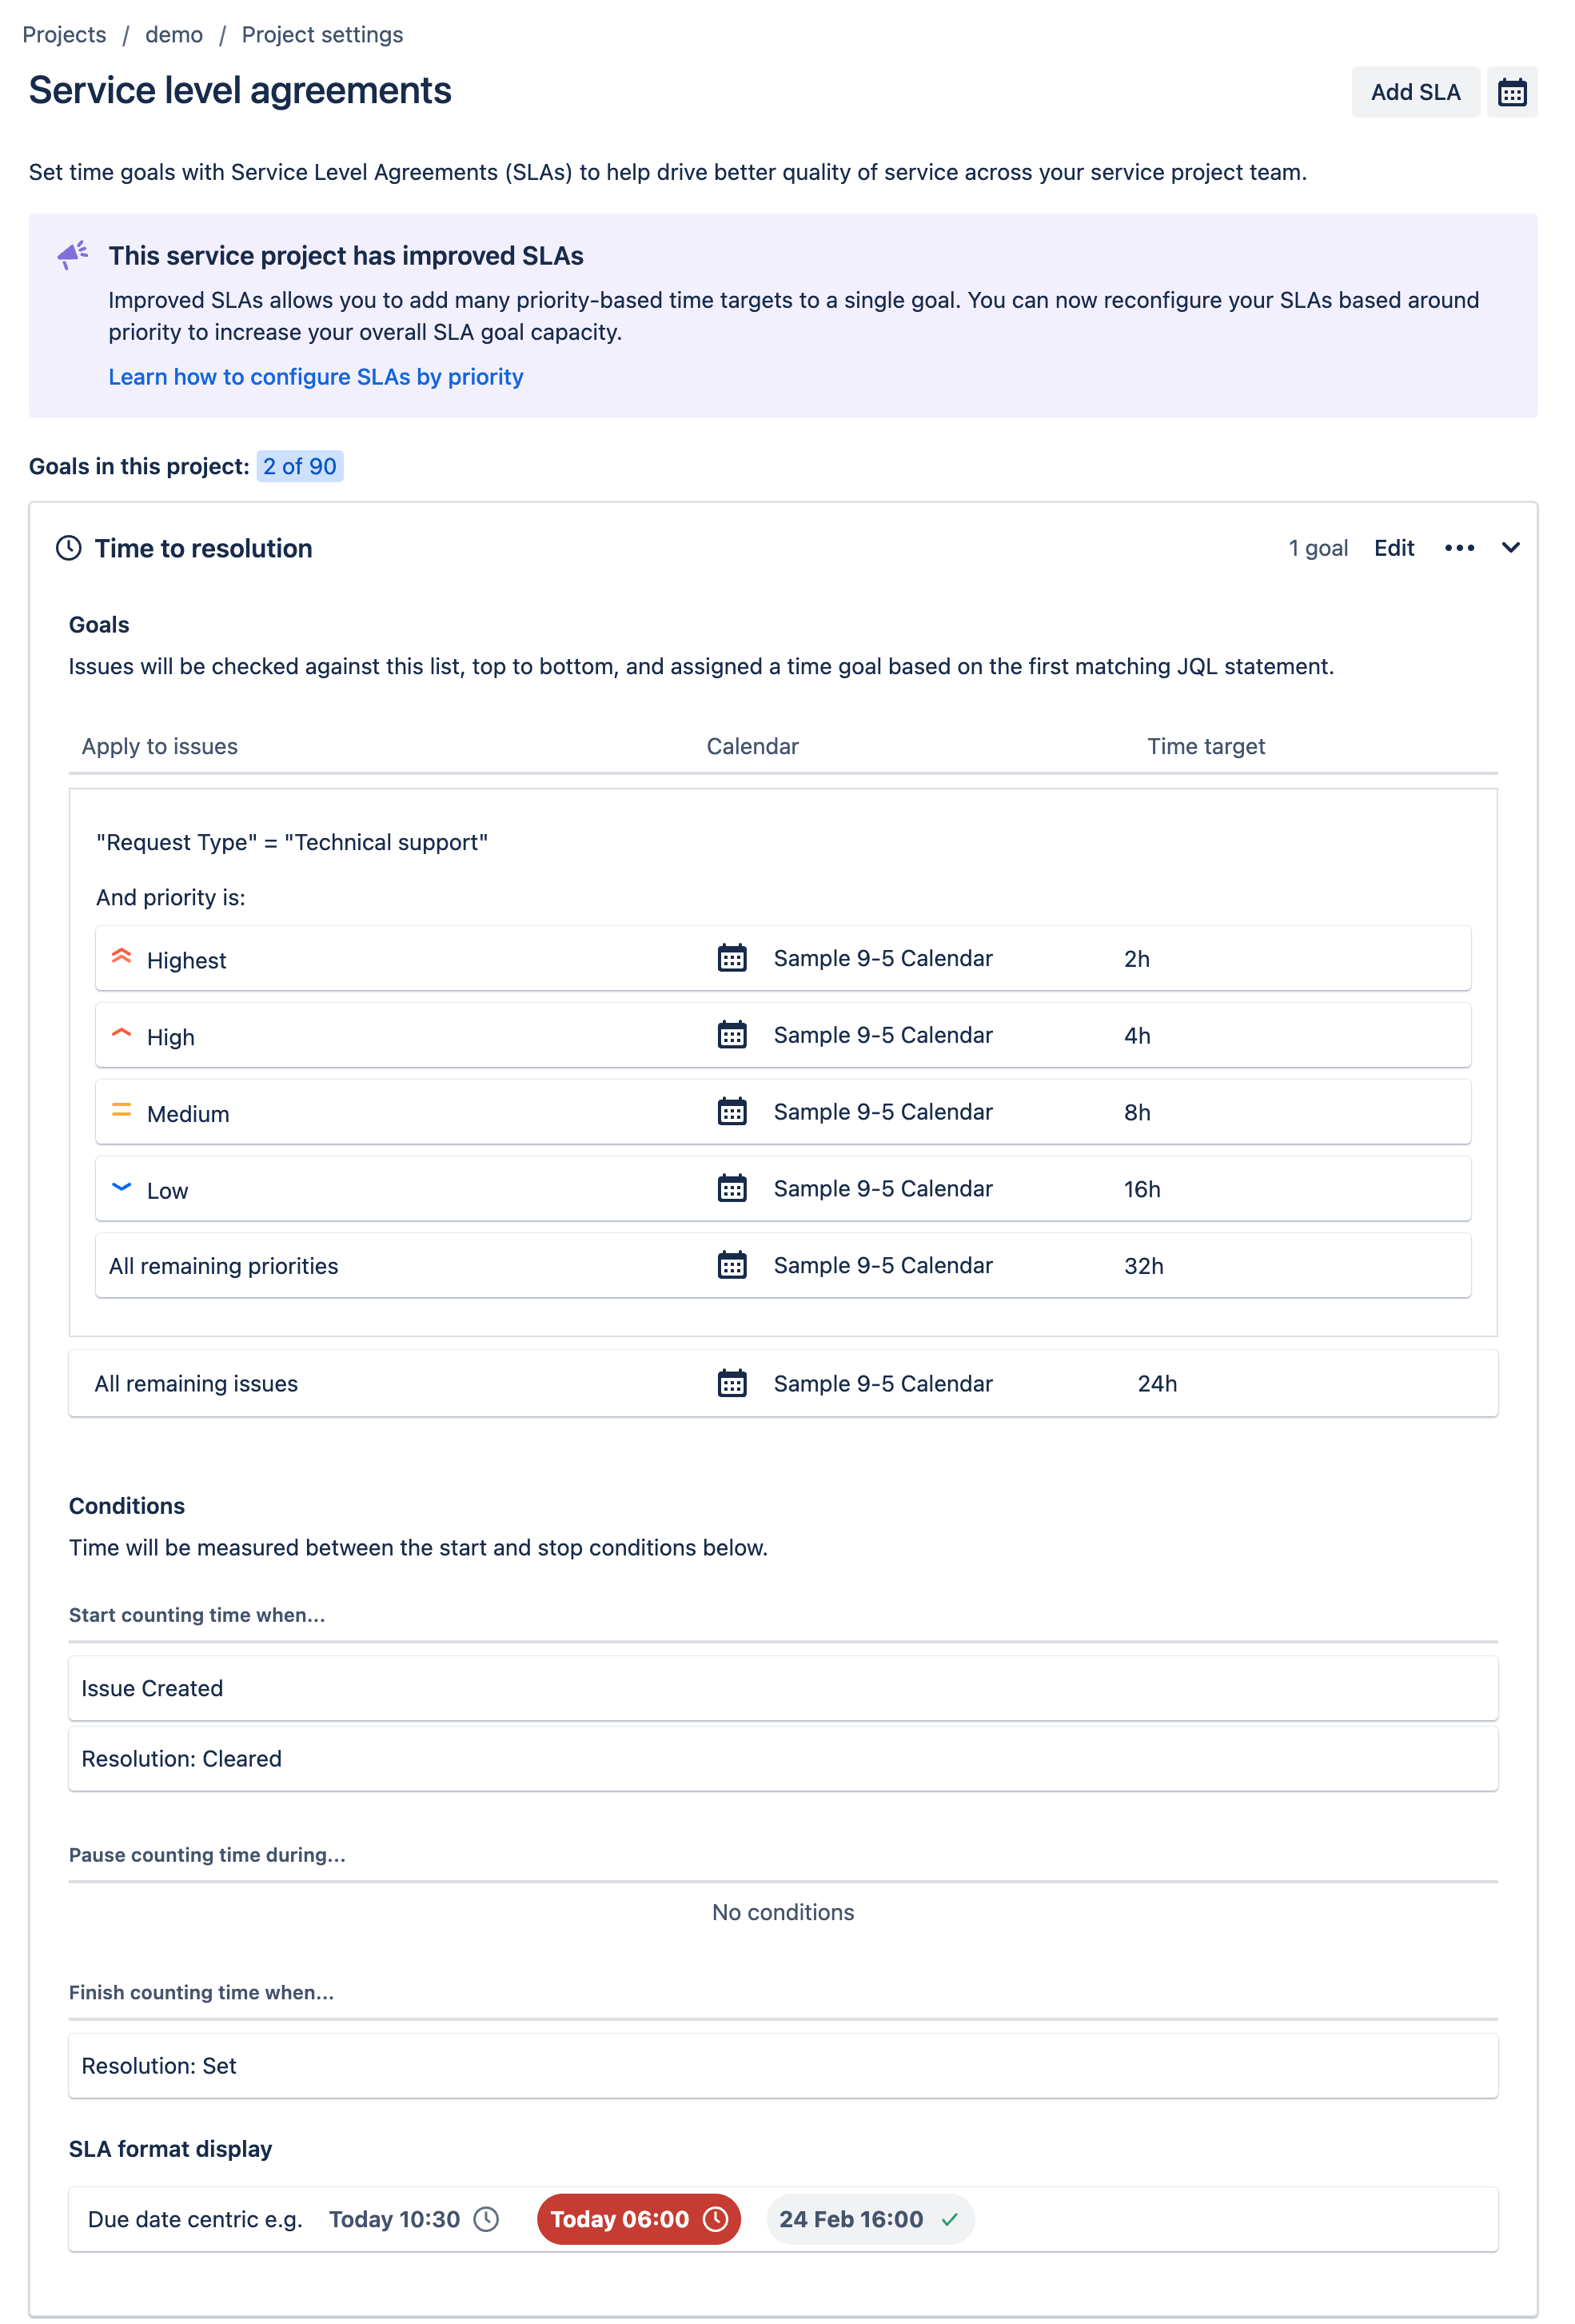
- Edit an existing SLA
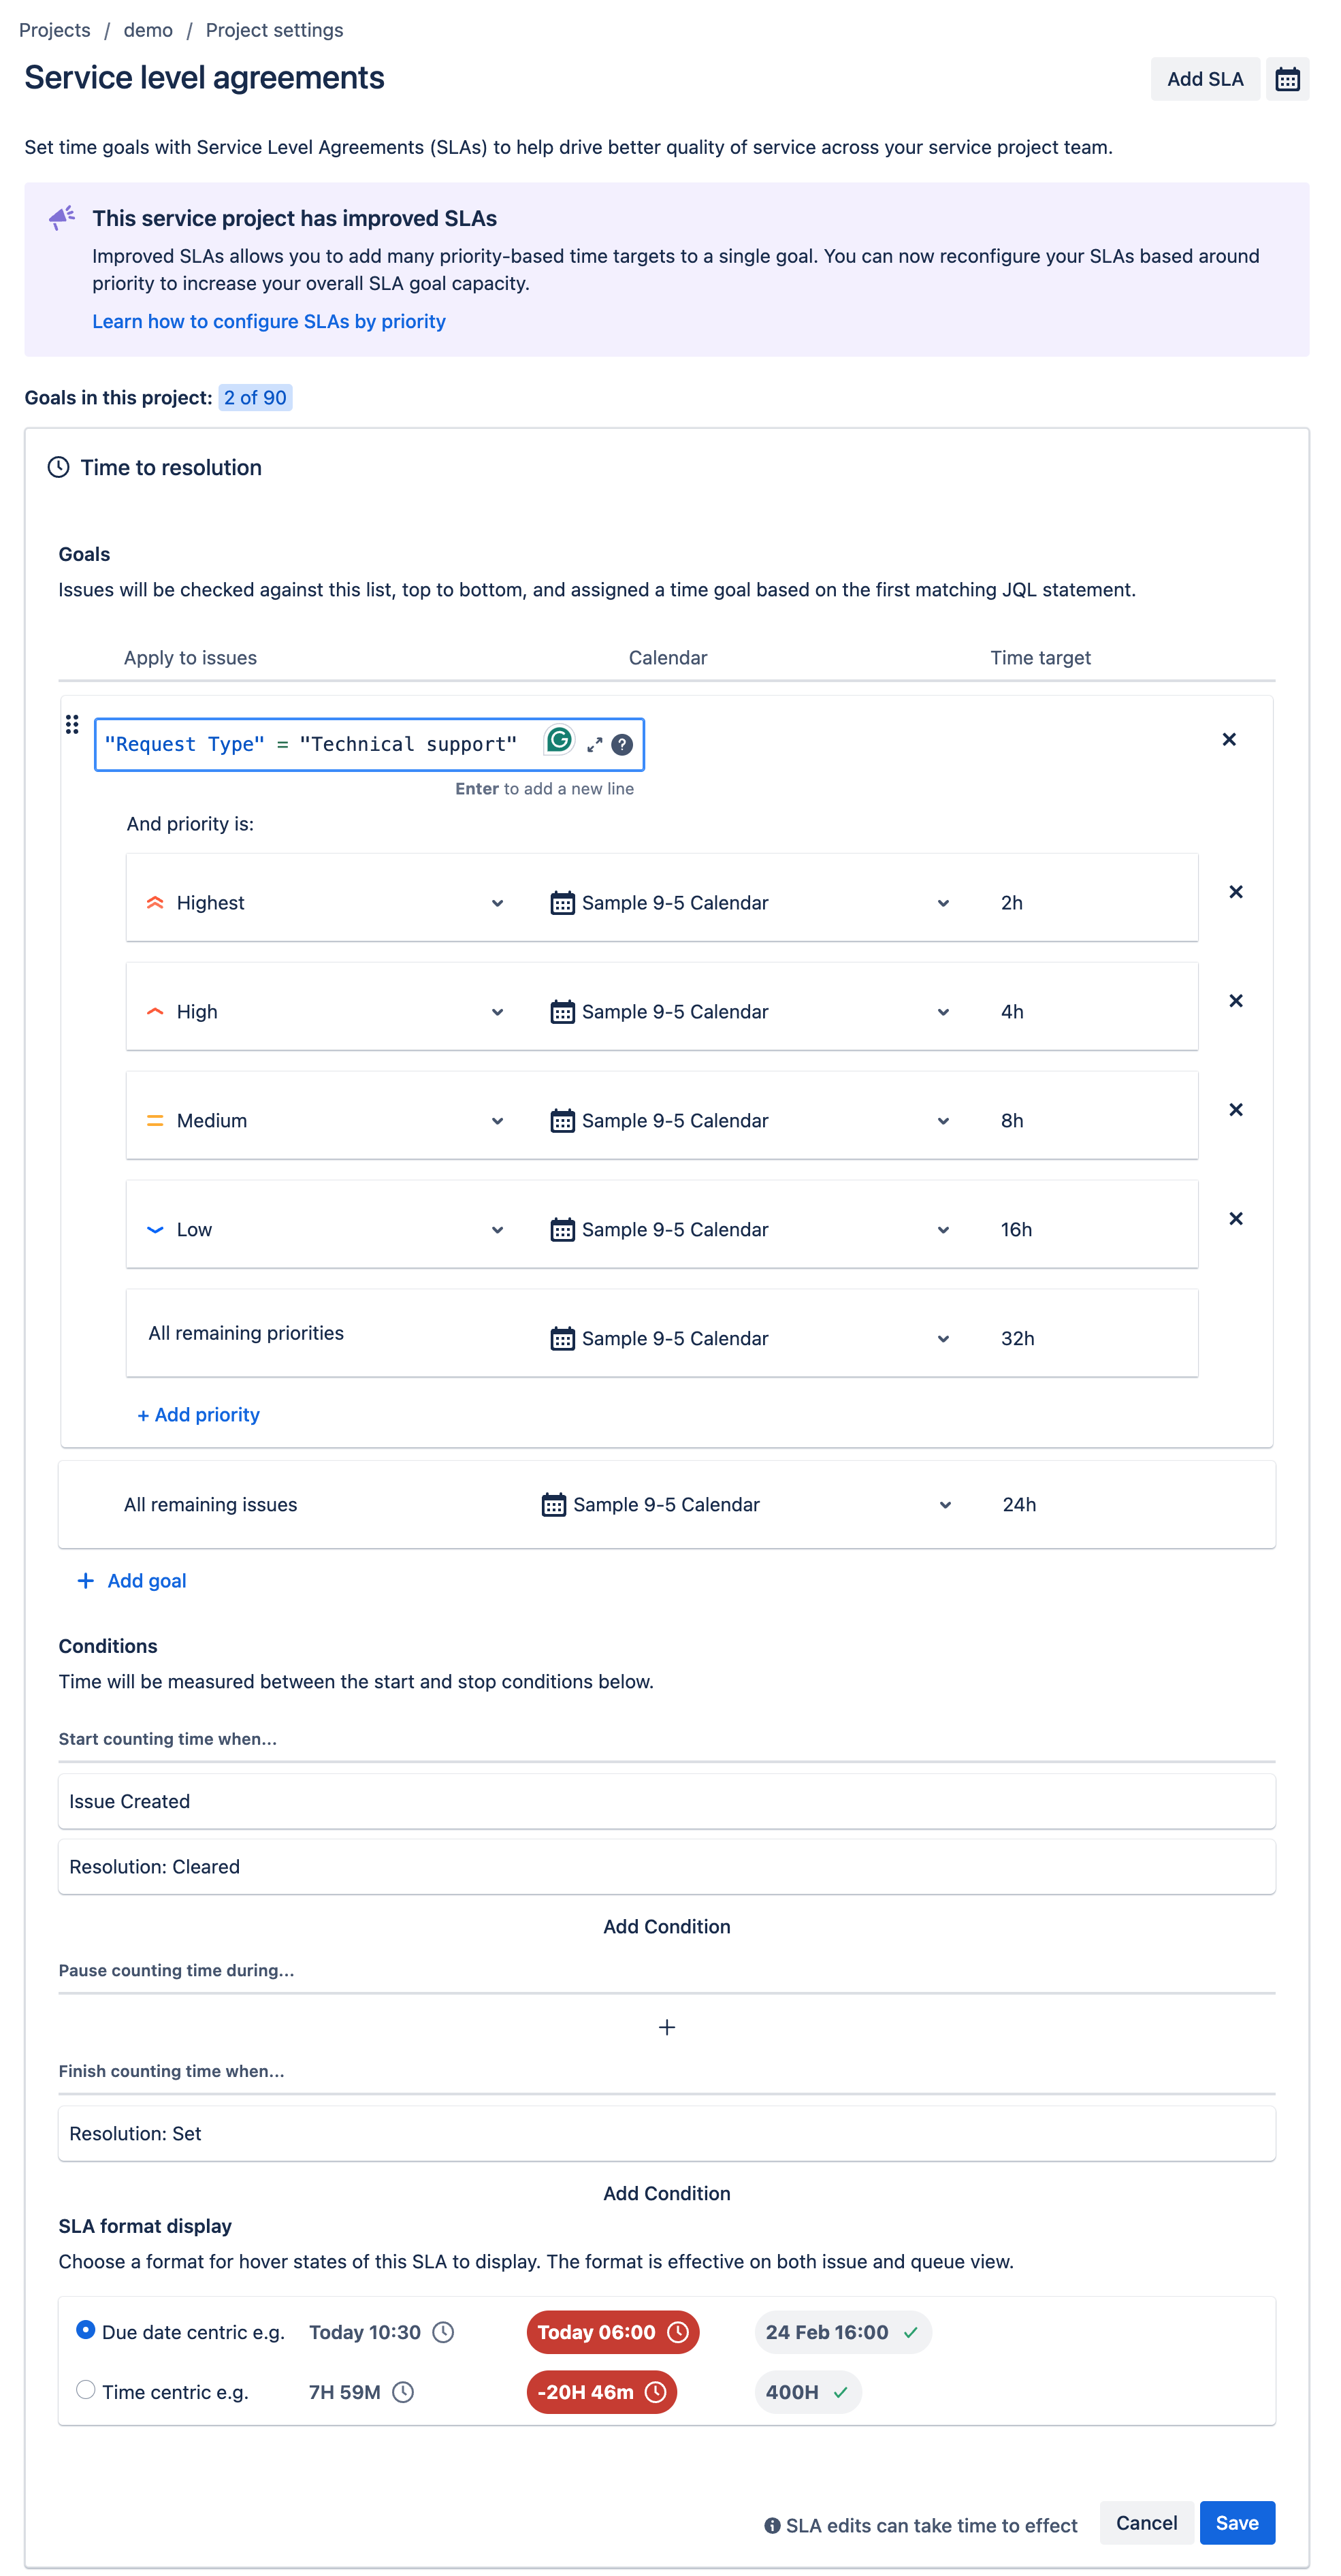
- Create a new SLA
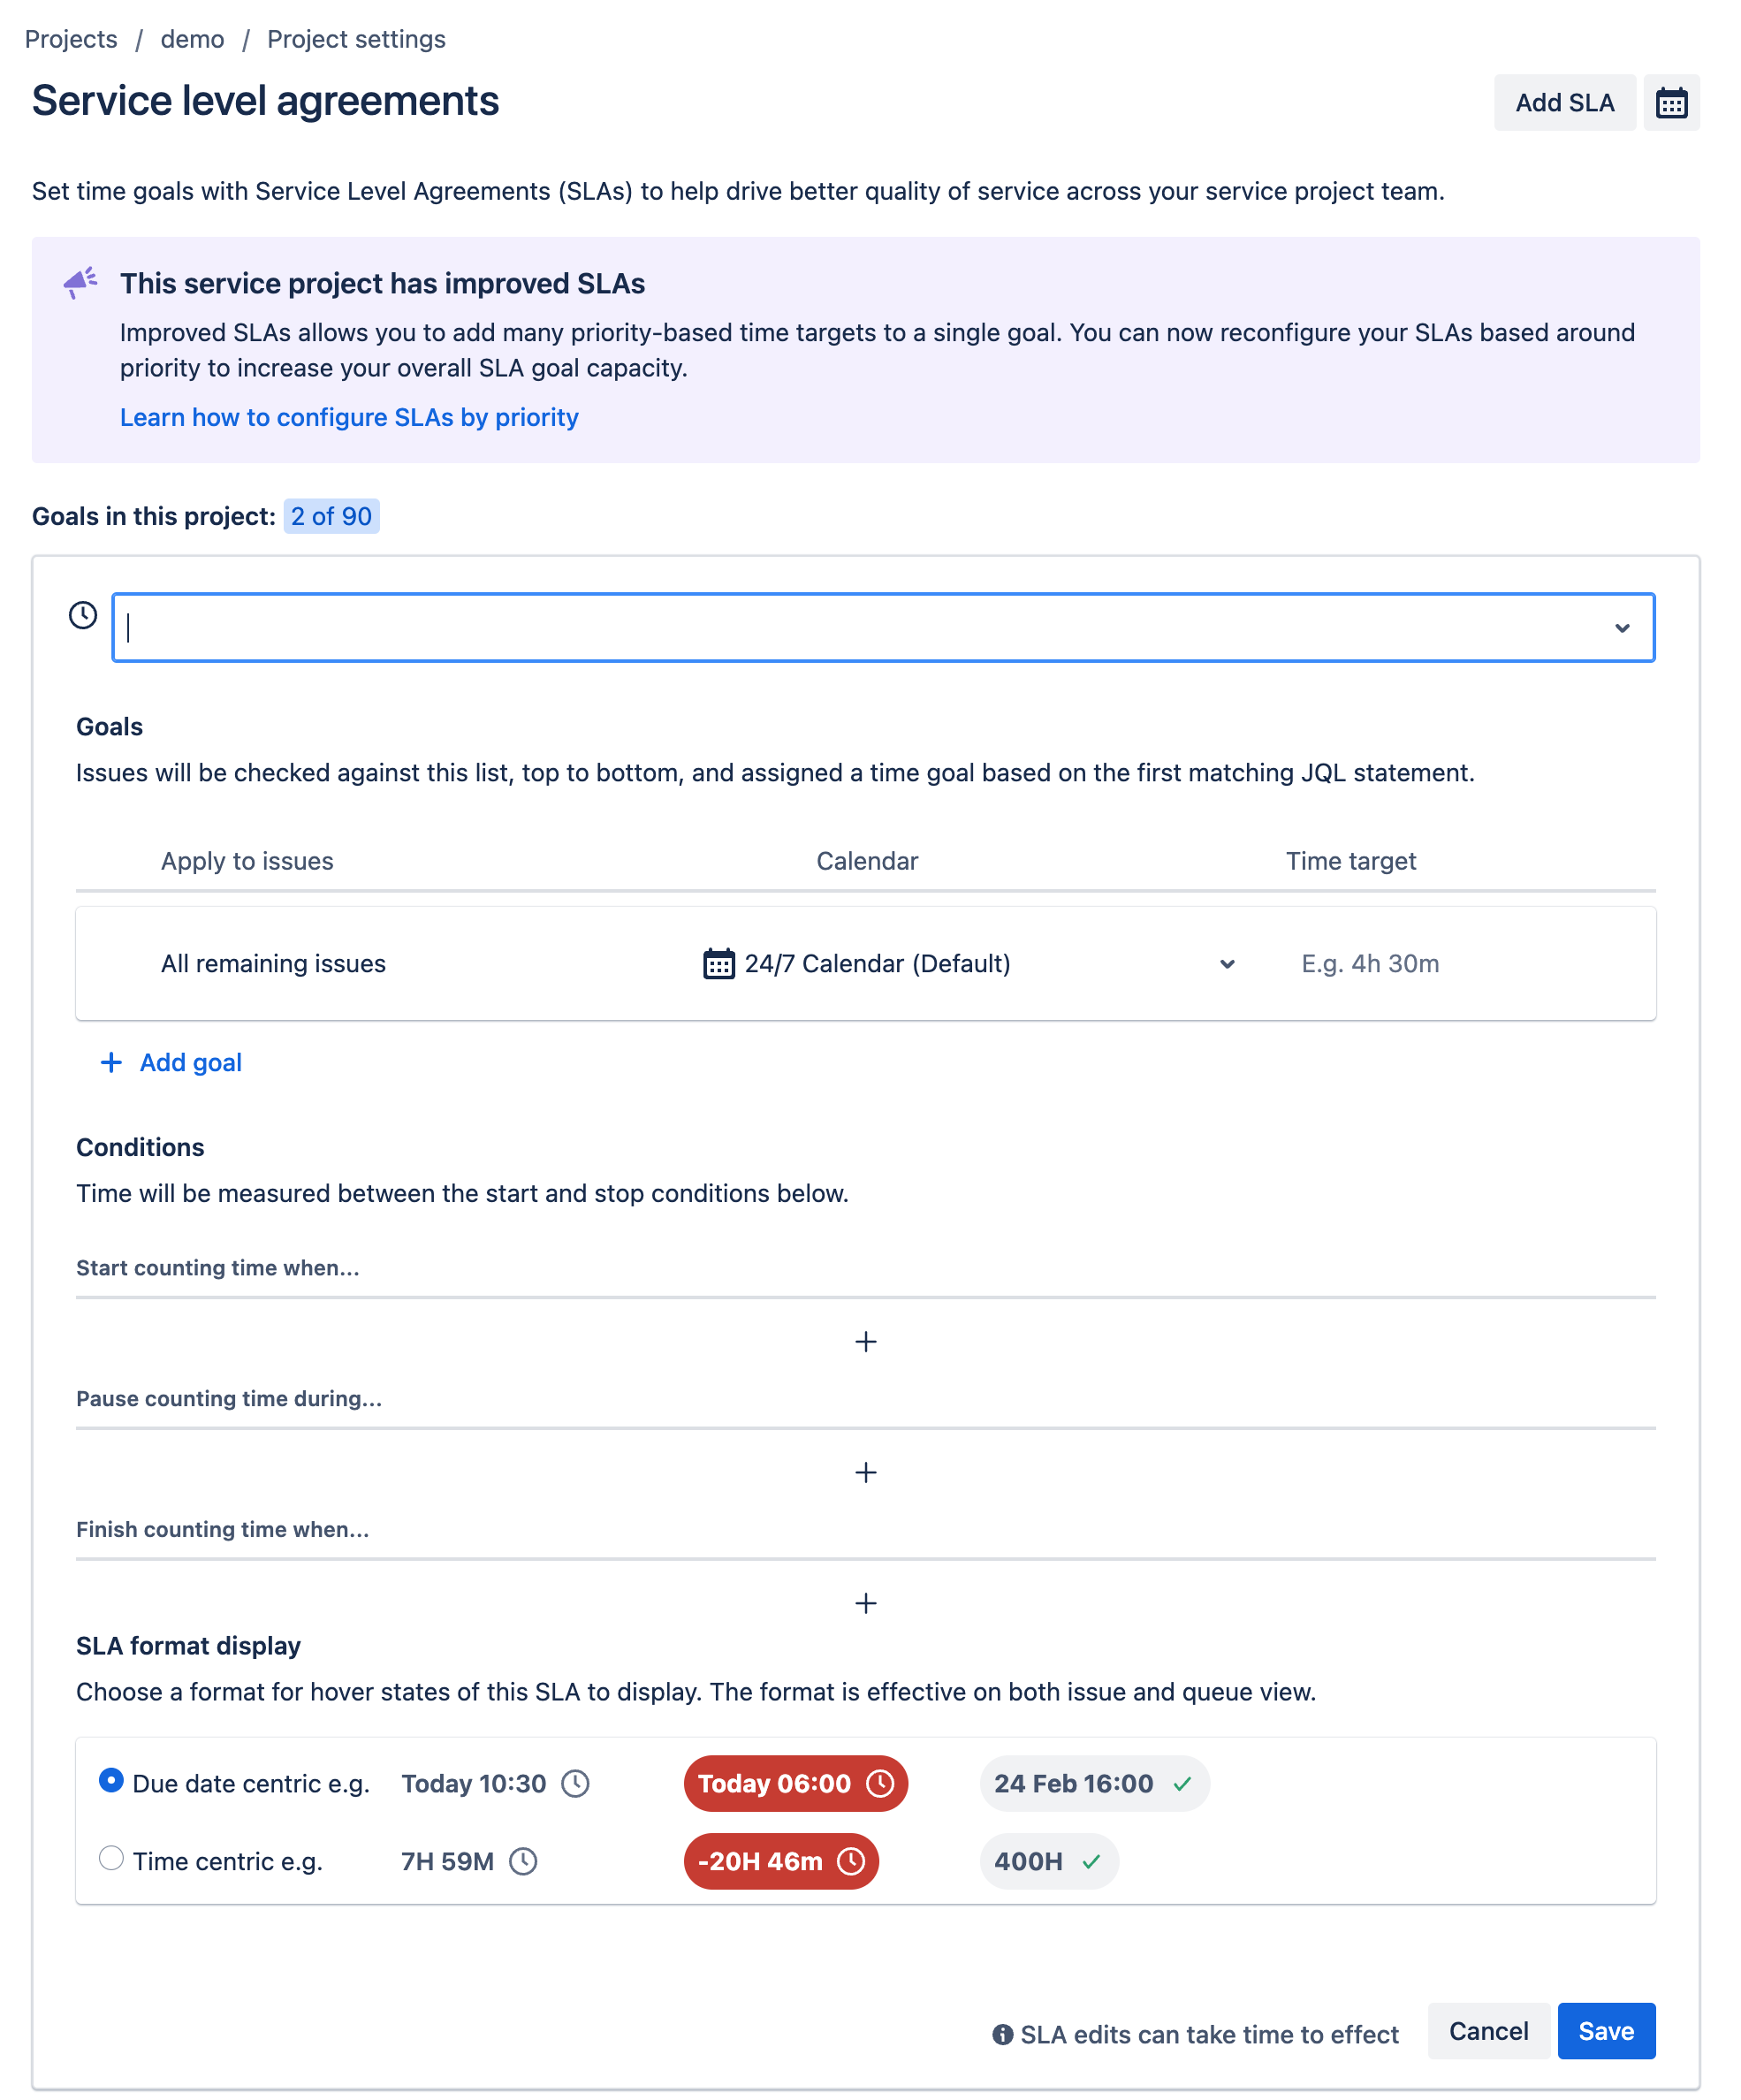
Note: The Premium and Enterprise plans come with additional SLAs as standard.
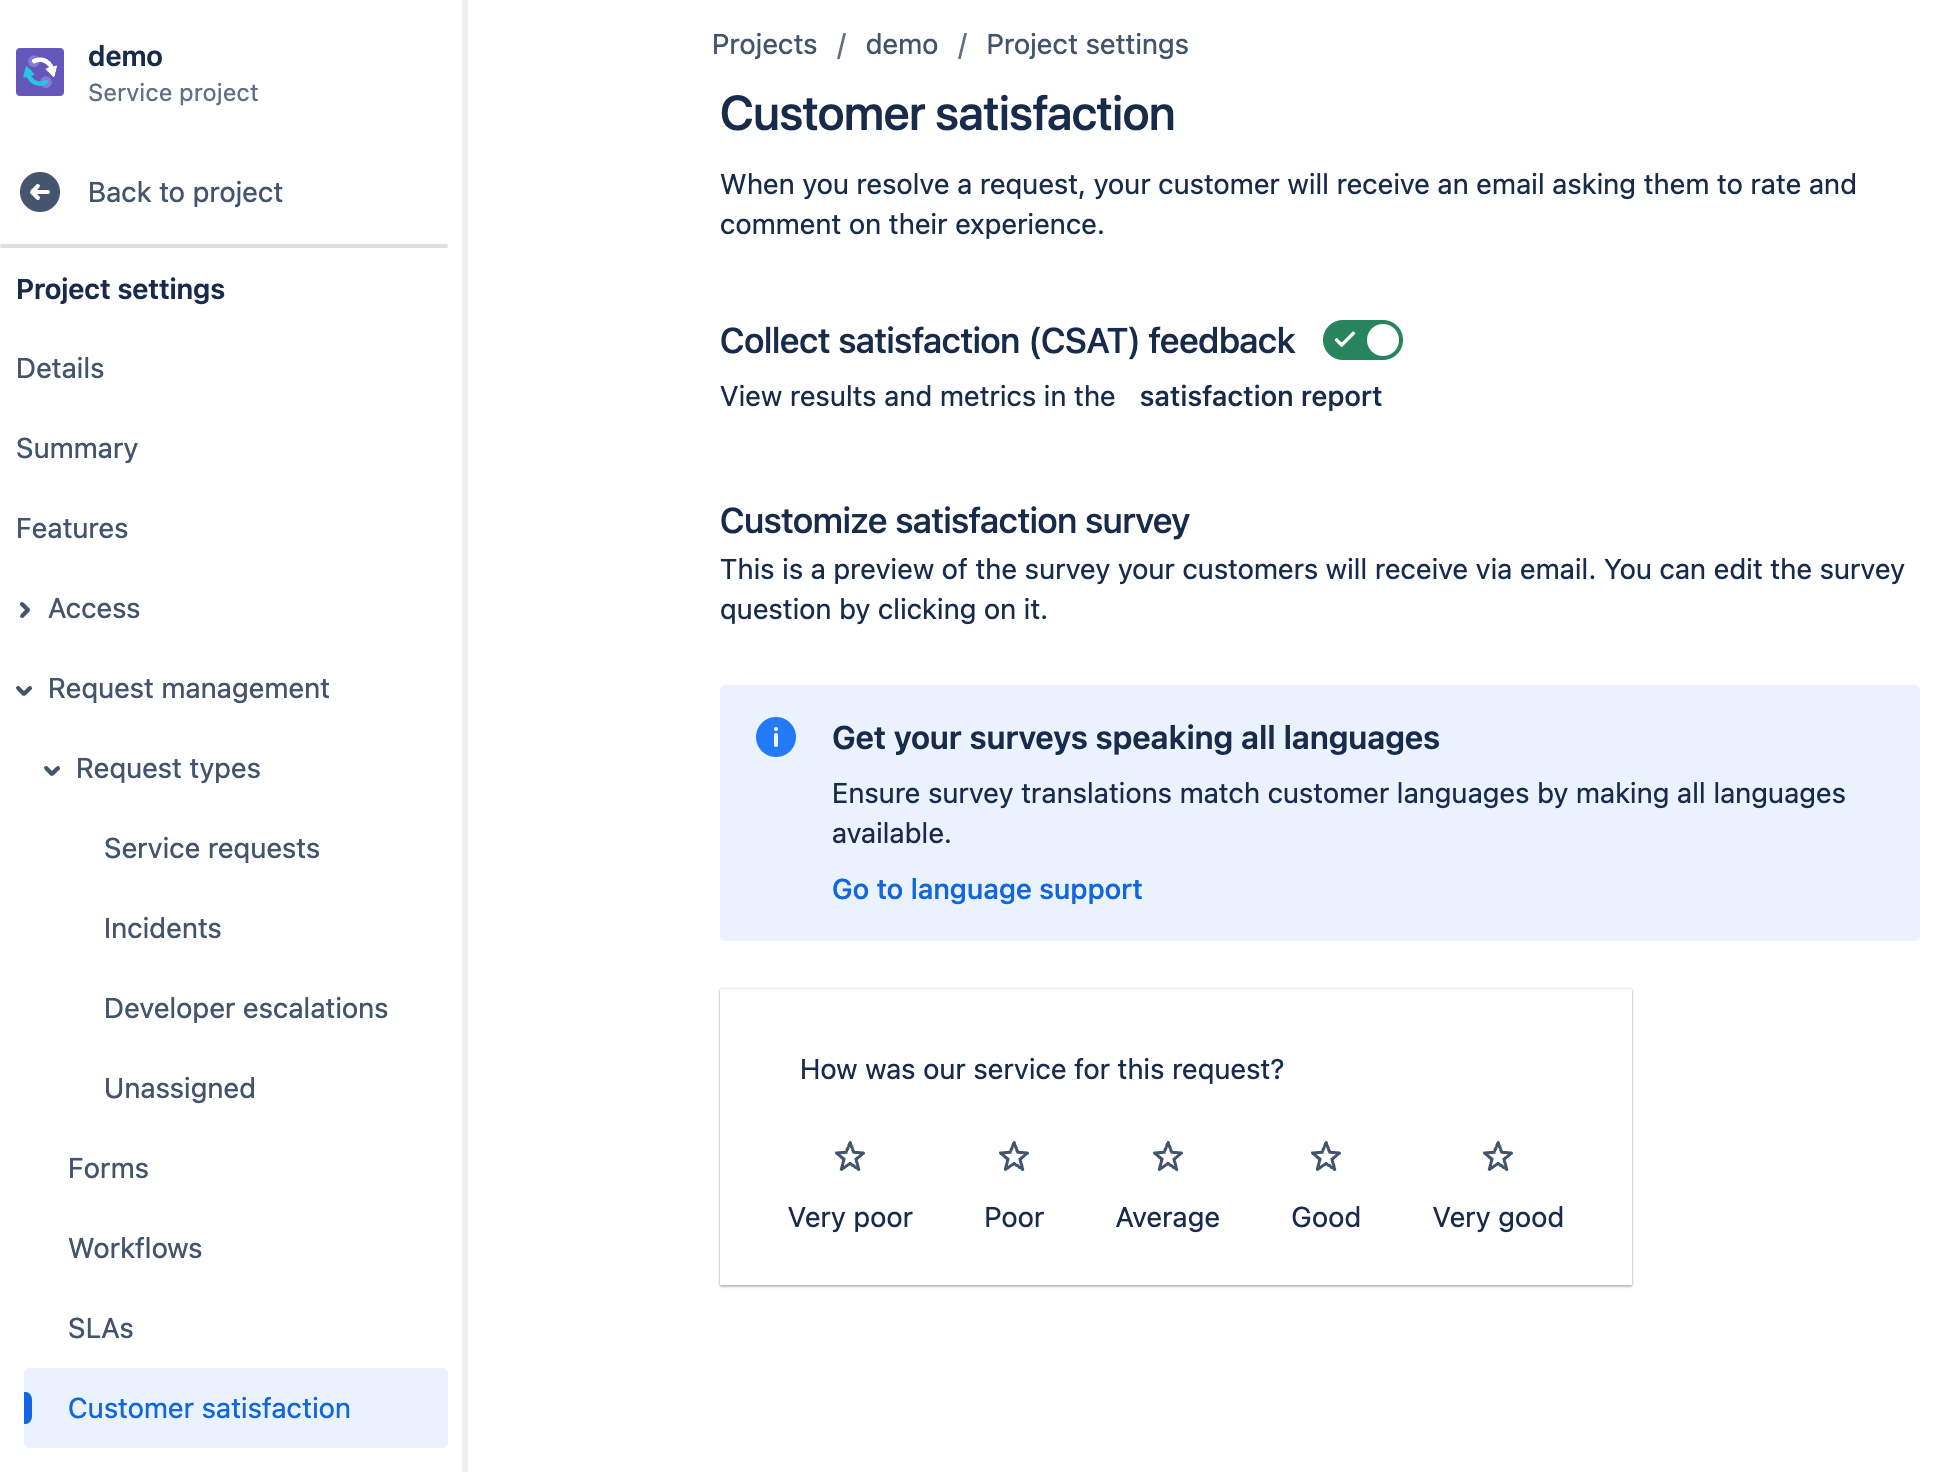
Customer satisfaction
The Customer satisfaction simply provides the ability to switch the capture of satisfaction, through an email sent once a request is closed, from the reporting user.
This functionality is switched on by default.
Capturing this information can be useful if you have Experience Level Agreements in place with your customers. If you are not familiar with XLAs I have a short series of articles that explain what they are and how they can be used XLAs.
Issue types
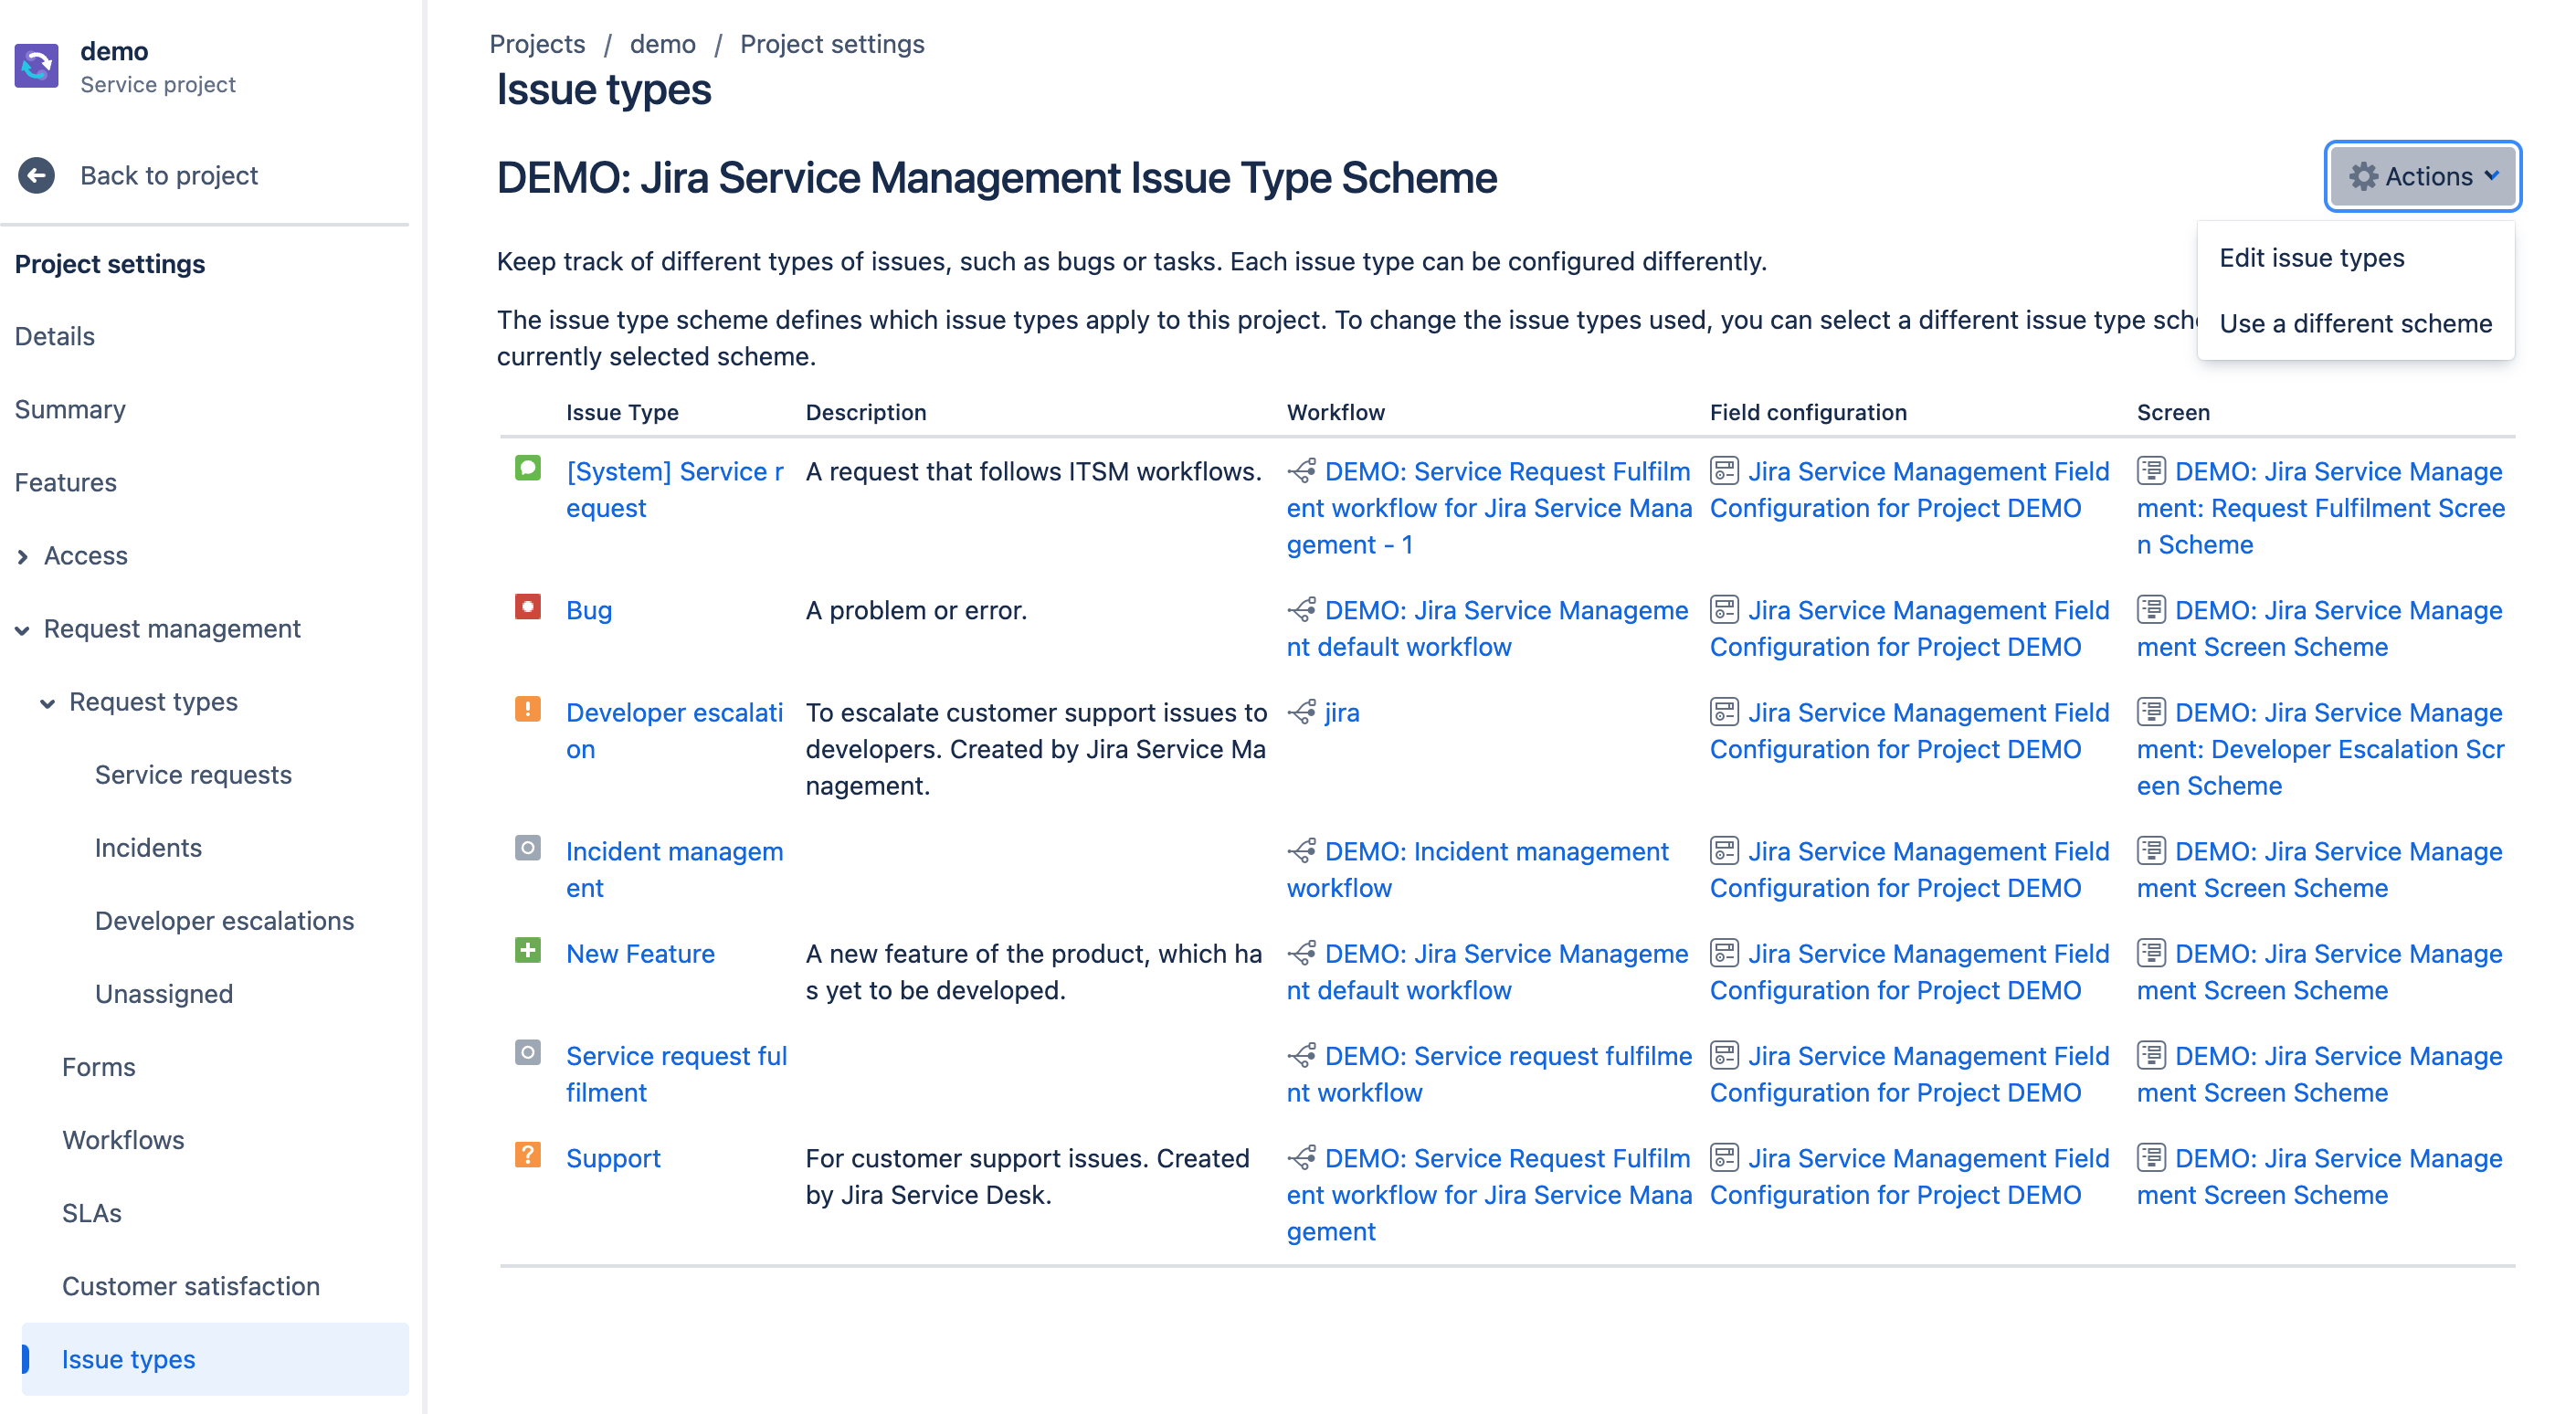
The Issue types screen lists all of the types of issues that you have configured in your JSM project. This view shows the following for each configured type
Name
Description
Workflow
Field configuration
Screen
The last three are all links that will take you to other areas of Project settings where you can amend the configurations as required.
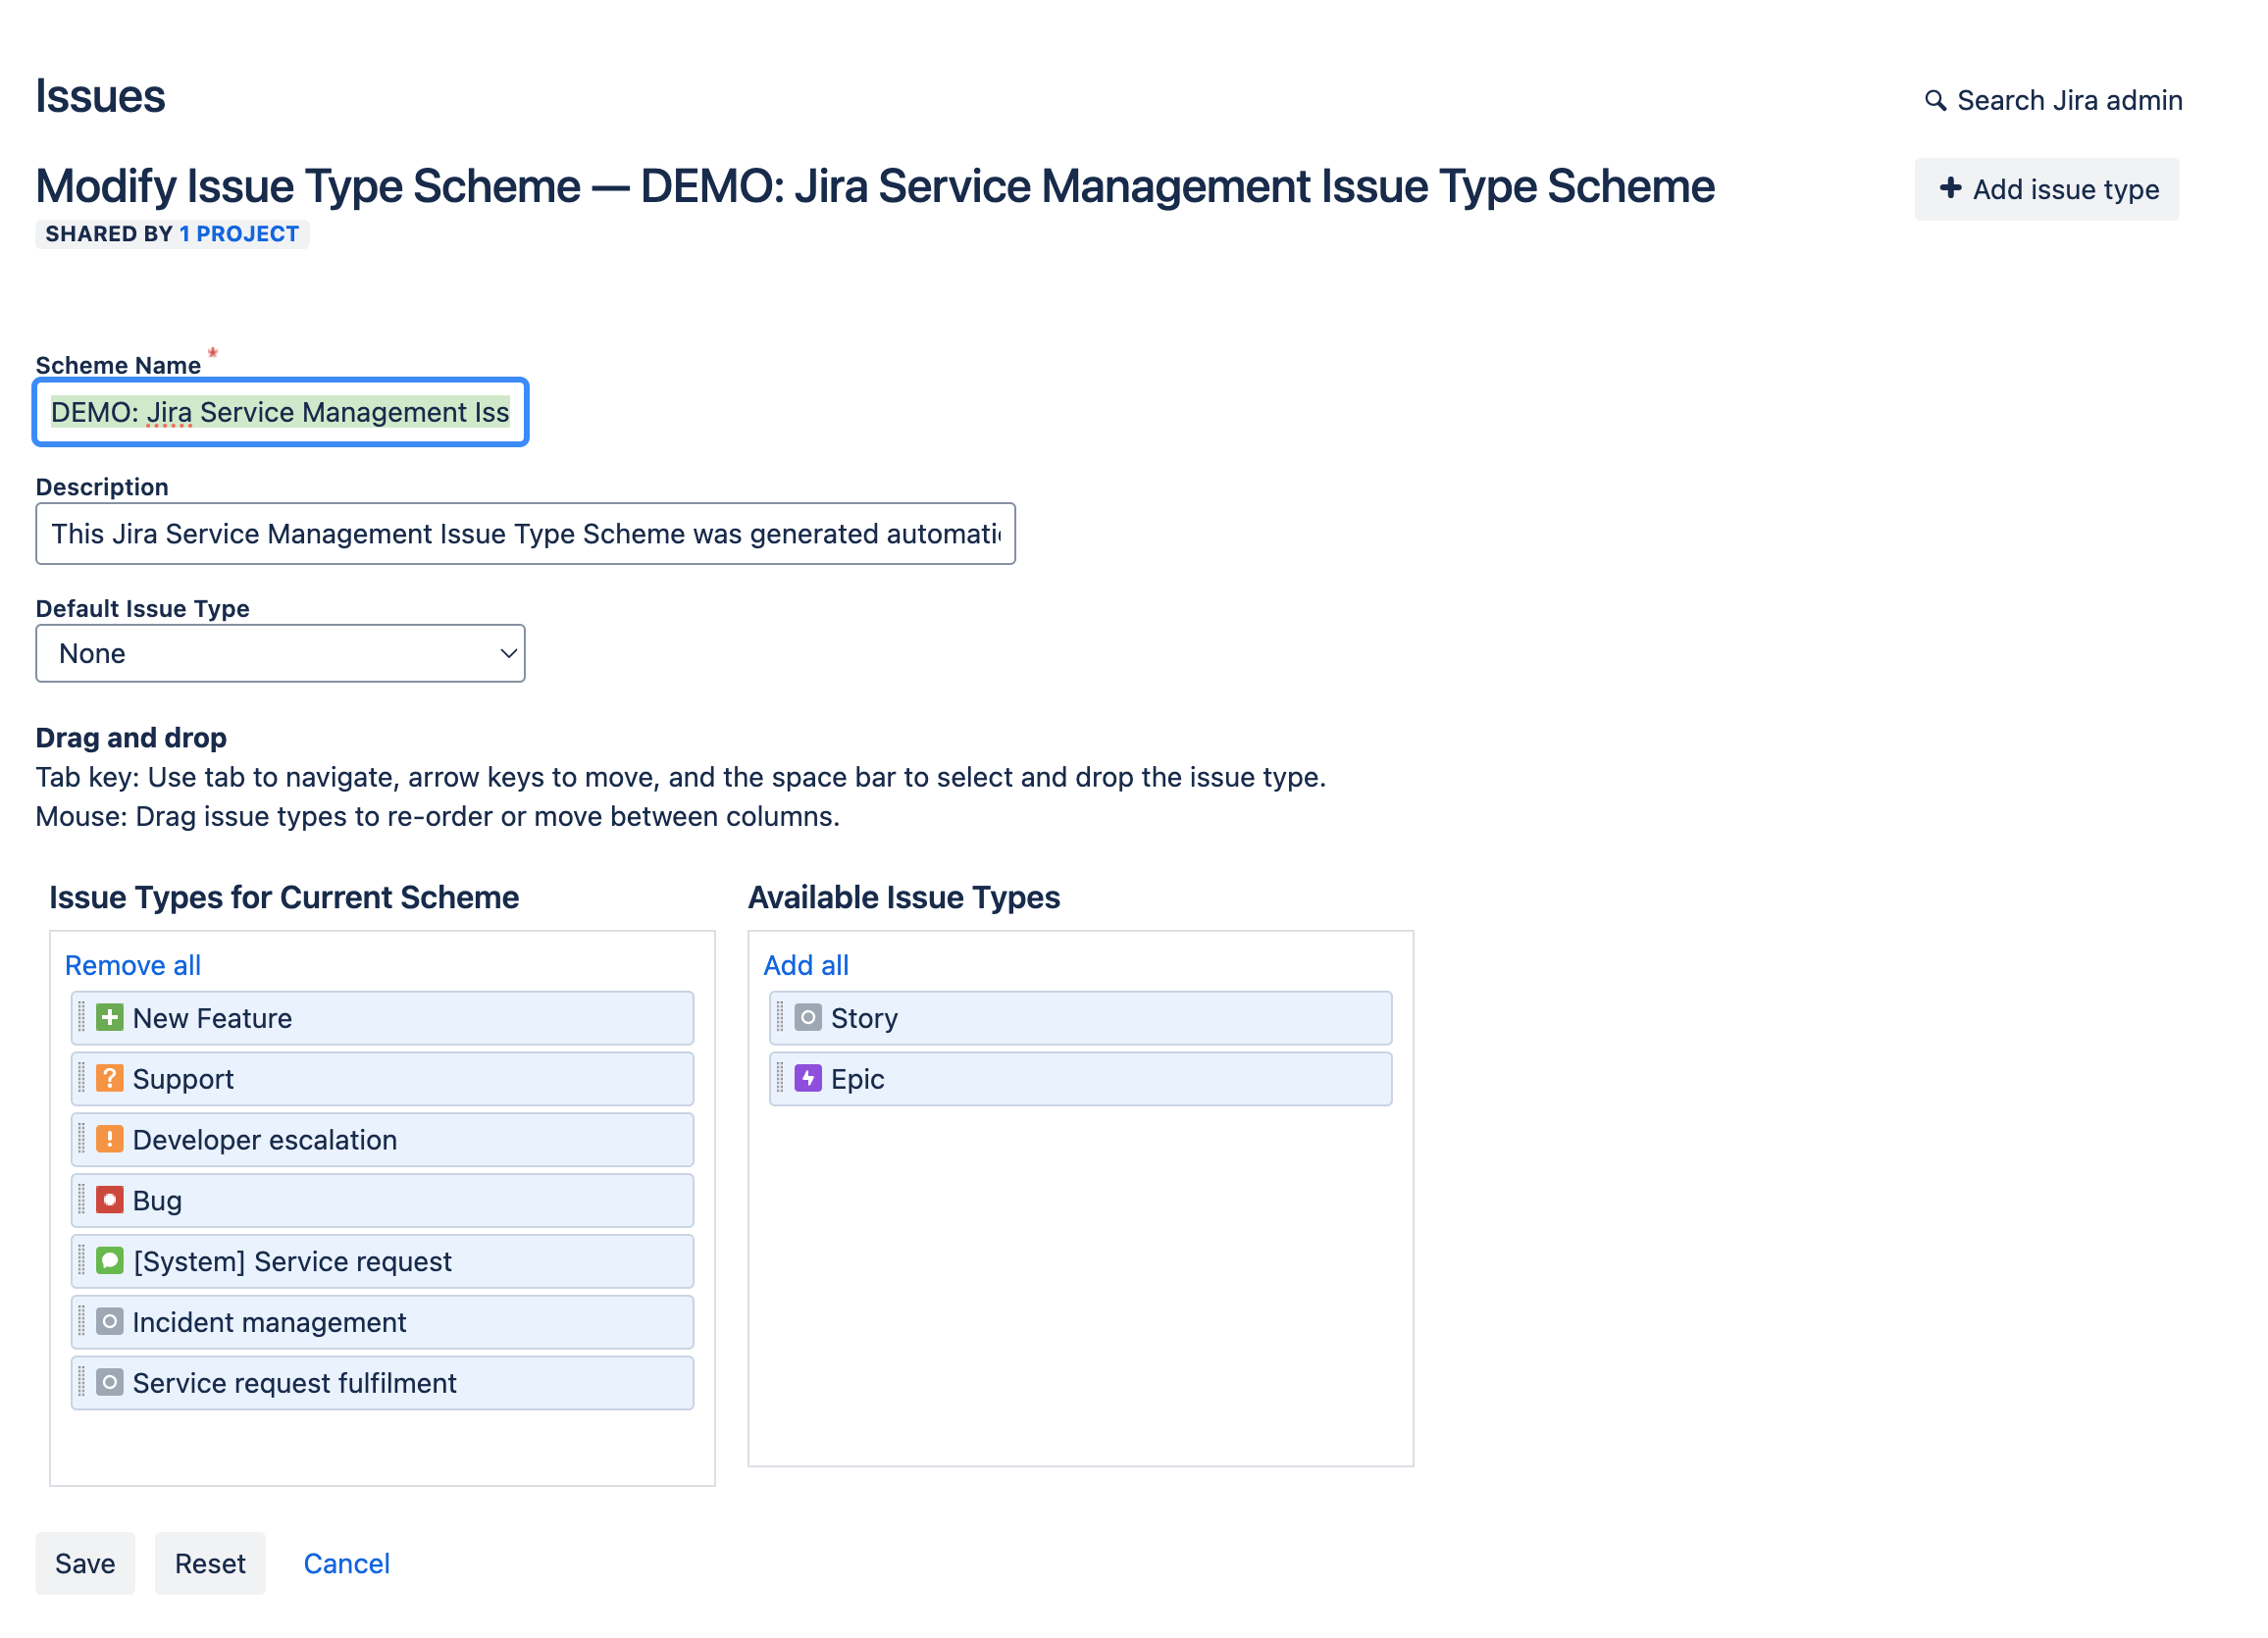
You can, through the Actions button, edit the available issues, through the following screen, or add new issue types. You are also able to
Change the scheme name
Update the description to be more meaningful
Add a default issue type, so that any issues raised without an assigned issue type will follow a common pattern
Fields
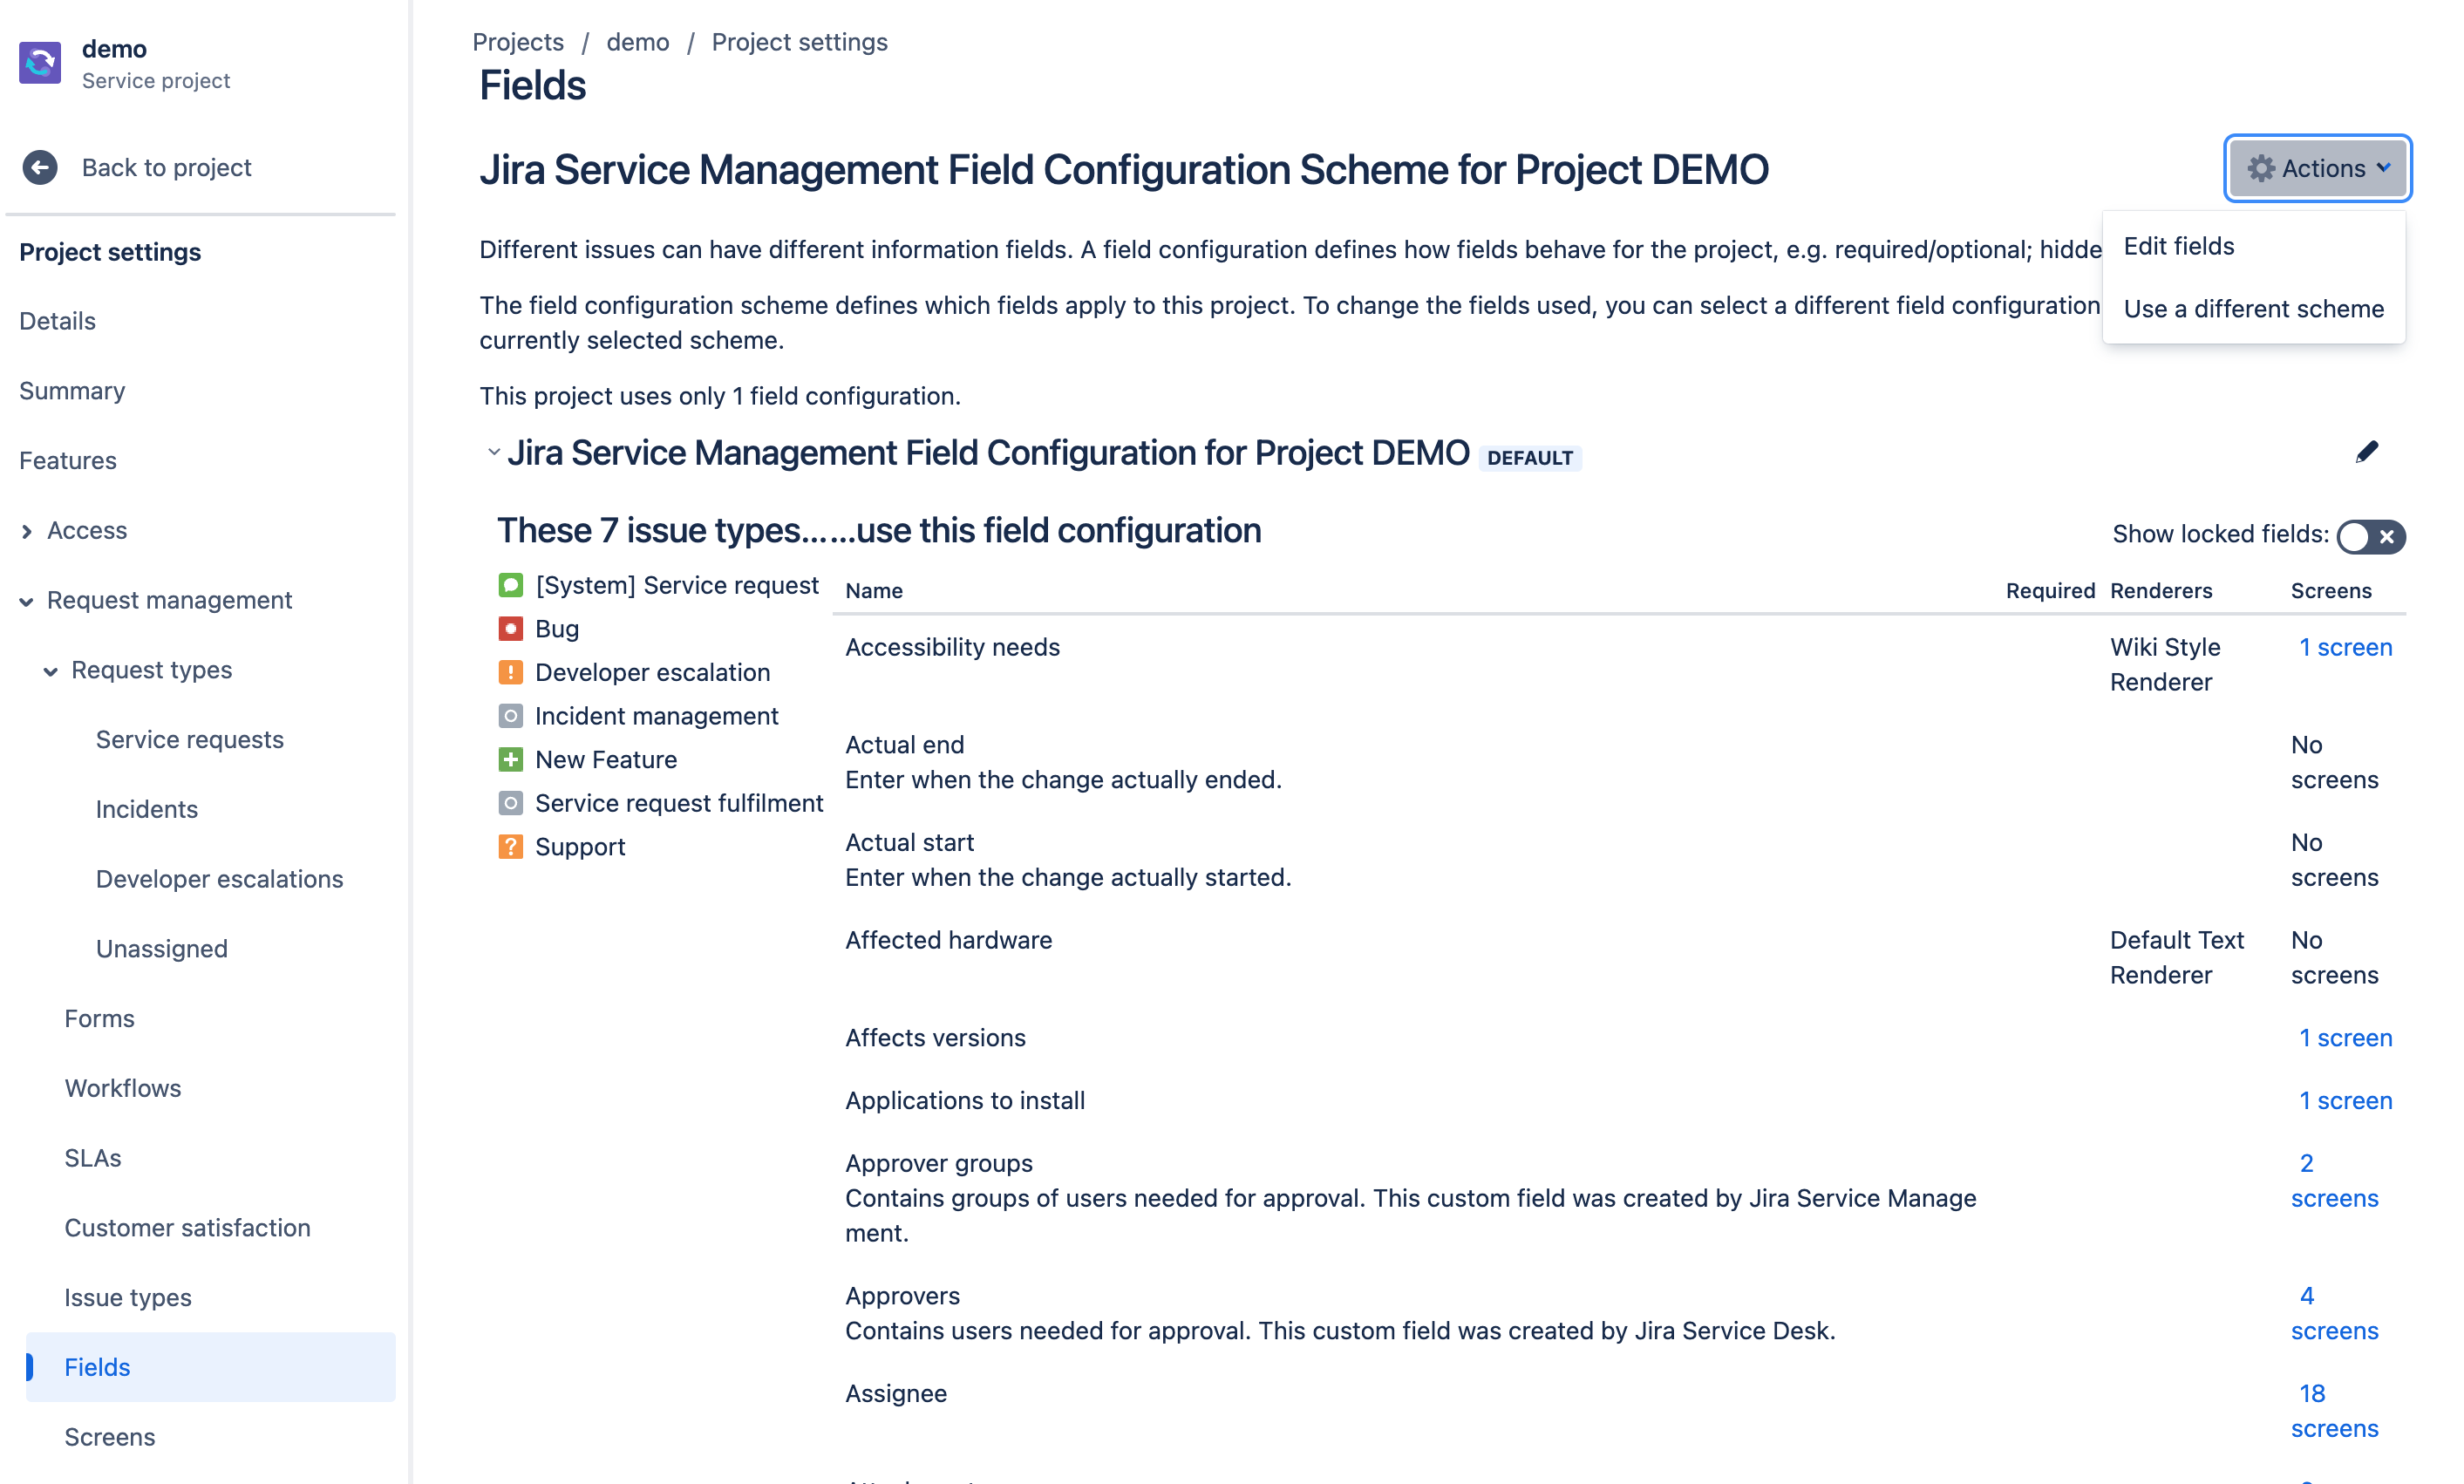
The Fields screen shows all of the fields that are available in the schema for your JSM project. From the screen you can
See which screens use each field, this is listed under the Screens column
Edit fields or Use a different scheme, selected from the Actions drop-down menu
Note: depending on the field, you may only be able to edit its description field.
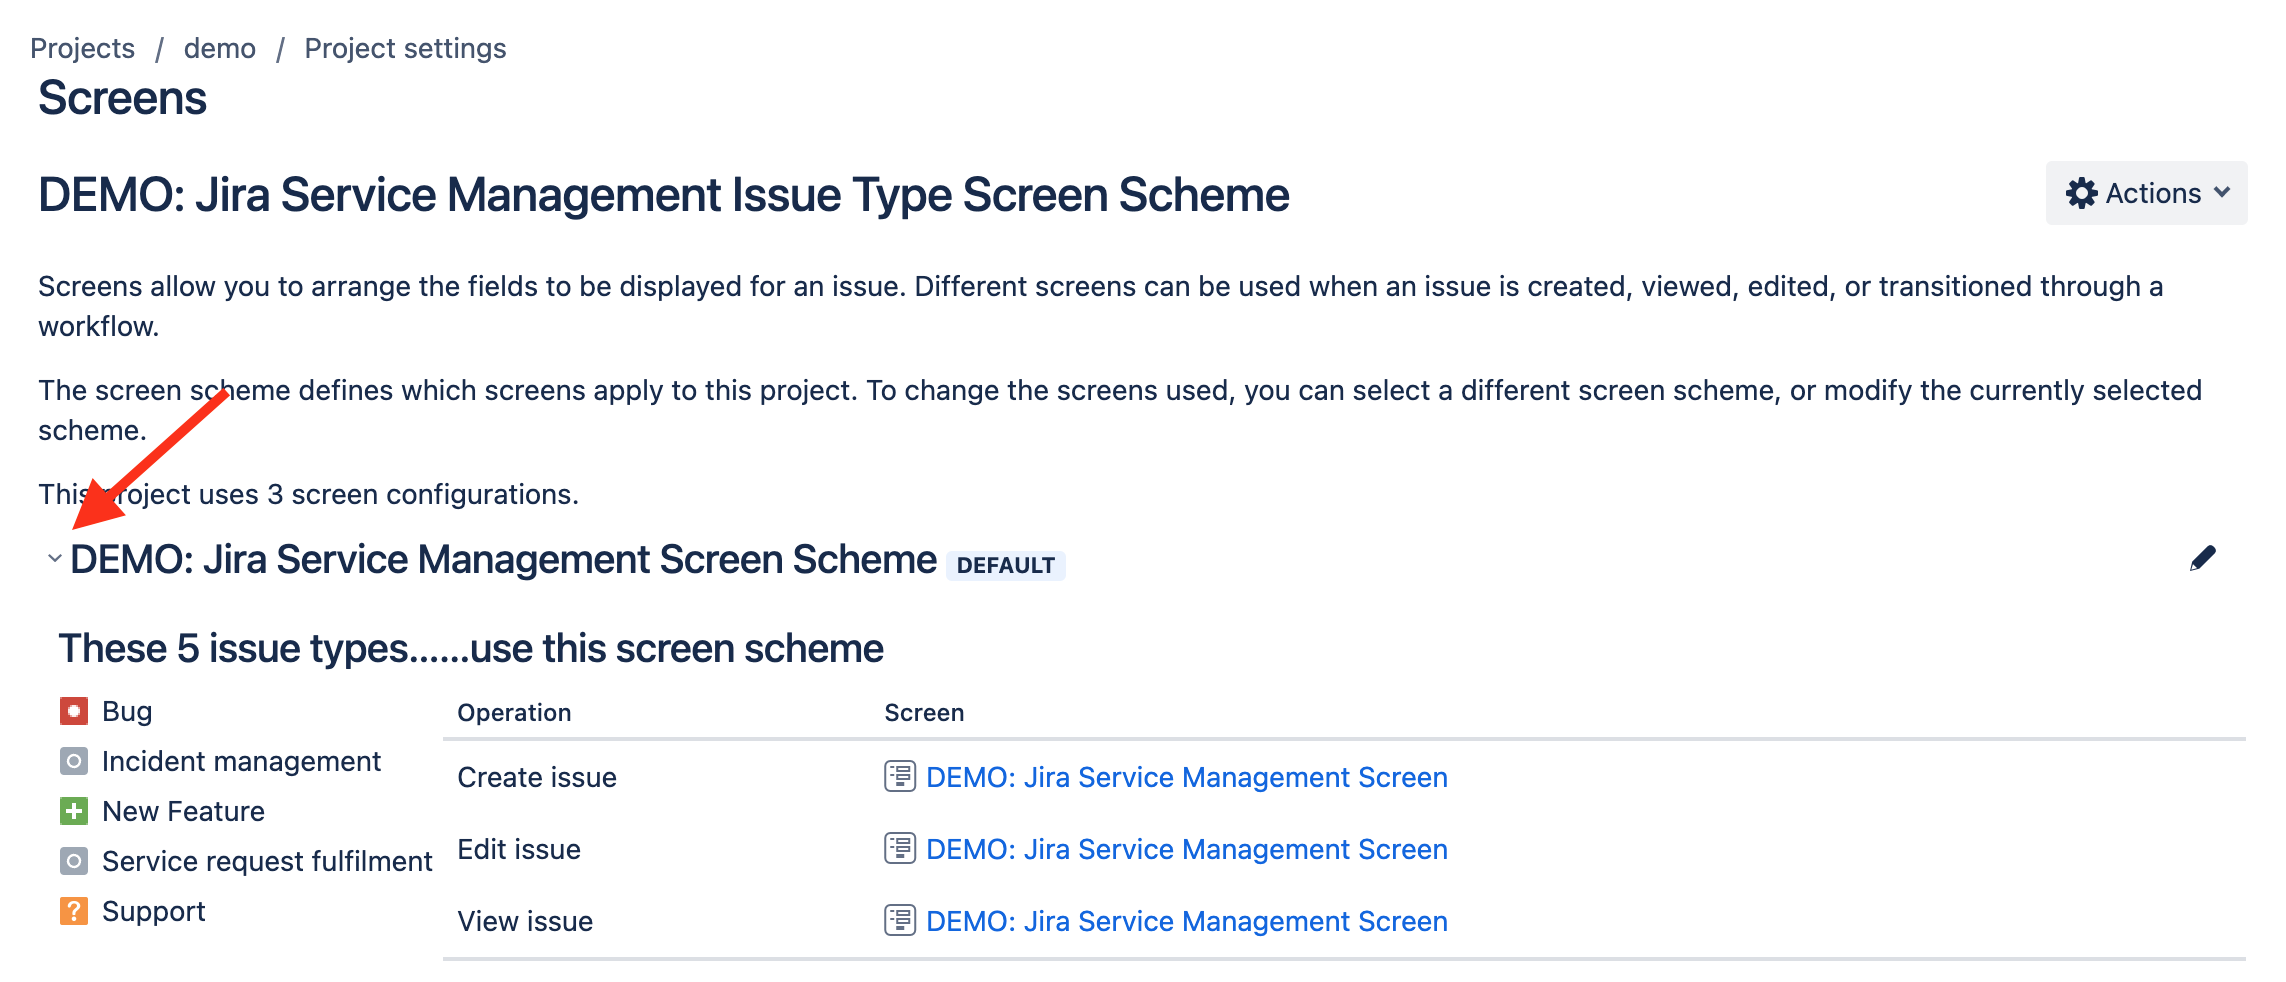
Screens
The Screens view, shown below, lists the screen schemes (layouts) that are active in your JSM project. You can edit the screen scheme by either selecting Actions -> Edit screens or by clicking on the pencil icon next to each listing.
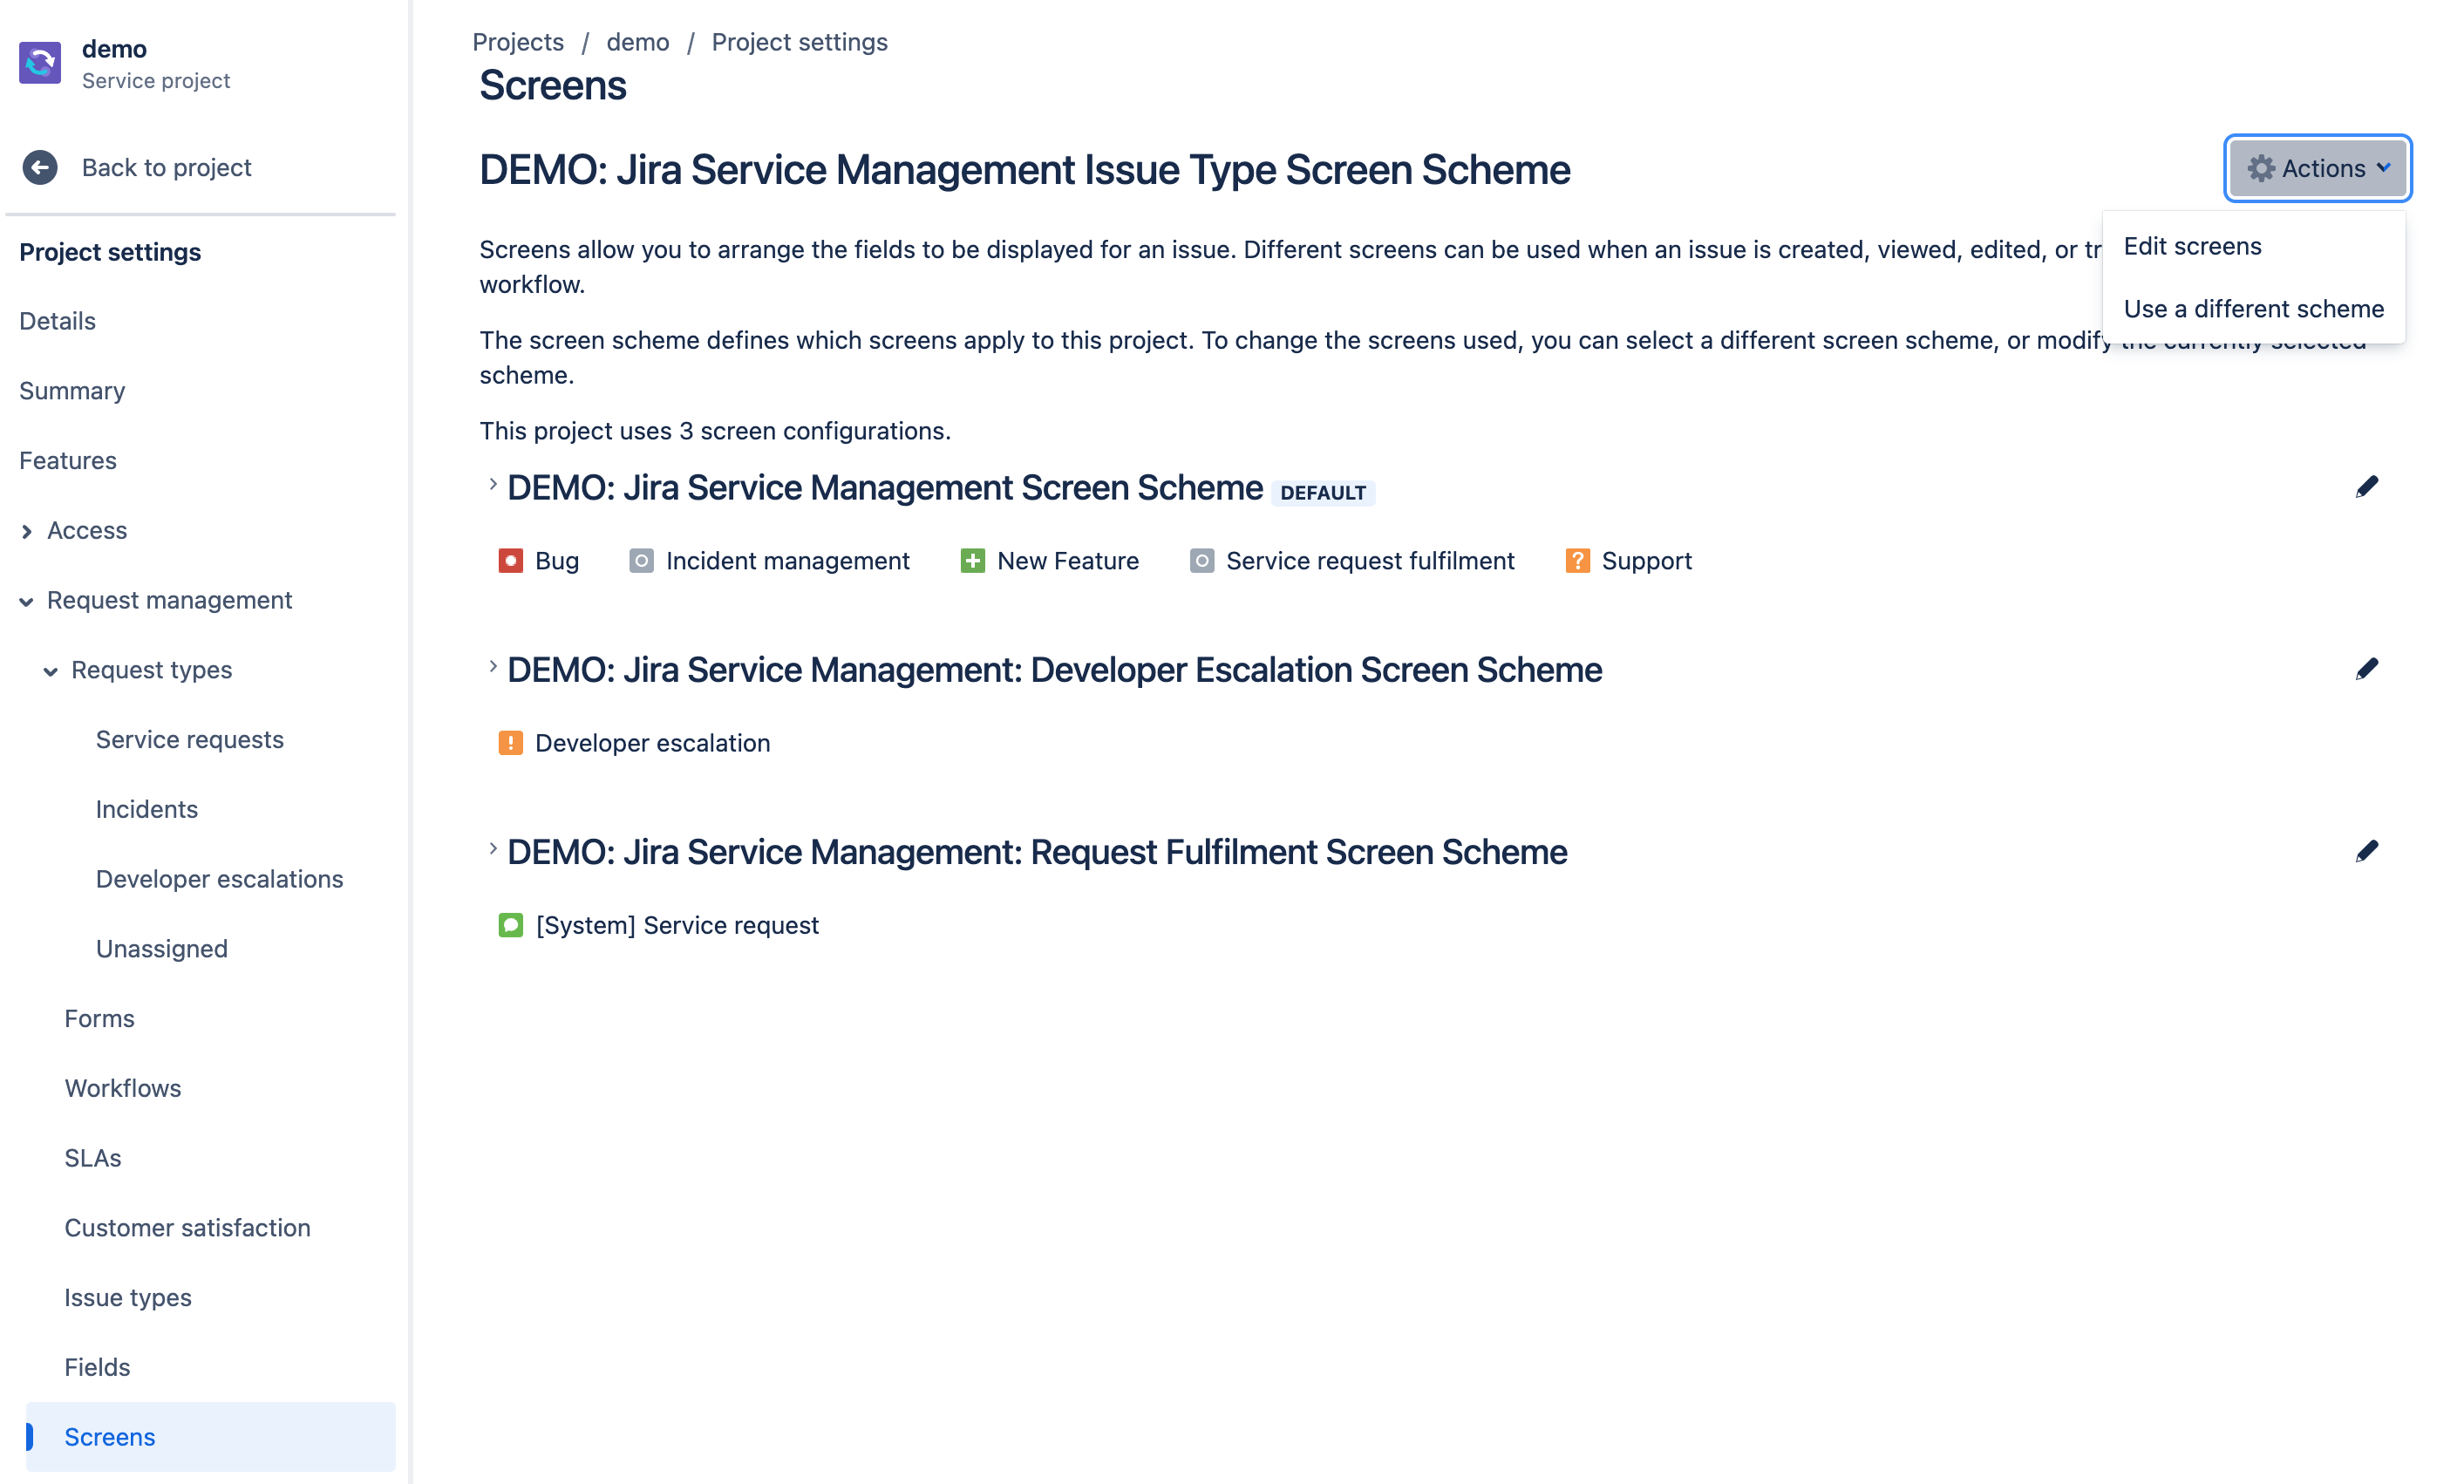
If you expand one of the screen schemes, by clicking on the arrow shown below, the view expands to show a list of the Create, Edit and View screens associated with the screen scheme.
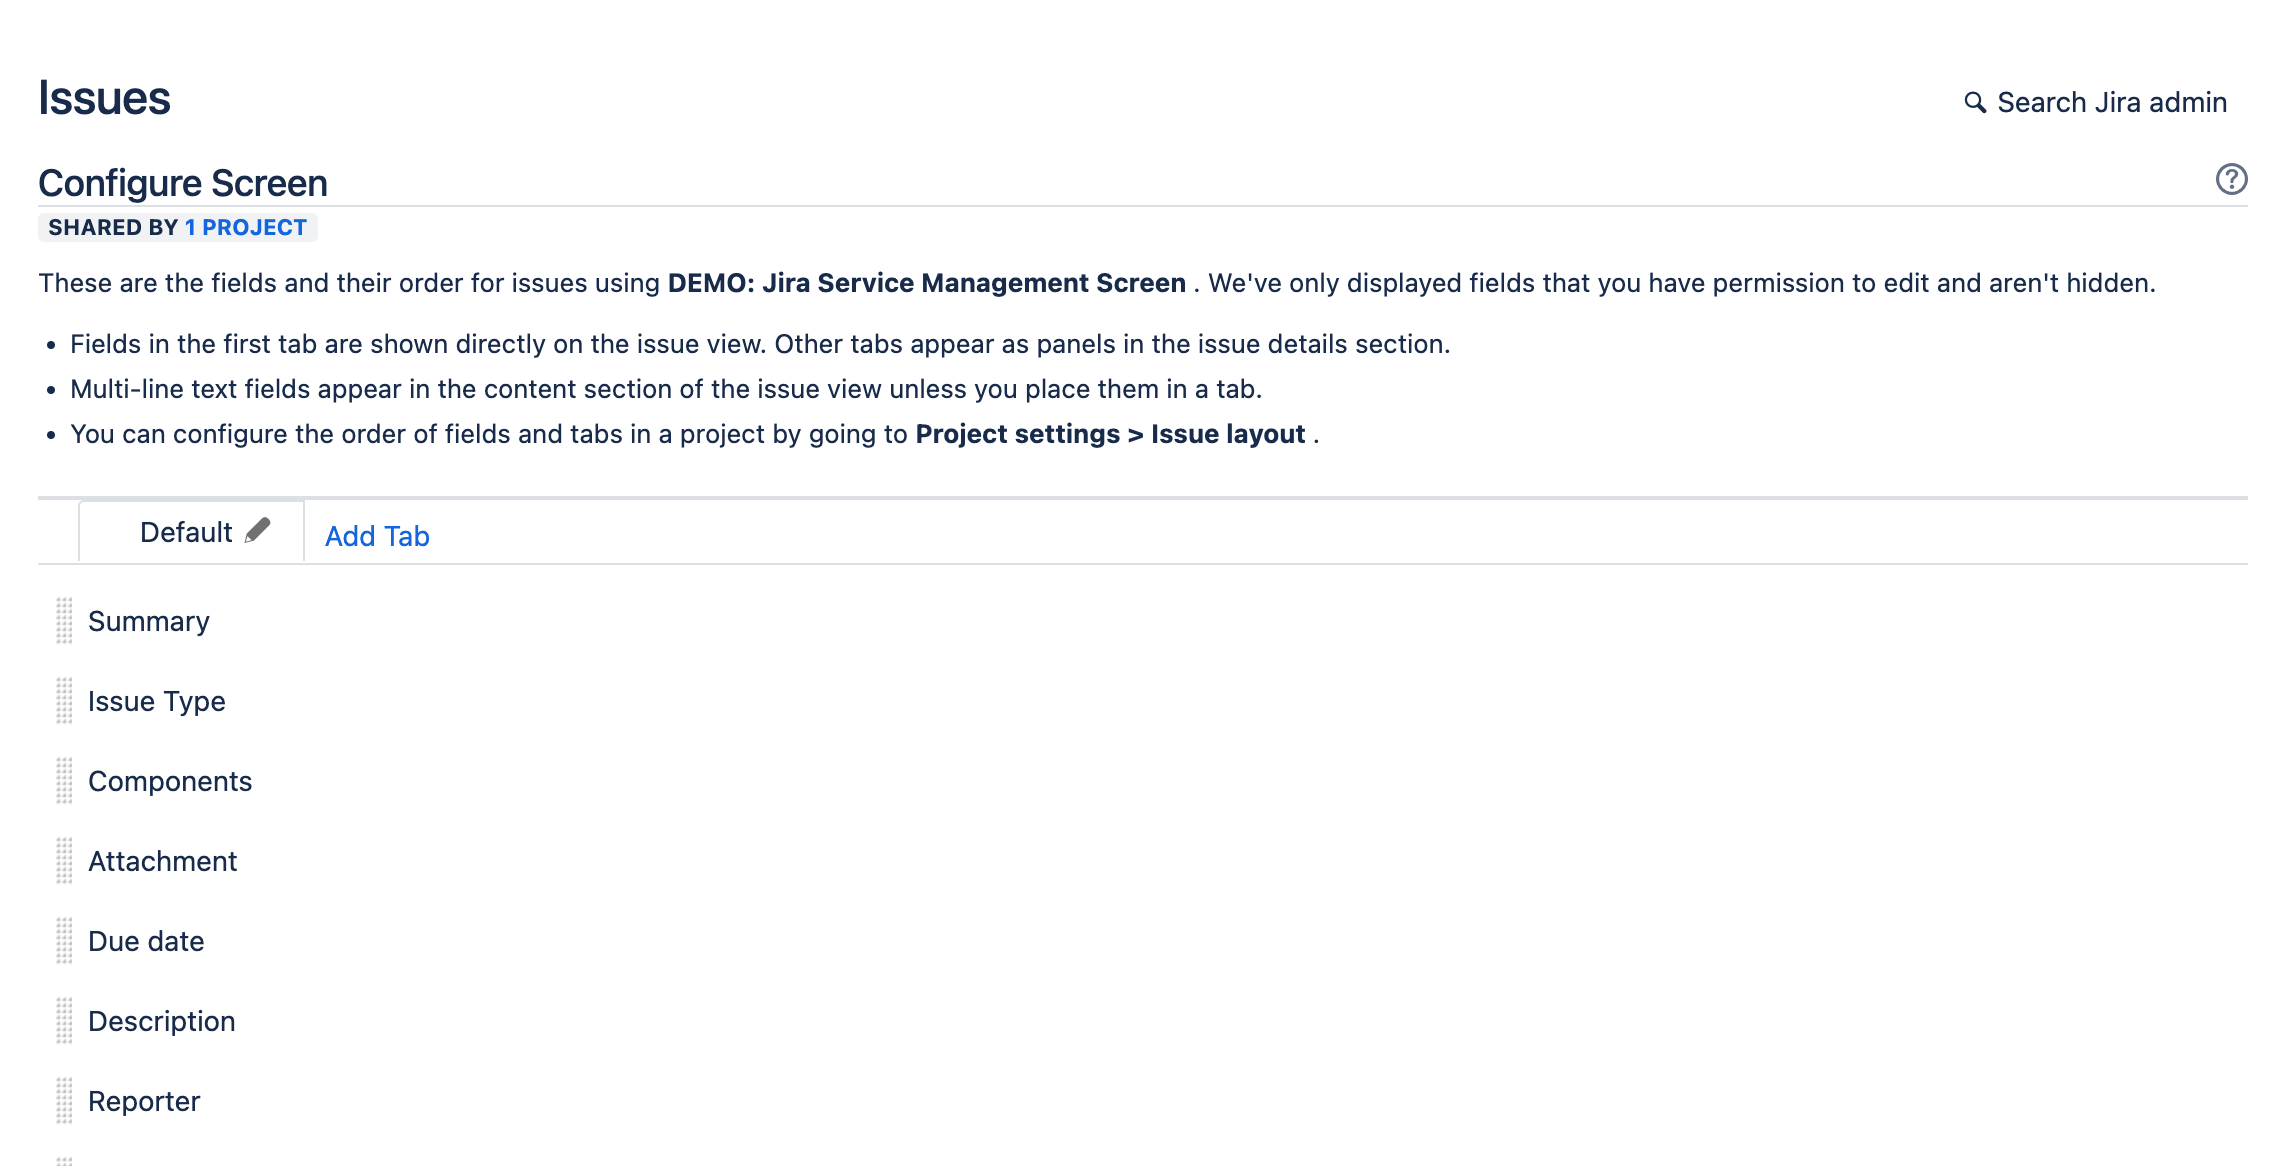
If you click on one of the screens, you will be taken to the screen below. This screen enables you to change the position of fields relative to the others listed and add form Tabs which can be used for logical grouping of fields.
You can also add fields by selecting them from the drop-down box at the bottom of the list or delete them from the screen by clicking on the Remove button that shows when you move the mouse cursor over each field.
Automation
Automating business and IT operational processes is key to having an efficient and cost effective service. The Automation section of the Project settings menu had 4 distinct tabs.
Templates
Rules
Audit log
Usage
We will look at each in the following sections.
Templates
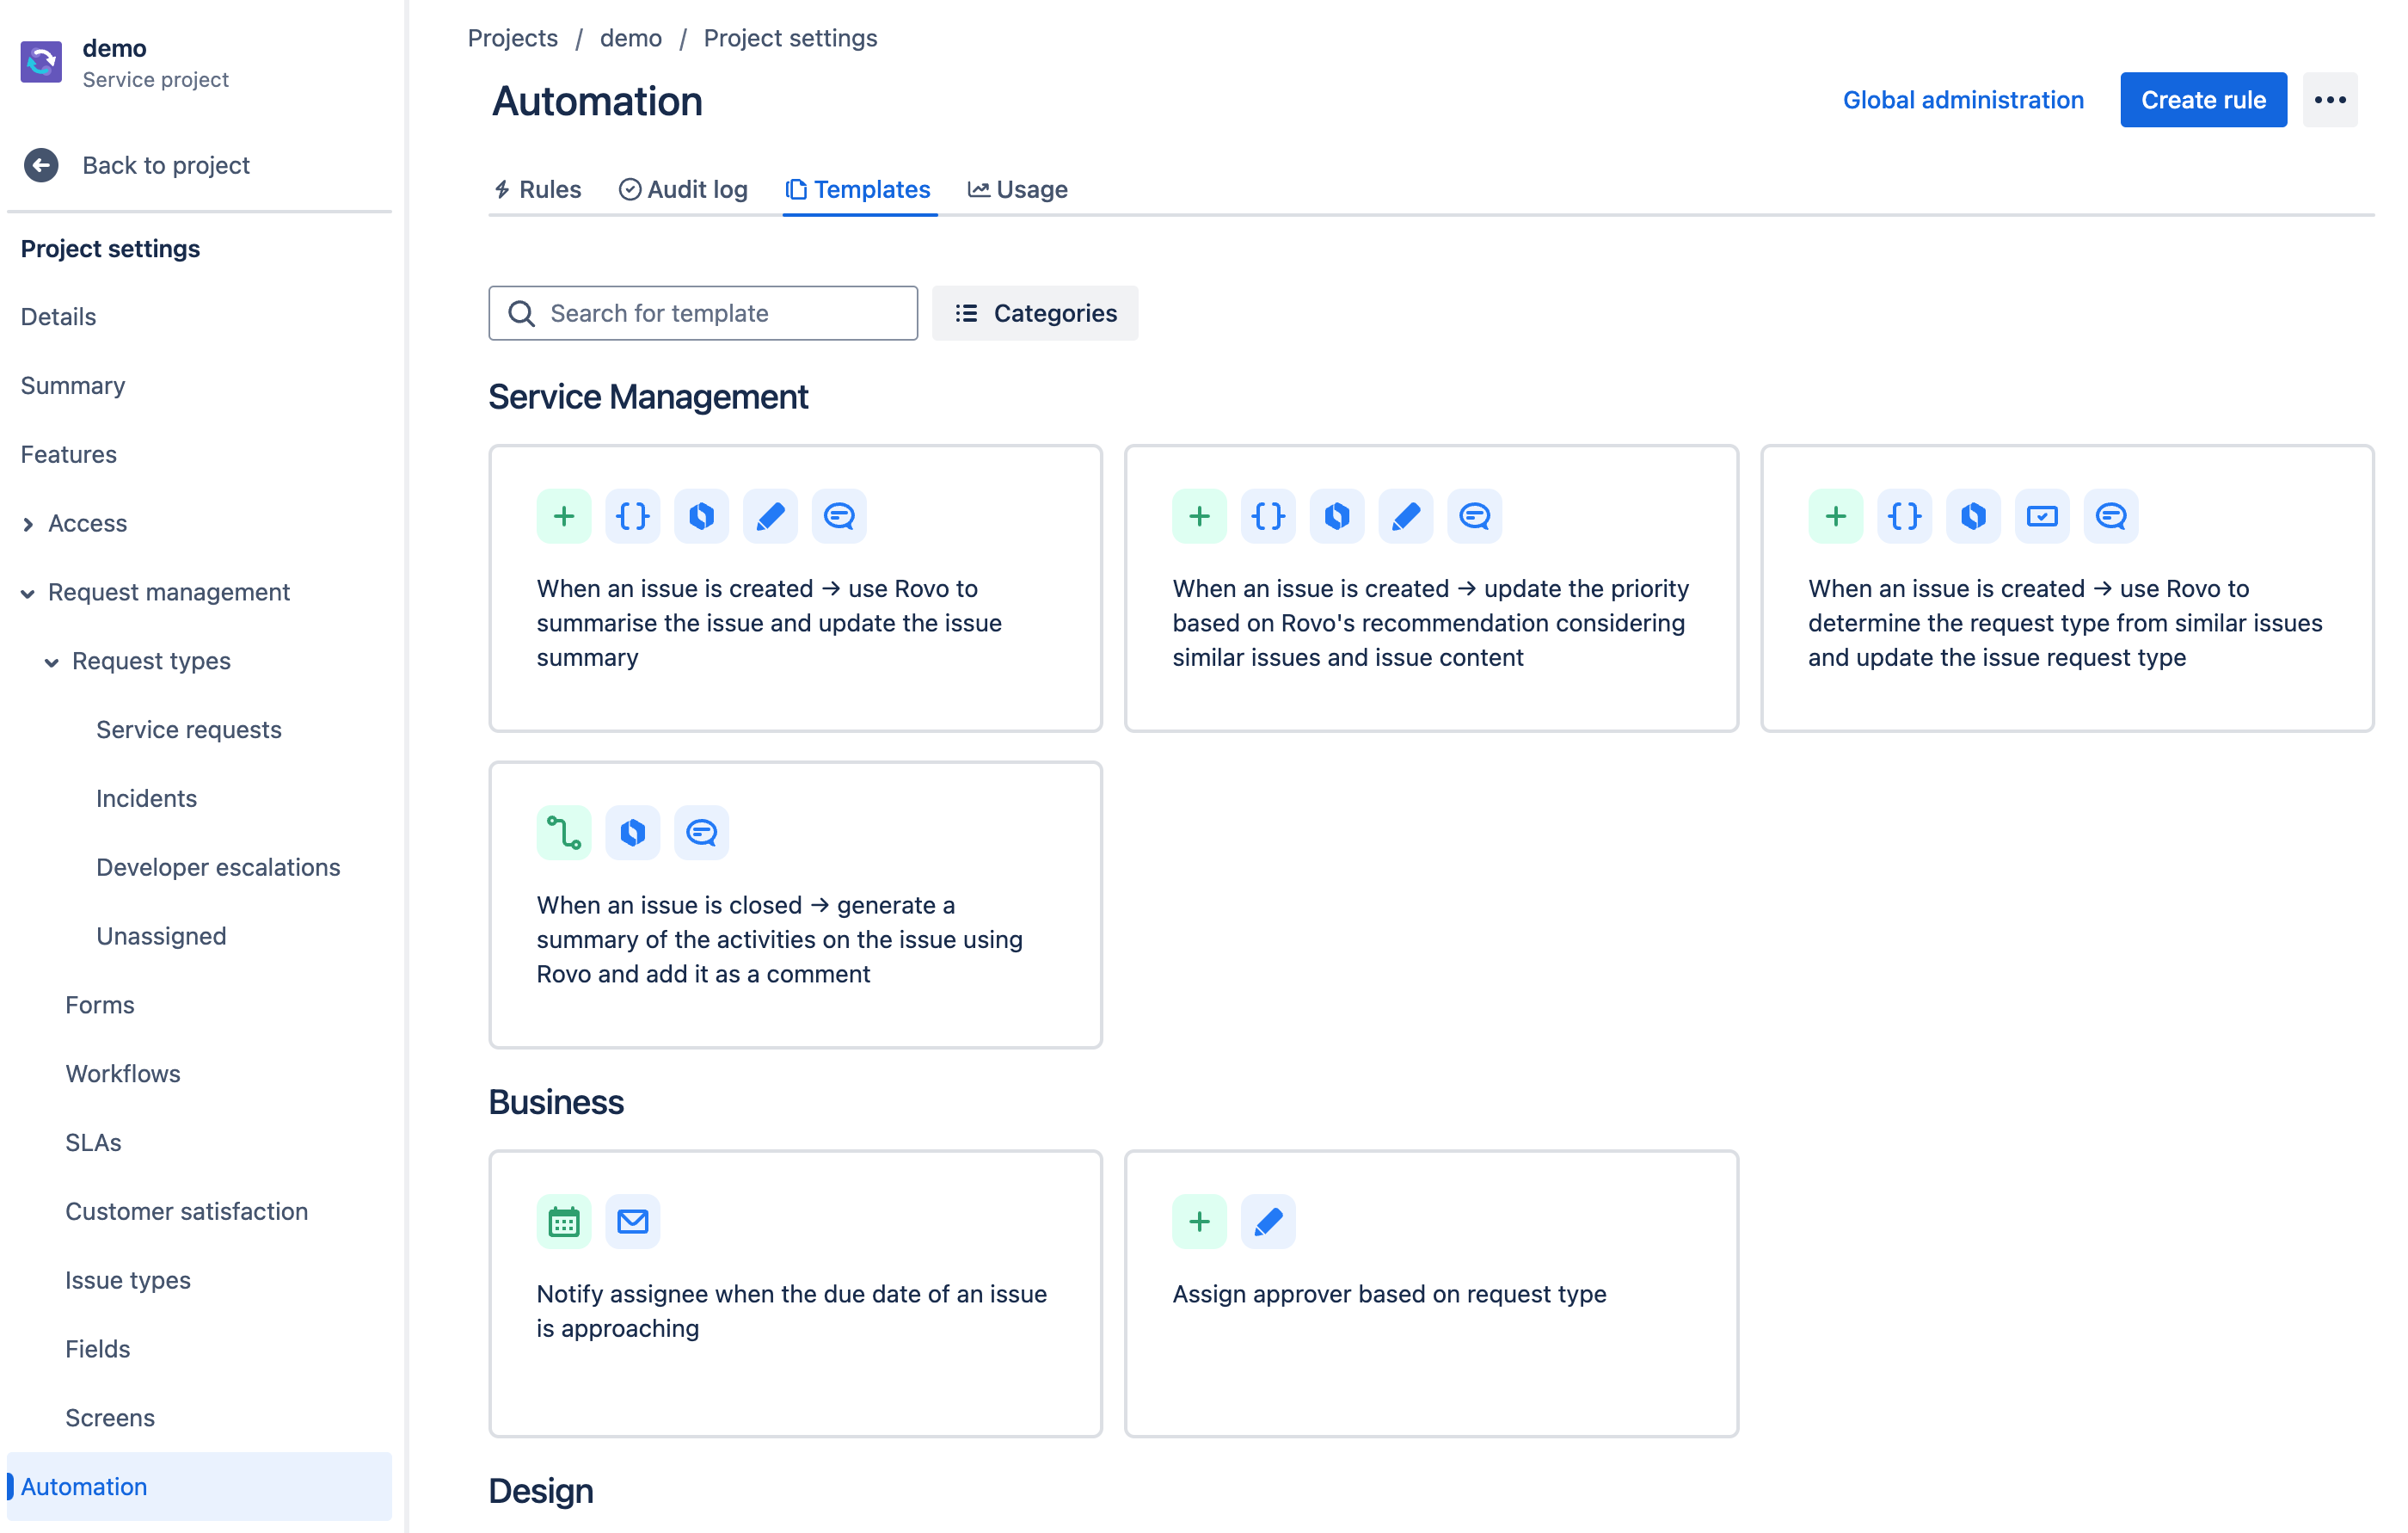
Templates, the default tab, lists the available templates, which can be filtered by Category, that are available.
If you want to use a template, simply click on its tile and you will be taken to the following screen where you can see
View the automation steps
Add additional components / steps to the automation
Configure the rule details (mandatory and optional)
Validate the rule e.g. test it works
Save the rule without enabling it, if it needs to be enabled at a later date or requires additional work at a later point
Turn the rule on
Note: you will need a Rovo account to use some automations. Rovo is Atlassian’s AI agent, and incurs an additional license charge to use.
Rules
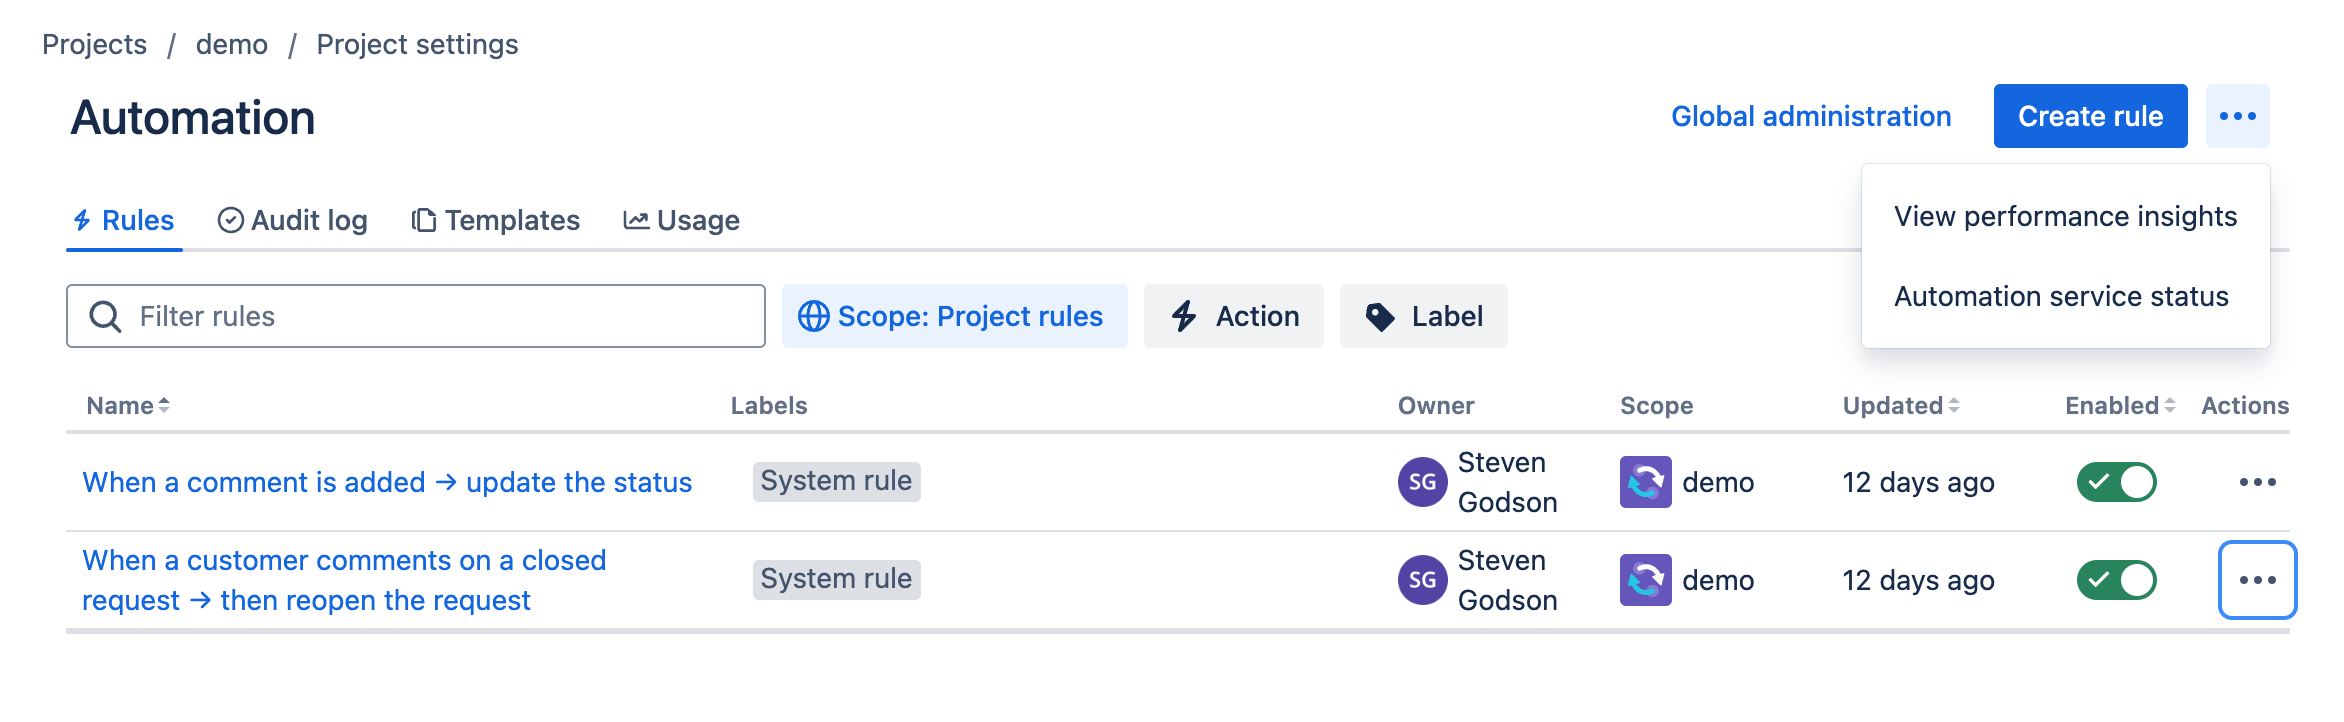
This screen lists all of the active rules in your JSM project. From here you can
Enable or Disable rules
Copy rules so the original can be used as a template that gets amended for a different use case
Create new rules
View performance insights
See the Automation service status
Audit log
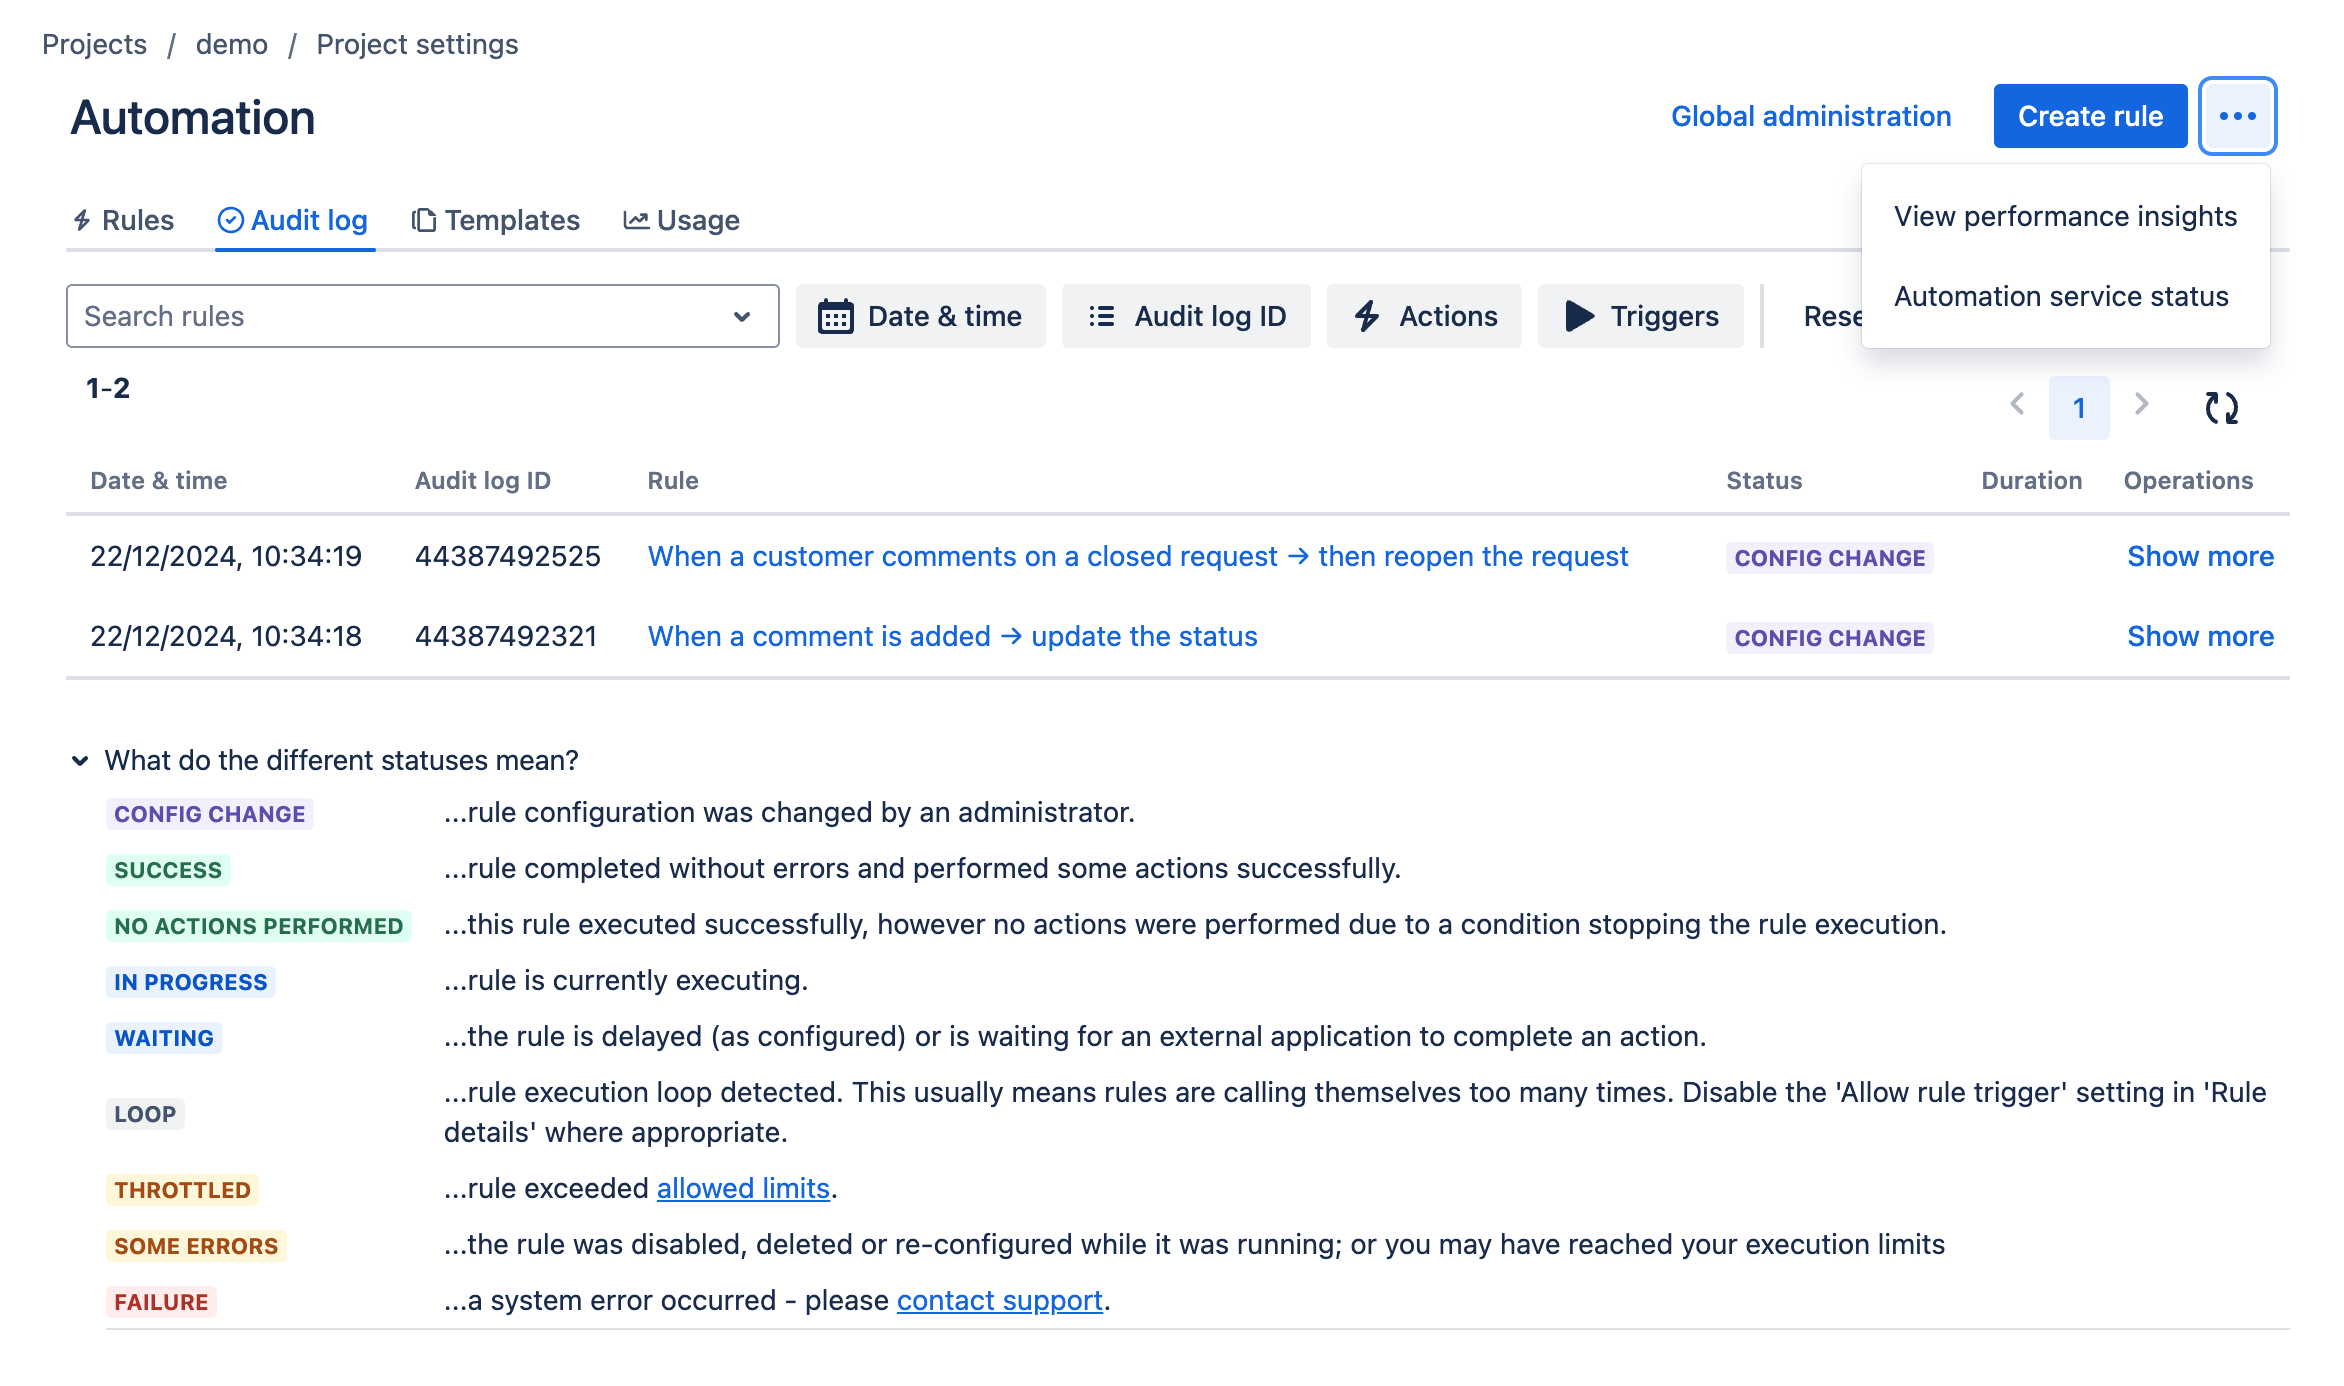
This screen shows a list of the status changes, of the enabled automations, as an auditable log. From this scree you can
Filter by date/time, audit log ID, action and triggers
See more details of the status change
Create new rules
View performance insights
See the Automation service status
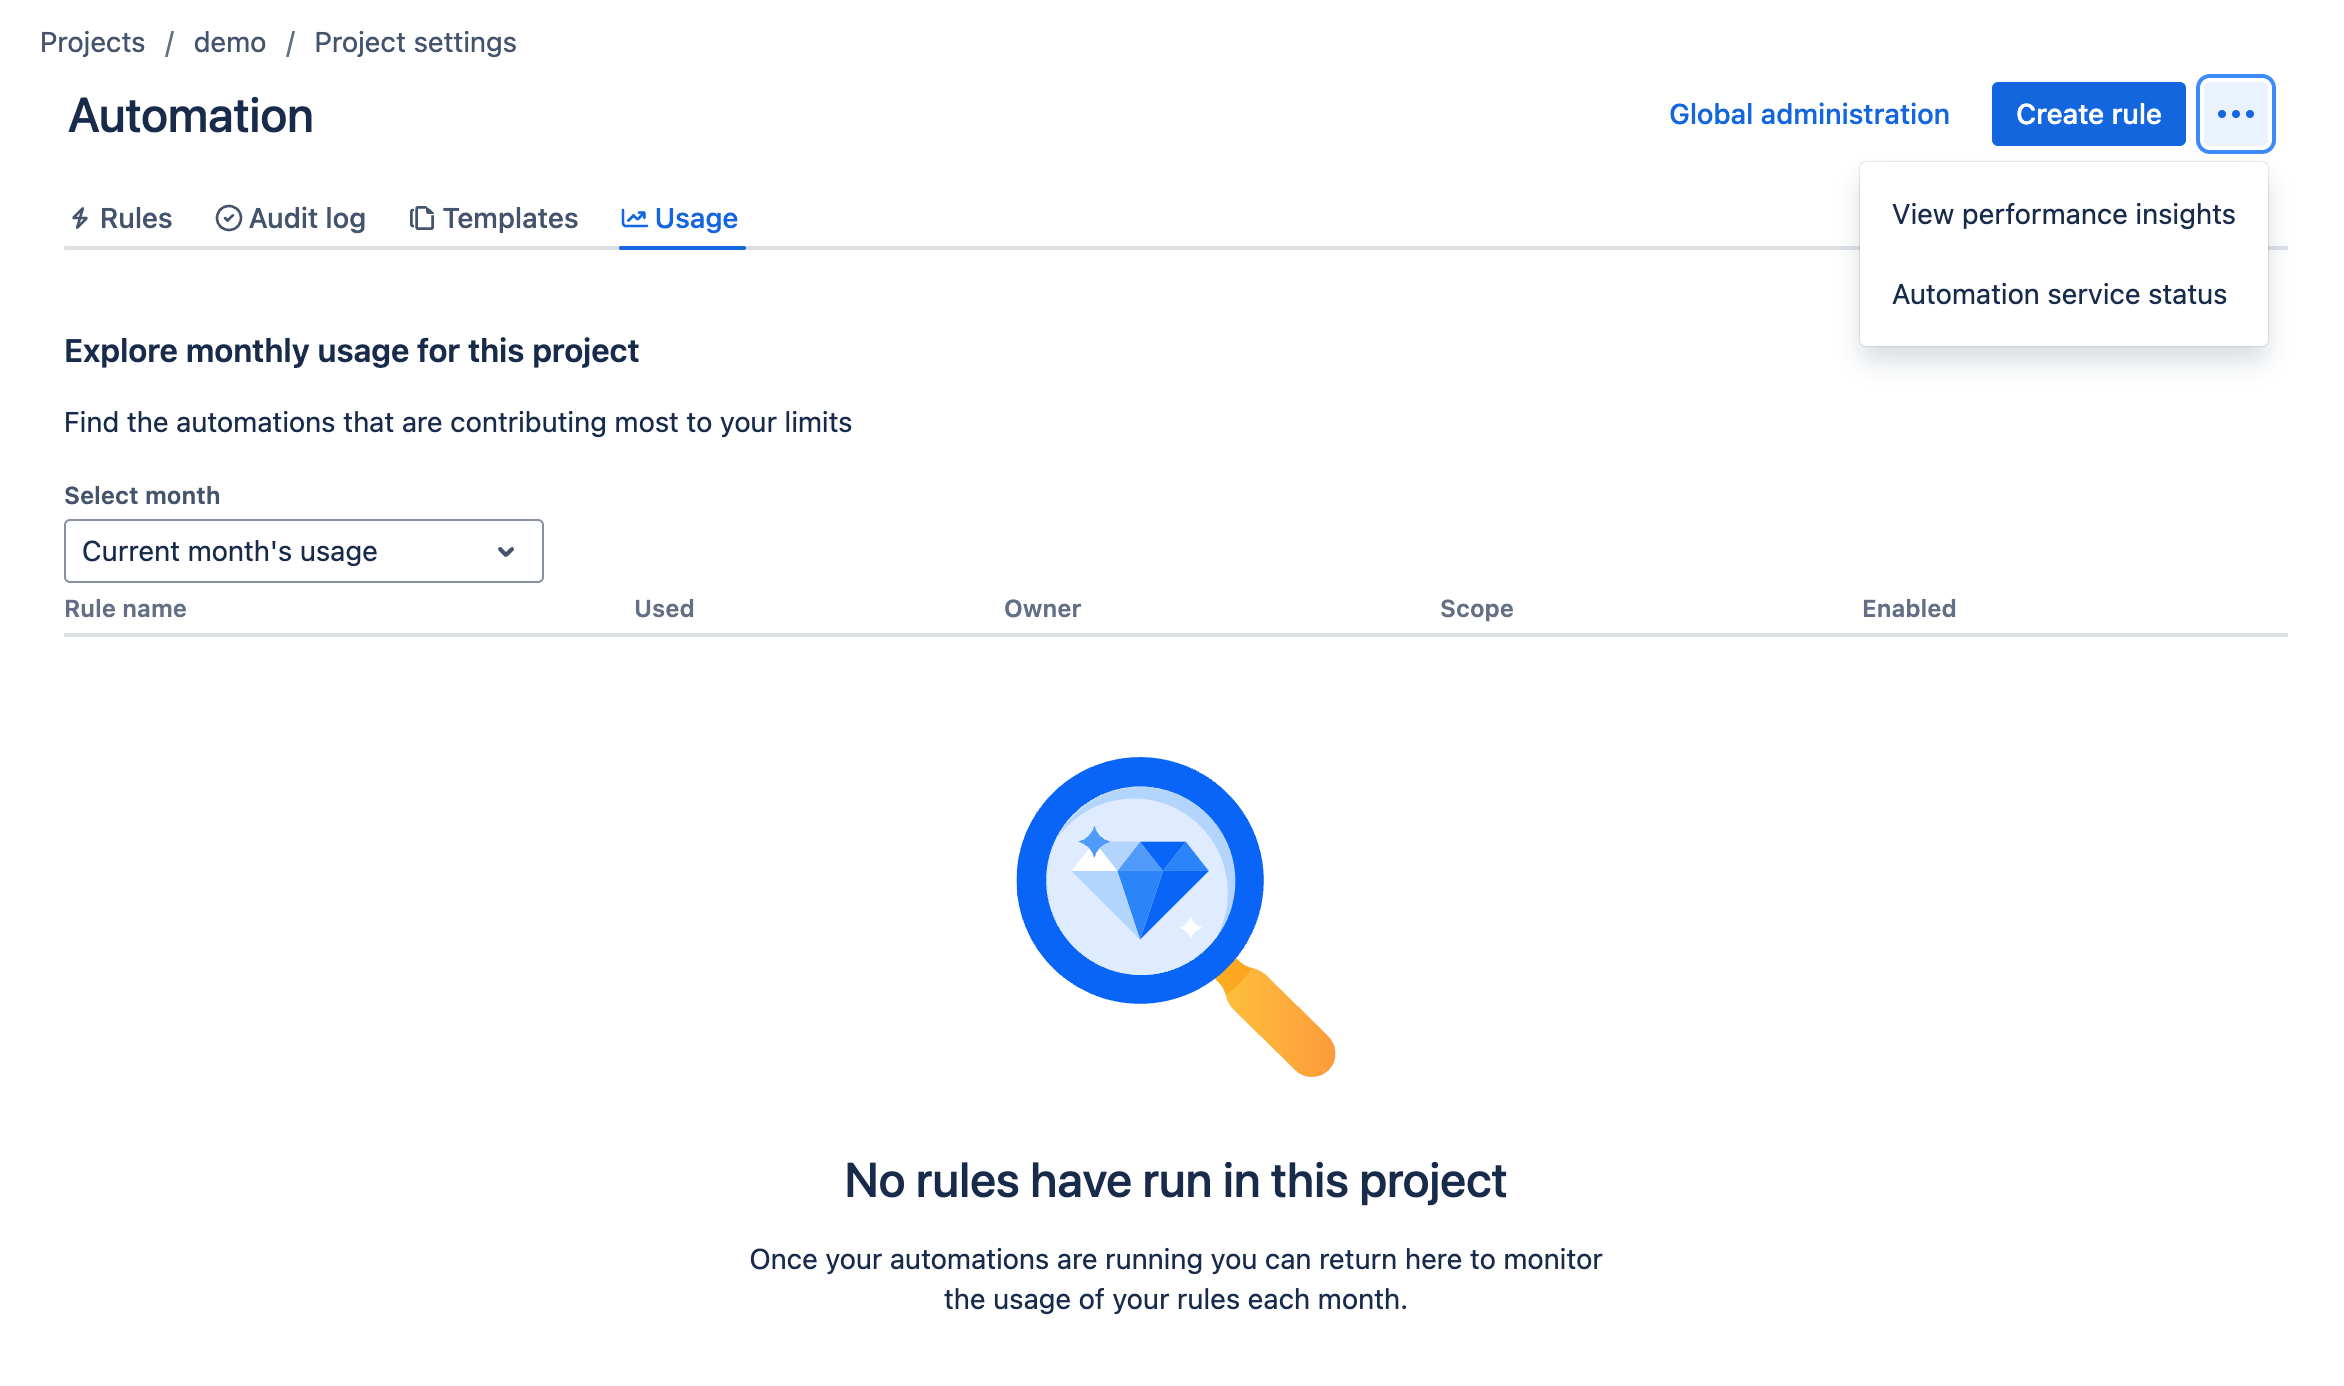
Usage
The Usage screen shows the usage of automations as a month by month view. These statistics give you an insight into which automations are being used the most by users.
From this scree you can
View the automation statistics for you JSM project
Create new rules
View performance insights
See the Automation service status
Conclusion
We have come to the end of the second article in this series. We have explored what JSM is, gone through some of the Project Settings feature.
In the next article we will continue to go through the Project settings options to discover just how versatile JSM can be.
Hopefully this has been useful to you and I wish you well on your ITSM journey…